Green/Blue Screen Keying and Premiere Pro Premiere Pro has adequate green/blue screen keying tools, but does not have a wide range of controls for fine-tuning the key, which is a hot topic. Because the primary Green Screen Key lacks these extra controls, for this lesson you will use the secondary color correction functionality of the Three-Way Color Corrector to enhance the green screen, making it easier to key. If you don't have After Effects, you can still get keying work done in Premiere Pro; however, if you have the Production version of After Effects, it comes with the Keying tool, Keylight, which is one of the best in the business for doing green/blue screen key work. Notes If you have the budget, you might consider some new alternatives to hanging a literal green screen. In the last couple of years, there have been some great breakthroughs that aid the green/blue screen process. For example, Reflecmedia's LiteRing enables you to create a sharp blue or green screen by using a small ring of light and a reflective gray screen. The LiteRing fits around the lens of your camera and emits a blue or green light. A custom fabric screen reflects this light directly back into the lens of the camera. Although the screen appears gray to the naked eye, the blue or green color can be seen perfectly and evenly through the camera's lens. One advantage to using this technology is that you need to light only your subject, and you don't have to worry about lighting the screen. With the LiteRing around the lens, the technology of the fabric takes care of a perfect- looking blue or green screen. The other advantage is that you will never have any reflective blue or green spillage onto your subject. For more information on LiteRing, see Reflecmedia's website at www.reflecmedia.com.
In this lesson, you will separately key out each of the backgrounds from Chapter 27's multi-cam shoot. Once you have the proper key set, you will then use the Garbage Matte effect to remove some excess material from the frame of the cluttered B and C cameras. As you work, you quickly will understand why you must have a bright and strong green screen background to get good results in Premiere Pro. However, you will also learn just how powerful the secondary color correction tools are. 1. | Open Key_Start.prproj from the APPST2 Lesson Files/Chapter 25 folder on the accompanying DVD. This project is a variation on the edit you will create in the forthcoming Chapter 27.
The multi-cam media in the project can be found in the APPST2 Lesson Files/Chapter 27 folder. The remaining files can be found in the APPST2 Lesson Files/Artbeats folder.
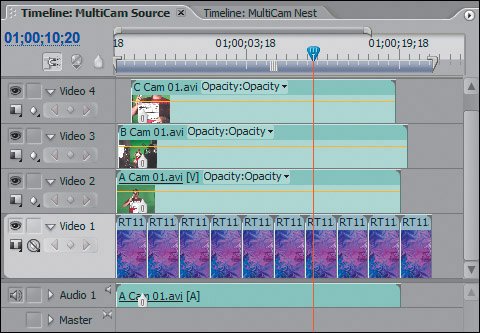
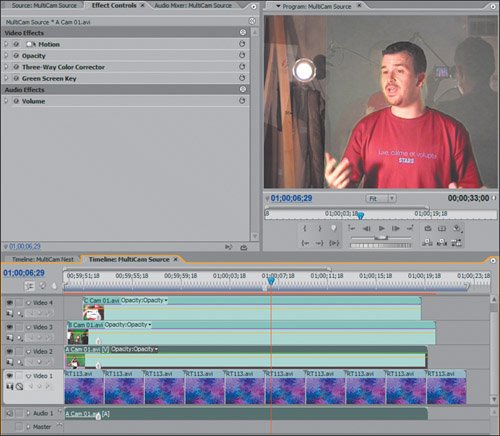
| | | 2. | Open the MultiCam Sequence in the Timeline panel, and review the stacked clips. Turning on and off the eye dropper for each video track, get acquainted with which shots are where and the green screen elements they contain (Figure 25.4). Drag and drop the Three-Way Color Corrector effect onto each of the A Cam 01, B Cam 01, and C Cam 01 clips. Finally, drag and drop the Green Screen Key effect onto the same clips (Figure 25.5).
Figure 25.4. In this sequence you have a camera shoot with each camera angle shooting me in front of a green screen. Using the Multi-Cam tool you will cut between each camera in a later lesson. For this lesson, you'll turn on and off each individual layer to assign and apply its proper Green Screen and color correction settings 
Figure 25.5. With a Color Correction effect applied first, you have the ability to adjust the color properties of each clip to enhance the effectiveness of the Green Screen Key effect that is applied second. Here you can see that each clip does, in fact, key out some of the green when the effect is applied 
For successful green screen keying, the green screen material needs to be on a track above the background. Because each of these clips will be keyed against the RT113 Artbeats file, your sequence contains each clip stacked on top of the other with the RT113 file as the underlying background. To apply the proper setting for each clip, temporarily disable the output of the other Camera tracks.
In this step you first applied the Three-Way Color Corrector effect. Keep in mind that effects process in descending order, so by placing the Three-Way Color Corrector above the Green Screen Key you have the ability to color correct the clip and then process the Green Screen Key effect on the results of the color correction.
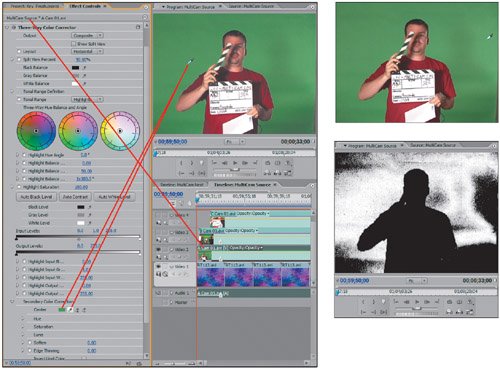
| | | 3. | Turn off the Output of Video tracks 3 and 4 in the Timeline panel. Click on A Cam 01.avi clip in Video track 2. Switch your workspace to Window > Workspaces > Color Correction. In the Effect Controls panel, turn off the Green Screen Key effect listing. Twirl down the Three-Way Color Corrector effect and set the Output mode to Mask. Twirl down the Secondary Color Correction listing in the Three-Way Color Corrector effect.In the Secondary section, click the eyedropper labeled Center (eyedropper only), and target the green of the green screen in the image (Figure 25.6). Click the eyedropper Add Color (the one with a + sign), and click the green areas of the screen that appear black in the mask view. After you make the mask white except for my body in the center (which should be black), set the Output mode back to composite.
Figure 25.6. When you target a secondary color you want to set your output to mask. Pick the color that you want to be your Secondary selection, then with the Mask output mode active, use the Add Color eye dropper to select more shades and tones to associate with your Secondary selection. This sequence of images shows how you can look at the Mask view, click the Add Color eyedropper, then target a region that is not in the Secondary and have it added 
Notes Effects applied in the Effect Controls panel are processed hierarchically; Premiere applies the top effect listed first, then applies the remaining effects on top of each other. In step 2, you applied the effects in the order in which they should be processed, the Three-Way Color Corrector effect is processed, before the Green Screen Key. This order ensures that the key will take advantage of the image adjustments made with the Three-Way Color Corrector. As you learned in Chapter 23, "Advanced Color Correction: Three-Way Color Corrector," using the Secondary Color Corrector can be an excellent way to isolate and select an entire color value from your video. Here you set your output to Mask so that you could gauge your results as you went. After you target the Green as your Center Secondary color, you used the Mask view to identify areas of Green that were not within the range of your Center selection. Using the Add Color eyedropper, you broadened the range of your Secondary selection so that the entire green screen behind me was White in the Mask view, which means it is selected.
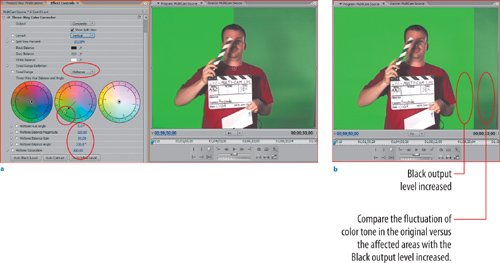
| | | 4. | In the Three-Way Color Corrector Effect for A Cam 01.avi, set the Tonal Range to Midtones. Enter the following values into their fields; do not change any fields that aren't specifically called out (Figures 25.7a and b):
Figures 25.7a and b. With both images I have turned on the Split view so you can compare the original with the secondary adjusted results. In 25.7a, you see the selected Secondary region with a Midtone color offset applied, thus making the Secondary region more green. In 25.7b, the Midtone Output Black Level has been increased dramatically. Because you are only selecting and adjusting in the Secondary color selection, previously dark portions of the green Secondary become much brighter, thus reducing the tonal range of the green Secondary 
Midtone Balance Magnitude: 100
Midtone Balance Gain: 80
Midtone Balance Angle: 136
Midtone Output Black Level: 150
At the very bottom of the Secondary Color Correction twirl down, set the Soften value to 4.0.
If you were to evaluate this image by setting the Output to Tonal Range, you would find that most of the image is gray and thus associated with the midtone range. Because the Secondary green selection is primarily midtone based, you selected the midtone range in which to modify the Secondary selection. By adjusting the Midtone color wheel to an extreme green value, you have strengthened the presence of green in your selection. This is the first step to making the Green Screen Key have an easier time of keying out the video more accurately. The second value you adjusted that made a big difference was setting the Output Black Level to a brighter value. Because your Secondary selection is very precise, you can make drastic tweaks without altering the image at large. By increasing the Output Black Level you reduced the tonal range within your Secondary selection, making the dark green become brighter and more of a flat overall value. The final adjustment was to slightly soften the Secondary selection so that the edges weren't so rough.
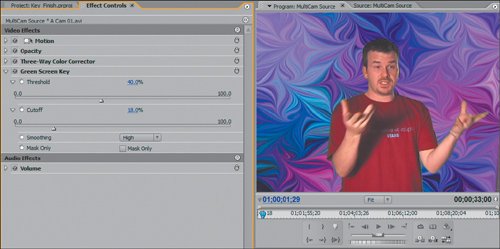
| | | 5. | In the Effect Controls panel for the A Cam 01.avi file, twirl up the Three-Way Color Corrector listing, then turn on the Green Screen Key and twirl it down. If you want to see what your Three-Way Color Corrector did to help the default application of the key, toggle the Three-Way Color Corrector effect listing off. Turn the Effect listing back on, then apply the following settings to the Green Screen Key (Figure 25.8):
Figure 25.8. I chose this frame because my hands are in a typically dynamic state, here you can see that all the detailed work you did paid off. By creating a stronger green screen presence in the clip, you allowed the green screen to do a better job, isolating the green screen portion of the clip 
Threshold: 40%
Cutoff: 18%
Smoothing: High
Toggling between the original clip without the Three-Way Color Corrector adjusted and the affected clip, you can see how accurate the Green Screen Key effect will be when it is applied. Reducing Threshold makes the image even more transparent by reducing the strength of the green part of the overlaying image. Increasing Cutoff further defines what the effect keys by making sure that anything below the Cutoff value is not keyed. Adjusting both these sliders is not really an exact science, it is typically a matter of reducing Threshold to a point that looks good and then increasing Cutoff to make it look better. With both controls you can go too far, and the effect will be obviously wrong when that happens.
| | | 6. | Using the same methodology to target the Secondary Green Region, mold it into place with the Three-Way Color Corrector controls and then refine the Green Screen Key effect, giving your best shot to clean up B Cam 01.avi and C Cam 01.avi.
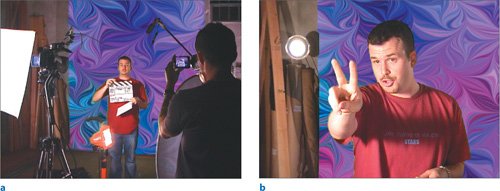
Although the last step might prove a bit too challenging, you can skip ahead to my finished project to see the results (APPST2 Lesson Files/Chapter 25/Key_Finish). Or you can import the Secondary Effect presets that I created and apply them to the appropriate clips and refine only the Green Screen Key settings. To import the Secondary Effect presets, right-click in the Effects panel and choose Import Preset, then import any of the A Cam 2nd, B Cam 2nd, or C Cam 2nd files from the same chapter folder. Remember to apply the Three-Way Color Corrector on top of the Green Screen Key and delete the current Three-Way Color Corrector effect that is applied if you decide not to do it (see Figures 25.9a and b).
Figures 25.9a and b. Compare my results with the B Cam01.avi clip (a) and the results with the C Cam 01.avi clip (b). In both instances the Secondary corrections definitely helped clean up and refine the raw green screen element 
Before you move on to the next lesson, whether you have applied the adjustment to the other effects or not, click on the MultiCam Nest sequence in the Timeline panel and take note that the keying results are preserved through the nesting process of doing a multi-cam edit. The Green Screen Key simply took the portion of the image that was green and made it transparent. The background video on Video 1 plays through the keyed-out portions of each clip instance in the multi-cam edit; therefore, instead of applying the key effect and Secondary in the MultiCam Nest sequence to every clip, you applied the effect to the source files, which carried the effect with them to the destination sequence.
|
Keying out the green screen at the source level of the multi-cam sequence makes you better appreciate the value of the nesting structure set up for you with this first lesson. Because the effects are applied to the entire source clips, you can update the nested sequence by making a quick alteration to the source. With your Green Screen Key effect assigned, you're ready to use the Garbage Matte effects to remove the extra elements from B and C cam clips. Garbage Mattes Eight- and Sixteen-Point Garbage Matte effects can be used to clean up and remove unnecessary elements that appear in a clip. Garbage Mattes are a way of cropping your image so that certain frame areas are cut entirely. Take a look. 1. | Open Garbage_Start.prproj from APPST2 Lesson Files/Chapter 25 folder. In your desktop workspace, be sure you have the Effect Controls panel and Effects panel open.
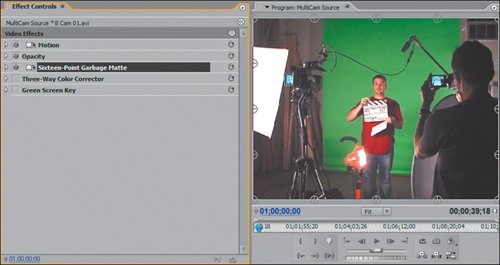
| | | 2. | In the MultiCam Source sequence, turn off the Output for Video 2 and 4, then click and select the video clip on Video 3. Open the Effect Controls panel, and click the Effect Toggle button for Green Screen Key and Three-Way Color Corrector to temporarily turn the effects off. Position the Edit Line at 1;00;00;00. From the Effects/Video Effects/Keying folder, drag and drop the Sixteen-Point Garbage Matte effect on top of the selected clip. Reposition the Garbage Matte effect so that it is at the top of the Video Effects list. Click on the Sixteen-Point Garbage Matte effect listing in the Effect Controls panel (Figure 25.10).
Figure 25.10. With both the Green Screen Key and Three-Way Color Corrector effects toggled off, you can see which elements need to be cropped out: the hanging microphone cord and the camera objects. Clicking on the Garbage Matte effect listing enables direct manipulation; you then can manually drag any of the visible handle points to a new position to crop the image 
A bunch of elements need to be removed from the B camera shot. Because this shot is from a tripod and the camera remains stationary, you can safely crop out certain areas of the frame to remove the objects surrounding the subject. Turning off the Green Screen Key effect enables you to see clearly the definition of the objects surrounding the subject and to identify which need to be matted out. Turning off the Three-Way Color Corrector effect as well enables you to have a faster update in your Program Monitor.
Because direct manipulation is available for the Garbage Matte effects, clicking on the effect listing displays each of the 16 points that you can move and reposition to crop out extra elements.
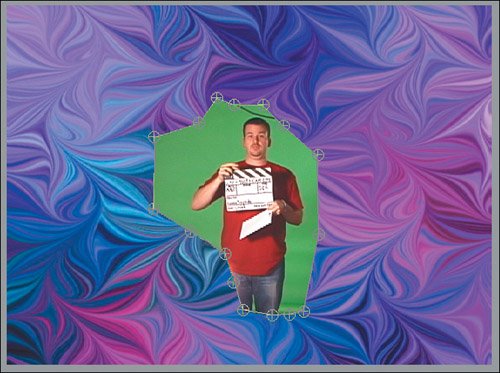
| 3. | Clicking on the various points for the Garbage Matte effect, drag each inward so that the wires, lights, cameras, and cameraman are cropped out (Figure 25.11). A Garbage Matte enables you to crop an image so that you can easily erase and entirely remove whatever portions of the image reside outside the matte's boundary.
Figure 25.11. With 16 points to manipulate, you can easily crop a cluttered frame. As the image is cropped, you can see the background clip beneath it appear in the cropped area 
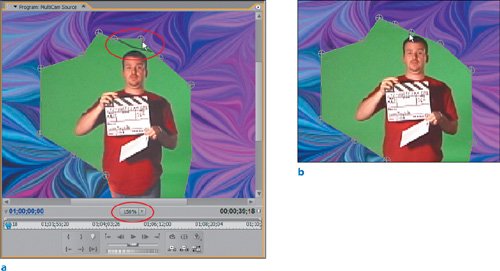
| | | 4. | Increase your Program Monitor zoom to 150%. Select the Hand tool (H), and reposition the frame in the Program Monitor so that you can see the top of the subject's head. Press V to get back to the Selection tool, and be sure that the matte is cropping out the wire and not the top of the head (Figures 25.12a and b).
Figures 25.12a and b. The Hand tool allows you to grab and reposition the image in the zoomed Program Monitor (a). At this level of magnification you have better feedback as to how much of an adjustment you can make. In 12.12b, because you are zoomed in, you can define the Garbage Matte so that it properly crops out the microphone cable 
Although the Program Monitor zoom is not used that often, this is a perfect example of when and where it is practical to zoom in and study your image to make sensitive adjustments.
| | | 5. | Click off the Garbage Matte effect in the Effect Controls panel, and toggle on the Green Screen Key and Three-Way Color Corrector effects. Scrub through the sequence, and check out the results.
The image is obviously much cleaner, and to see just how much the three-way correction helped the key, temporarily toggle off and on the Three-Way effect.
| 6. | Toggle the track output for Video 3 off and turn on the output for Video 4. Select the C Cam 01.avi clip and try what you've learned by applying the Eight- or Sixteen-Point Garbage Matte.
Study the full C Cam 01.avi clip and notice that it is a bit more difficult to matte, because the camera moves. Like all effects, however, the Garbage Mattes are keyframeable, and you will need to use keyframes to remove the light that keeps appearing on the left side of the frame.
Remember to assign keyframes before the move begins and then continue assigning them as the move progresses. To see my results, open the Garbage_Finish.prproj from the APPST2 Lesson Files/Chapter 25 folder and look in the Effect Controls panel for the C Cam 01.avi instance.
|
Using the Garbage Matte effects, you can quickly crop out areas of your image. Because there is a video clip beneath your clip with the Garbage Matte, as soon as you start making matte adjustments the clip elements are removed and the background shows through. By clipping out the extra pieces of the image, you can clearly see that the Green Screen Key effect did the trick you wanted it to. If you have a perfect green screen key, then Premiere Pro can do the job just fine; however, if you have a troublesome or less than desirable green screen key, try using the Three-Way Color Corrector to enhance it. If that doesn't cut it, your next option is to take the project into Adobe After Effects. Adobe After Effects and its Keylight plug-in (available with the Production Bundle) can complement Premiere Pro by adjusting keys further without compromising the integrity of the original image. |
