Event-Driven Programming: The Event Structure
|
The Event Structure (found on the Programming>>Structures palette) is an extremely powerful programming tool (see Figure 13.44). It allows you to write highly efficient code that waits for events to happen, rather than inefficient code that periodically checks whether events have happened. Figure 13.44. Placing an Event Structure onto the block diagram from the Programming>>Structures palette So what is an event anyway? An event can be almost anything that "happens" in LabVIEW, for example:
As you can see, events usually refer to GUI events, but can also refer to front panel controls changing their value. You can even define your own custom events. Without the Event Structure, in order to detect if a user pressed a STOP button, for example, you have to "poll" its value periodically in a While Loop (like you've done in several of the activities). With the Event Structure, you don't have to "poll" because the VI will "know" when that event occurs. The Event Structure looks similar to a Case Structure, in that it has multiple "case" frames. Each case of an Event Structure can be registered to handle one or more events. When an Event Structure executes, it will wait until an event has occurred and then execute exactly one case framethe case that is configured to handle the event that has occurred.
You can create and edit an Event Structure only in the LabVIEW Full and Professional Development Systems. If a VI contains an Event Structure, you can run the VI in all LabVIEW packages, but you cannot configure the Event Structure in the Base Package. The Timeout EventWhen we first place an Event Structure on the block diagram, it will be preconfigured with only one event case that is set to handle the Timeout event. The Timeout event is a special event that gets triggered if no other events (that the Event Structure is configured to handle) happen before the timeout value occurs.
Timeout Terminal You can specify the Event Structure's timeout value by passing it to the Timeout Terminal, in the upper-left corner of the Event Structure. The default timeout value (if unwired) is 1, which means "never time out" or "wait indefinitely." Figure 13.45 shows three different timeout configurations of the Event Structure. Note that the first two (left and middle) are equivalent. Figure 13.45. Event Structures with different timeout values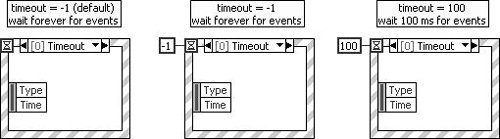
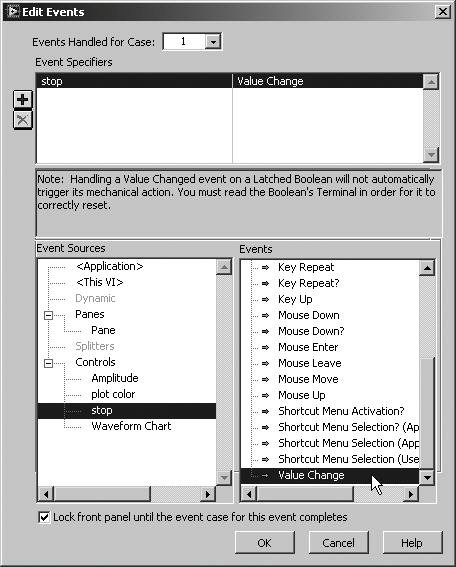
If you set a timeout value of -1 and no events ever occur, then your VI will appear to be non-responsive. This sort of situation is similar to an infinite loop, which exhibits the same non-responsive behavior. This situation can be avoided by either setting a reasonable timeout value, or making sure that the Event Structure is also registered for other events (besides just the Timeout event). Editing Events Handled by Event Structure CasesTo register an Event Structure to handle events of front panel controls, pop up on the frame of the Event Structure and select Add Event Case . . . . This will open the Edit Events dialog. For example, if you have Boolean control on the front panel called "Do some work?," you could create a Value Change event for it by popping up on the Add Event Case, selecting that control, and selecting the Value Change event. This is shown in Figure 13.46. Figure 13.46. Edit Events dialog, which is used for configuring event cases of an Event Structure, alongside the front panel control that is configuring as an event source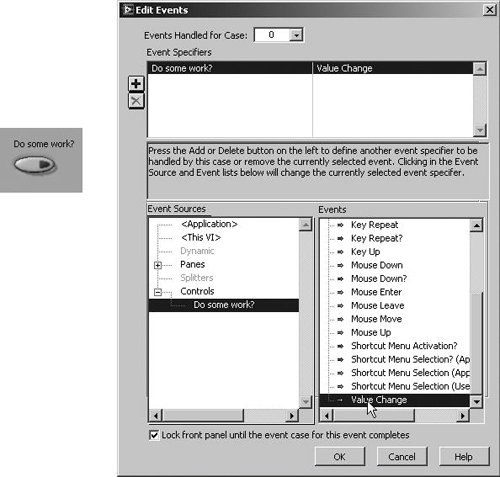 This dialog has the following components:
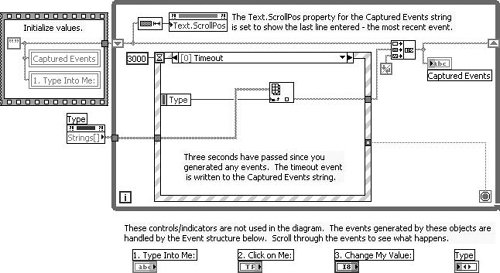
From the Event Structure's pop-up menu, you can also select Edit Events Handled by This Case . . . to modify an existing case, Duplicate Event Case . . . to copy a case, or Delete This Event Case to delete an existing case. Now that we have talked about how to edit the Event Structure to handle events, let's look at an example of how to use the Event Structure. Using the Event StructureWithout using an Event Structure, we can detect events such as pressing a Boolean control by periodically testing the value of the control. This technique is called polling. Figure 13.47 shows an example of how to poll the value of Boolean control in order to do work once the user presses it. Note that the Boolean control has been configured with the Latch When Released mechanical action so that it "bounces back" to FALSE immediately after the True value is read by LabVIEW. Figure 13.47. Capturing front panel events by polling, without the use of an Event Structure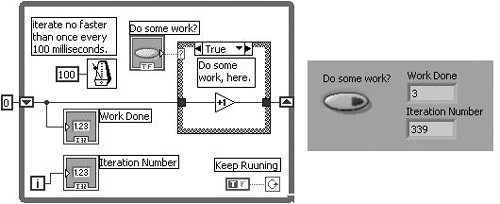 In this example, we can see that the user has pressed the Do some work? button three times, but the While Loop has iterated a total of 339 times! This loop may run for days, iterating millions of times before the button is actually pushed. Of course, this is no problem for most computers, because we have specified that the While Loop should not execute more than once per 100 millisecondsthis leaves a lot of computational resource available for other tasks. (However, this also means that there can be up to 100 milliseconds between when the user presses the button and when the value is read (and responded to) inside the polling loop.) But, what if there were a way to put the While Loop to sleep (so that it does not iterate) until the button was pushed? That would mean that our While Loop would only iterate once for every time that our button was pushed. Guess what? That's exactly what the Event Structure does! Figure 13.48 shows an Event Structure that waits on the Value Change event of our Do some work? button. (The Value Change event is generated when the user changes the value of a control.) As we can see in Figure 13.48, the user has pushed the Do some work? button five times, and the While Loop has only iterated five timesone time for every push of the button! Additionally, there is no detectable delay between when the button is pushed and when the value is read inside the Event Structurethis is much more efficient and responsive than the polling technique. Figure 13.48. Capturing front panel events using an Event Structure, without having to poll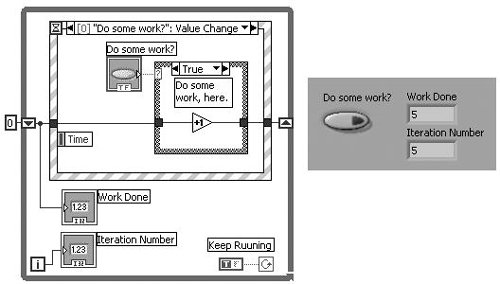 Placing a single Event Structure inside a While Loop is the most common (and probably best) way to use the Event Structure. We can see from direct comparison between the polling example in Figure 13.47 and the Event Structure example in Figure 13.48 that our code does not look dramatically different. All we have done is (1) wrapped our Do some work? terminal and Case Structure in an Event Structure and (2) removed the Wait Until Next ms Multiple function because the Event Structure will wait indefinitely (Timeout = -1) for a Value Change event to occur.
An Event Structure will capture events that occur at any time while the VI is running, not just while the Event Structure is waiting. When the VI first starts running, the Event Structure creates an event queue, behind the scenes, for buffering events. As events occur, they are put into this event queue. When the Event Structure does execute, it dequeues the oldest event from the queue (First In First Out [FIFO]). If no events are in the queue, it will wait until the next event occurs. So, the bottom line is that the Event Structure will never "miss" events that happen while it is handling events, or after it handles events (before the While Loop reiterates and calls the Event Structure again). Those events will remain in the event queue until the Event Structure has handled them.
There are a few important guidelines for using the Event Structure:
Event SmorgasbordThe most common events you'll probably use are the Timeout and the Value Change events. However, keep in mind there are a myriad of other events that can be used to do things that you could never dream of easily doing in LabVIEW, were it not for the Event Structure. For example:
We could go on for days describing all of the events available in LabVIEW; however, we will leave it up to you to explore the events available in the next activity.
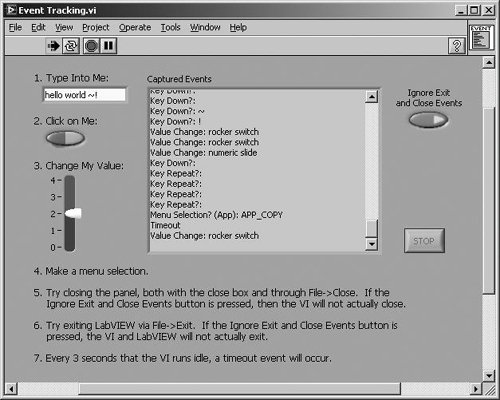
Use the Edit Events dialog in conjunction with the Context Help window to explore the various events available in your VI and its front panel controls. When the mouse cursor is moved over an event name in the Events list of the Edit Events dialog, the context help window will display a description of that event (see Figure 13.49). Figure 13.49. The Context Help window showing useful documentation for an event in the Edit Events dialog, as the mouse is hovered over the event name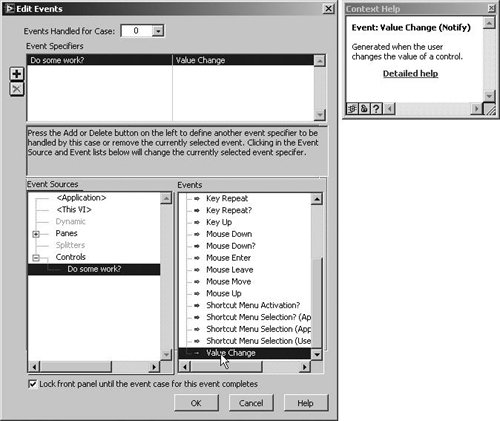 Activity 13-6: Playing with EventsIn this activity, you'll use a simple LabVIEW example to gain insight into how events work and what triggers them.
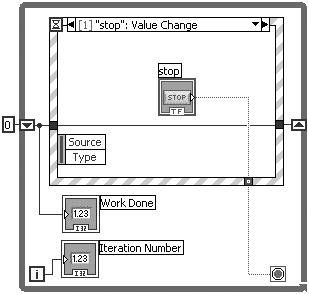
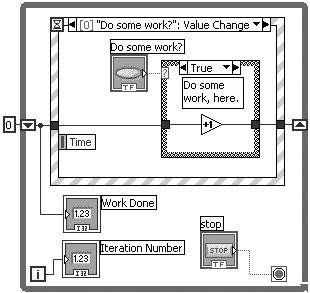
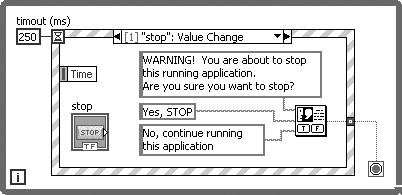
Stopping While Loops That Contain Event StructuresStopping a While Loop that contains an Event Structure can be done with a stop button (Boolean control) wired to the conditional terminal of the while loop, just as we might do for a While Loop that is polling control values. However, there is one major difference: We must place the stop button inside the Event Structure, in an event case that is configured to handle the Value Change event for the stop button. If the stop button is outside the Event Structure, the Event Structure will continue to wait, even after we have pressed the stop button (see Figures 13.52 and 13.53). Figure 13.52. The correct way to stop a While Loop with Event Structure Figure 13.53. The incorrect way to stop a While Loop with Event Structure
Use Default if Unwired
Stop if True One thing to pay attention to when wiring the stop button through the frame of the Event Structure is that the output terminal is configured to "Use Default if Unwired" (this setting is accessible from the pop-up menu of the output terminal). This means that if some other case of our Event Structure executes, a value of False (the default value of the Boolean data type) will flow out of this terminal. Because the conditional terminal of the While Loop is set to Stop if True, the While Loop will not stop running, unless the stop button's Value Change event occurs and the value of the stop button is True.
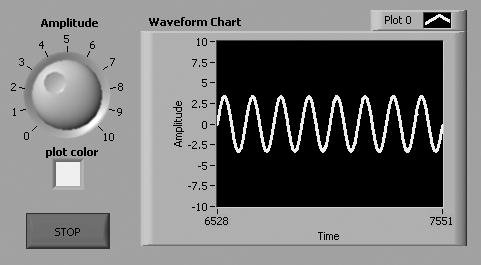
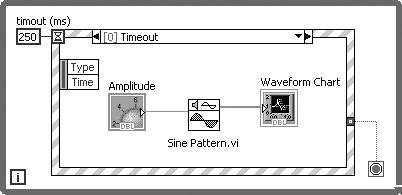
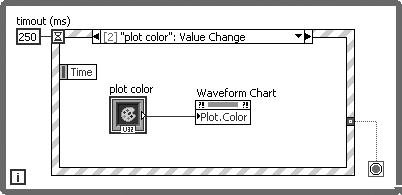
Whenever an output terminal is created by wiring through the frame of an Event Structure, the output terminal will be automatically configured to Use Default if Unwired (this is the opposite behavior from a Case Structure, which will automatically configure output terminals with this setting turned off). You can change the value of an output terminal's Use Default if Unwired setting from the terminal's pop-up menu. We used the Use Default if Unwired setting to our advantage in the stop button example, but this setting is not always desired. For example, when wiring a shift register through an Event Structure (as we did for the Work Done value), we do not want the shift register to be reset to the default valuewe want the shift register value to remain intact, until we explicitly change it. Activity 13-7: Using the Event Structure to Read Data Value ChangesIn this activity, you'll use the Event Structure to control a simple loop that plots a sinewave. The Event Structure will detect if the stop button or the plot color changes its value from the front panel, and take appropriate action.
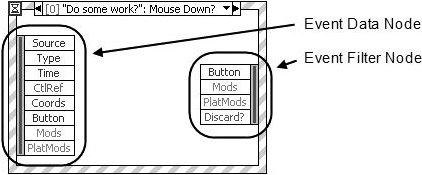
The next couple of sections briefly discuss some fairly advanced topics related to the Event Structure. Feel free to skip them if you feel you've had enough to digest in this rather meaty chapter. In simple applications, you often won't ever need to use these concepts. Advanced Concepts: Event Data Node and Event Filter NodesIf you were paying close attention, you probably noticed that there are terminals inside the event cases, attached to the left and (if you ever chose an event with a red arrow next to its name in the Edit Events dialog) right walls, that look very similar to the Unbundle By Name and Bundle By Name functions (but without any cluster wires connected to them). These collections of terminals are called the Event Data Node and the Event Filter Node (see Figure 13.60), and are used for accessing and modifying data related to the event. Figure 13.60. Event Structure with its Event Data Node and Event Filter Node showing
The Event Data Node provides you with extra information about the event, such as when it happened, what type of event it was, mouse coordinates (for mouse-related events), and more. We'll talk briefly about the Event Filter Node now. Advanced Concepts: Notify Events Versus Filter EventsUp to this point, you may not have ever seen the Event Filter Node, shown in Figure 13.60. So far we have only seen examples that do not use this node. In order to explain when the Event Filter Node will appear, we first need to understand that there are two different types of events: notify events and filter events. Only filter events have an Event Filter Node. We can distinguish notify events from filter events in the Edit Events dialog from the color of the arrow icon to the left of the event name in the Events listboxnotify events have a green arrow next to them, and filter events have a red arrow next to them. You might also notice that events whose name ends in a question mark are almost always filter events; however, there are many filter events whose name does not end in a question mark.
They are called filter events, because you can choose to filter the event and/or modify the event data by wiring data to the Event Filter Node terminals. What this means is you can "catch" the event and, if you wish, modify the event or even tell your VI to ignore the event. For example, in Figure 13.60, we could discard the Mouse Down event by wiring a value of True into the Discard? Input of the Event Filter Nodethe result would be that the user's mouse down would not cause the button to change state, thus making the button behave as if it were disabled. In order to filter an event, the event case must run synchronously with the user interface. This means that the user interface will be locked from the time the event occurs until the event case that handles it finished executing. (That is why, in the Edit Events dialog, the Lock front panel until the event case for this event completes checkbox is always checked for filter events.) This contrasts sharply with notify events, which only receive notification that the event occurred. They cannot change the event data, or discard the event, so there is usually no reason to lock the user interface while a notify event case is executing (although you can select the Lock front panel until the event case for this event completes setting, if you like). Because notify event cases never change the event data (or filter/discard the event), they can run asynchronously from the user interface. Advanced Concepts: Dynamic Events and User Events
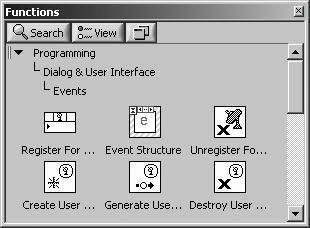
So far, we have seen how to use the Edit Events dialog to configure an event case to handle events for controls on the front panel of the VI that contains the Event Structure. However, the Event Structure also has a feature called Dynamic Events, which allows you to programmatically specify which controls will be handled by the event cases. You can pop up on the frame of the Event Structure and select Show Dynamic Event Terminals to show the terminals to which you can wire an Event Registration Refnum created using the Register For Events node (found on the Programming>>Dialog & User Interface>>Events palette, shown in Figure 13.61). Figure 13.61. Events palette The Register For Events node can be used to register both VI Server object events and User Events. We will learn about VI server in Chapter 15. A User Event (containing event data that you define, similar to a queue or notifier) is created and generated using the Create User Event and Generate User Event functions, respectively (found on the Programming>>Dialog & User Interface>>Events palette). An in-depth look at Dynamic Events and User Events is beyond the scope of this book. But, if you are interested in learning more about these advanced event features, take a look at the help resources available for functions and structures on the Programming>>Dialog & User Interface>>Events palette, as well as the examples that ship with LabVIEW in examples\general\dynamicevents.llb. |


EAN: 2147483647
Pages: 294