Optimizing Cell Layout, Size, and Appearance
Optimizing Cell Layout, Size , and Appearance
Just as tables have properties, so do the individual cells within them. Cell properties determine whether cells are considered data or header cells, the alignment of information within them, their width and height, and much more.
Designating Header Cells
When you create a table, its cells are designated as data cells by default. Typically, this means that the cells are left-aligned and not displayed in bold font. To designate cells as header cells and change their default formatting to bold, centered text, select the cells you want to work with, right-click, and then select Cell Properties. Then, in the Cell Properties dialog box, choose Header Cell under Layout.
Aligning and Sizing Table Cells
Table cells have several different properties that control their layout and size. These properties include settings for horizontal and vertical alignment of cell elements, row and column spanning options, and width and height settings. To set these table cell options, follow these steps:
-
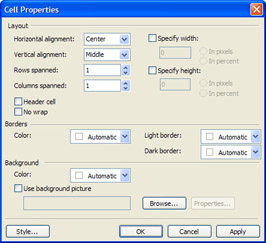
Select the cell, or cells, you want to format. Then right-click, and select Cell Properties from the shortcut menu to display the Cell Properties dialog box, shown in Figure 9-8 on the following page.

Figure 9-8: Use the layout options to align and size table cells. -
Under Layout, use Horizontal Alignment to left-align, right-align, or center cell contents. You can also justify elements so that they are displayed with even left and right margins, if possible. Default sets alignment per the user s browser, which typically means data is left aligned.
-
Use Vertical Alignment to align cell contents with the top, middle or bottom of the cell. Default sets alignment per the user s browser, which typically means data is aligned with the middle of the cell.
-
If you want cells to have a specific width, height, or both, select and set values for the Specify Width and Specify Height as appropriate.
Note Cell width and height can be set in pixels, or as a percentage of the window size. You may want to use a fixed size, when you are adding content of a specific size, such as a picture. If you don't have fixed- sized content for a cell, you ll probably want to use relative sizing (if you use any sizing options at all). With relative sizing, the browser sets the cell width, height, or both, based on the percentage of window size you specify.
-
Cells normally span only one row and one column. Use Rows Spanned and Columns Spanned as necessary to create cells that go across several rows or columns .
-
Click OK to update the layout of the select cell, or cells.
Setting Cell Border Style and Color
Cell borders are the borders within a table, not those on its boundaries. Normally, cell borders are displayed in the same way as the borders of the associated table. If you want table and cell borders to be displayed with a single solid line, rather than a double line with a colored border in between, right-click anywhere in the table, and select Table Properties. Then, on the Borders panel, choose Collapse Table Border. If you want to set cell borders differently from table borders, right-click anywhere in the table, select Cell Properties, and then use the options of the Borders panel to set the cell border colors.
Adding Background Colors and Pictures to Table Cells
Using the Cell Properties dialog box, you can also add background colors and pictures to cells. First, select the cells you want to work with and then display the Cell Properties dialog box by choosing Table, Properties, Cell.
Like the Table Properties dialog box, the Cell Properties dialog box has a Background panel. If you want to use a background color, use the Color selection list to choose it. If you want to use a background picture, choose Use Background Picture, and then click Browse to find the picture.
| Note | As stated previously, the background picture should be in GIF or JPEG format. If it isn t, FrontPage will convert it automatically to either GIF or JPEG, as discussed in Chapter 7, Using Pictures in Web Pages. |
EAN: 2147483647
Pages: 179