Managing Schedules
| Shared Schedule | Report-Specific Schedule | |
|---|---|---|
| Permissions needed to create/modify | Needs system-level | Can be created by individual users |
| Can be temporarily disabled? | Can temporarily pause and then resume shared schedules | Have to be modified to change the time |
| Manageability | Are managed centrally from the Site Settings tab in the Report Manager or Object Browser | Have to be managed from the individual items |
| Customizable | Cannot be customized for a specific item | Can be easily without any other downstream implications |
Creating/Modifying Schedules
The process for creating or modifying schedules is generally the same whether it is a shared or report-specific schedule. The only difference is the scope. For the shared schedule, it is created once and can be referenced in a subscription or property page when you need to specify schedule information.
From Report Manager or Object Explorer, administrators can specify which items use the shared schedule. Report-specific schedules are created and referenced by only that one report, subscription, or report execution operation to determine cache expiration or snapshot updates.
To create a shared schedule using SQL Server Management Studio, follow these steps:
| 1. | From Object Explorer, navigate to the Shared Schedules folder, right-click on Shared Schedules, and select New Schedule. |
| 2. | Enter a name for the schedule. |
| 3. | 3. Select how often you want the schedule to recur or select Once for a one-time event. |
| 4. | Click OK. |
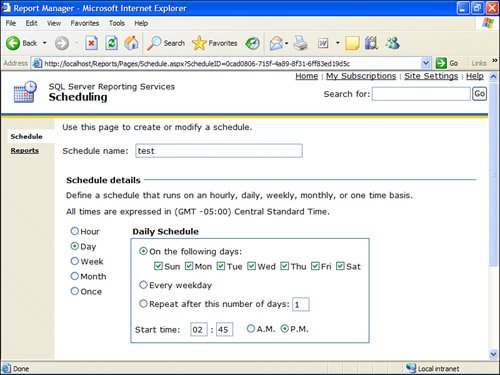
Alternatively, you can create a shared schedule from Report Manager by completing the following steps (see Figure 20.1):
| 1. | Navigate to Site Settings. |
| 2. | Click Manage Shared Schedules under the Other section toward the bottom of the screen. |
| 3. | Click New Schedule. |
| 4. | Enter a name and how often the schedule should recur, and then click OK. |
Figure 20.1. Creating a new shared schedule in SSRS.
After being created, a schedule can be modified at any time. Modifying the schedule of a running process (subscription, snapshot, and so on) does not cause that process to stop. If the process that a schedule triggered is already running, modifying the schedule serves only to start the process again at the new time.
Deleting a schedule does not guarantee that the events that it triggers will stop firing. Deleting a shared schedule only serves to create report-specific schedules for any items that reference it. A better way to stop a schedule is to expire it, by putting an end date on it. Expired schedules are indicated as such by the status field. Schedules that have been expired can be restarted by extending the end date.
Another alternative is to pause a shared schedule. A paused schedule can be resumed at a later date and time. Report-specific schedules cannot be paused . Pausing a schedule is similar to modifying it. Pausing the schedule of a process that is already running or of one that is in queue only stops the subsequent runs. It has no effect on the currently executing process.
Note
Administrators can pause schedules from Report Manager.
To pause a shared schedule, select it from the list of the Report Manager schedules, and click the Pause button. The same process is used to delete a shared schedule.
EAN: 2147483647
Pages: 254