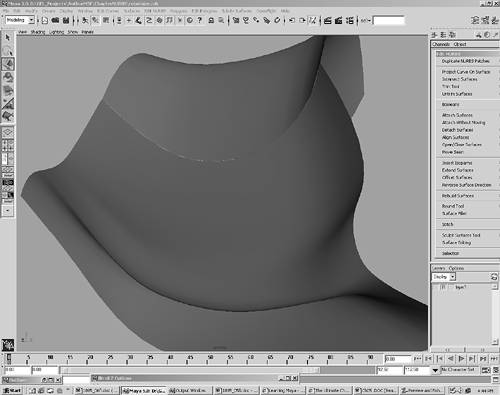
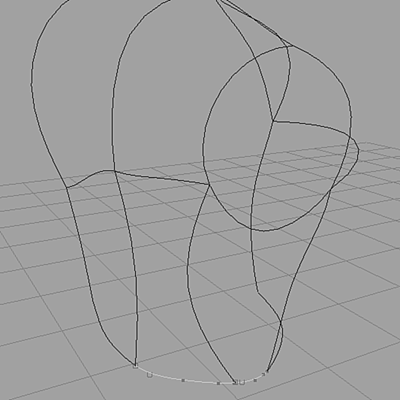
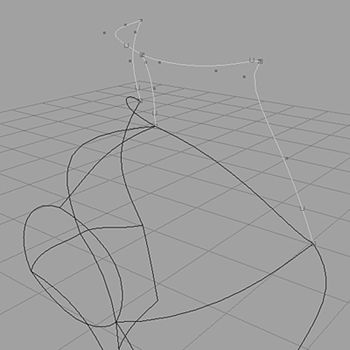
| Modeling comes in three flavors in Maya: NURBS, Subdivision Surfaces, and polygons. Most 3D animation products work entirely with polygons, objects made from fixed 3D triangles. Subdivision Surfaces are a kind of variation on polygons, in which a smooth surface is controlled by a coarse surface. Maya offers another complex and powerful modeling system known as NURBS Non-Uniform Rational B-Splines. Think of them as 3D curvy sheets in space. They have their own rules and limitations for how you can build, attach, and cut them, but in general, they are quite flexible. A major advantage of NURBS is that they remain as pure curves mathematical constructs in Maya. You can choose to have more or less detail in your 3D views or renderings at any time. The faceted, low-resolution look that often occurs when creating curved surfaces with polygons is easily handled in NURBS models, which can display curved surfaces as virtually any number of polygons. NURBS modeling is not simply putting objects together. Unlike fixed polygons (which were covered in Chapter 5), NURBS create 3D objects from curves and surfaces. Therefore, NURBS can be modeled in a variety of ways. Those who enjoy building the topology of a character's face and body will definitely find NURBS modeling an enjoyable alternative to SubDs. Although the term NURBS sounds a little silly (are they distant relatives of the Chub-Chubs?), it's actually a rather complex concept. To make it a little simpler, however, NURBS are simply a variation of splines, which are used to define a curve. Curves are the basis for the underlying mathematical structure of what makes up a NURBS surface, and in this chapter, you get to see how they actually work (instead of wading through pages of theory). In computer graphics, the best way to learn is through trial and error, so this chapter gives you the opportunity to work through a detailed tutorial. Reminders for where to find certain settings or commands are supplied to help you remember them. To help you absorb so much detail, all the actions, locations, hotkeys, and values you'll need are mentioned. As you progress through this book, you won't need these reminders as often, but they're included in this chapter to ease the learning process. Choosing NURBS as a Modeling Technique Each modeling technique has its own strengths and weaknesses, and deciding on the best method is a matter of experience. When choosing a method to use for a specific object, you need to consider several factors. Generally, NURBS are best for organic objects, such as animals, fruits, and vegetation objects with smooth-flowing surfaces that run together. Ideal candidates for NURBS are industrial surfaces (defined as curvy and mass-produced) that require both precision and flowing curved surfaces: vehicles, molded parts, appliances, and other man-made curvy objects. If you're in doubt about which modeling technique to use, it's okay to start with NURBS and convert to Subdivision Surfaces or polygons later. A major advantage of modeling with NURBS in Maya is that you can convert any NURBS object to Subdivision Surfaces (also called "SubDs") or polygons at any time. For example, if you're modeling a character and find that you can't get rid of a seam between multiple NURBS surfaces in the limbs, you might want to convert that character to polygons so that you can weld it into a single object. By using Maya's Construction History, you can later deform and animate the original source NURBS surfaces, and the converted surface follows automatically. Using NURBS can have its drawbacks, however. When modeling a character that needs to be animated, you might notice seams, or even visible gaps, between NURBS surfaces (see Figure 8.1). As a result of the way NURBS are constructed, you rarely come up with an object composed of a single surface, and the surfaces must meet together exactly to avoid these problems. Figure 8.1. A surface with a visible seam. 
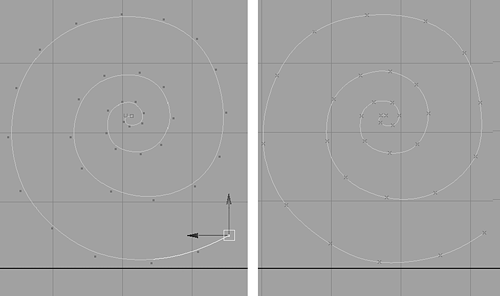
Using NURBS also adds to your model's complexity. It can be hard to modify an object if you have a large number of curves that define the shape. A complex NURBS surface can also make your model so hefty that it becomes difficult to interact with it in real time (depending on the power of your 3D accelerated video card). Another major drawback, especially in a production environment, is rendering time, which is when NURBS must tessellate. The ideal mathematical curves that define the surface shape are fleshed out with polygons, and this process can be time-intensive when a lot of polygons are required. Curves to Surfaces In earlier chapters, you might have noticed images of different primitives created from NURBS, polygons, and SubDs. All are similar and consist of the basic sphere, cube, cylinder, cone, plane, and torus. The main difference is that the NURBS primitives are made from curves surrounding surfaces. The cube is a perfect example; it consists of six individual planes that can be selected one plane at a time. Or you can toggle up in the group, using the up arrow, like all other groups. Because splines are at the core of what makes primitive shapes, it's no wonder many people prefer to begin building from splines and create the surfaces of their model from a cage of sorts. Before going too far, however, you need to know the difference between the two types of splines to decide which is best for your use. When created, the CV curve looks slightly different from the EP curve, but in the end, both are manipulated by the same four subobject levels (see Figure 8.2): Control Vertex, Hull, Curve Point, and Edit Point. When creating a CV curve, the control vertex is the dominant subobject displaying the curve; during the creation of an EP curve, the edit point is the dominant subobject. They remain visible until you complete the curve and press Enter. This is the main method you'll use in the tutorials for this chapter. Figure 8.2. On the left, a CV curve during creation, and on the right, an EP curve. 
Starting a New Project Because of the complex nature of NURBS, you'll explore several methods of patch modeling for this tutorial. You can apply these methods to a variety of other object types. For example, the tutorial is based on building a Matrix-style trench coat, which could be added to a character you've built. Modeling in patches is one of the preferred character modeling techniques. Another example is photorealistic car modeling, which needs to be fairly precise. A major tool in this tutorial is the Birail tool, which is essential in car modeling. When creating the smooth lines and angles of fenders, hoods, and bumpers for a car, you'll use the Birail tools quite often. You'll also learn how to attach patch surfaces together, resulting in a complete mesh. The nature of NURBS is that they never quite produce a complete solid, as you've seen in polygons and SubDs. With a little planning, however, you should be able to attach the surfaces together in areas where seams could break during animation. In other areas where less bending occurs, you can use the Stitch tool to hold two patches together. The Stitch tools might leave gaps in the mesh, as mentioned before, and could lead to breaking a stitched NURBS mesh during animation. Therefore, you'll see how to plan ahead of time to avoid this problem and learn what steps to take to create a cleaner mesh, resembling those created with polygons and SubDs. Using Curves to Create Patch Edges note With Maya's Construction History, you can modify new surfaces by changing the source curves used to create them. They're still in the scene, and they are still linked to the surface that was created. Try this with different objects you create; it's easy to undo by pressing Ctrl+z. You could get some impressive results and open your mind to the variety of modeling and animation techniques that are possible with NURBS.
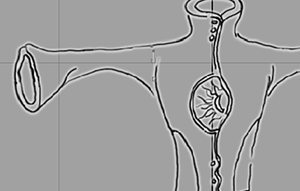
Tutorial: Building the Surfaces of a Coat Load the file noted next to the DVD icon. This file contains a background image to build from, which is a conceptual sketch of a coat you can draw curves over. It serves as a base form for modeling the surfaces in this tutorial. The curves you draw will be like connected "outlines" for creating a surface. You'll also use several primitives to see how their basic makeup can be split apart to build the repetitive parts of the model, such as the ends of sleeves. On the DVD  Chapter_08\movies\ch08tut01.wmv |
On the DVD  Chapter_08\ch8tut01begin.mb |
Set the project to the Chapter_08 folder on the DVD or to the location you've copied this folder to on your hard drive (Hotbox | File | Project | Set). Begin by creating three new layers to the right in the Layers dialog box. Double-click on the first layer and name it Patchcurves. Then, double-click on the second layer and name it Surfaces. Double-click on the third layer and name it Primitives. These layers will help separate your work near the end of the tutorial as the model becomes more complex. On the DVD  Chapter_08\Nurbscoatdrawing.tga |
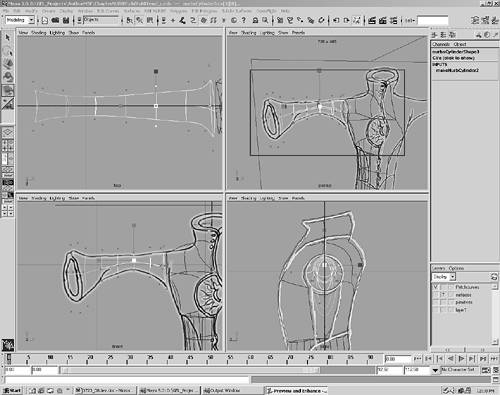
You should see in the Perspective view and the Front view an image of a long trench coat. If it isn't visible, select the Front view camera and open the Attribute Editor. To open the Image Plane Attributes section, in the Environment section, click the small box icon to the far right of Image Plane. Next to Image Name, click the folder icon at the far right to browse to the location of the Nurbscoatdrawing.tga file. After you set the project, however, Maya should automatically find this image. Much like a tailor, you'll begin by drawing lines over the pattern in the Front view to create the basic lines for the shoulder and midsection. To save time and create a more symmetrical coat, you need to build just half the coat; you'll then mirror that half and stitch the entire coat together. Select the CV Curve tool (Hotbox | Create | CV Curve Tool | option box). Set the Curve Degree to 3 Cubic and click Apply. Begin drawing a CV curve along where the armhole seam would be, starting at the top of the shoulder and ending at the armpit (see Figure 8.3). About four to five clicks should be fine. Press Enter to finish the curve. Figure 8.3. The first curve from the top of the shoulder around the front to the armpit. 
tip Remember: You can always press g or y to quickly reuse the last action performed. Also, the Hotbox has a list of recent commands (Hotbox | Recent Commands). You can select one in the list to repeat it. Switch to the Perspective view. Right-click on the curve and choose Control Vertex. Select each vertex in the middle of the curve, one at a time, and move them forward in the Z-axis to create the circular shape that will be the seam the sleeve connects to (see Figure 8.4). Figure 8.4. Shaping the armpit curve by moving the vertices in the Z-axis. 
Switch back to the Front view and start another curve (hotkey: y to use the last tool). Begin where the last curve left off near the armpit. Using four vertices, bring the curve across the chest to the center, where the coat will be buttoned. Switch back to the Perspective view to move the center vertices out in the Z-axis, indicating the volume of the chest (see Figure 8.5). Figure 8.5. Building the spline cage for the chest and midsection. 
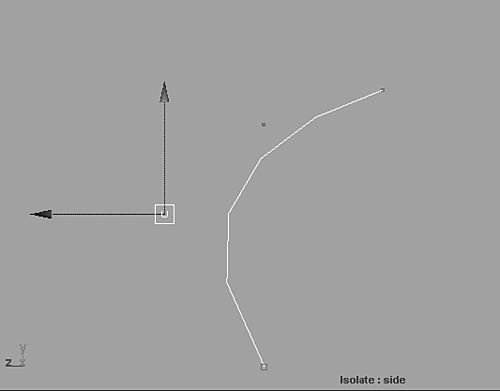
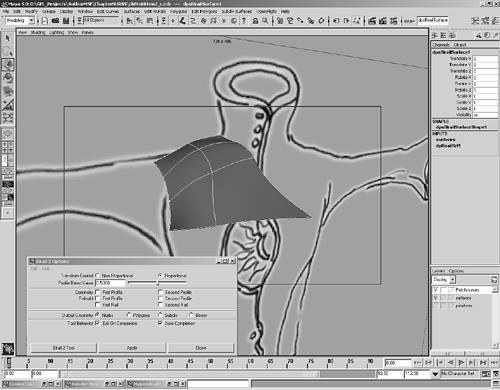
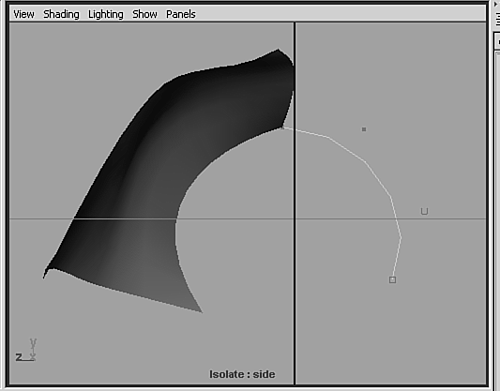
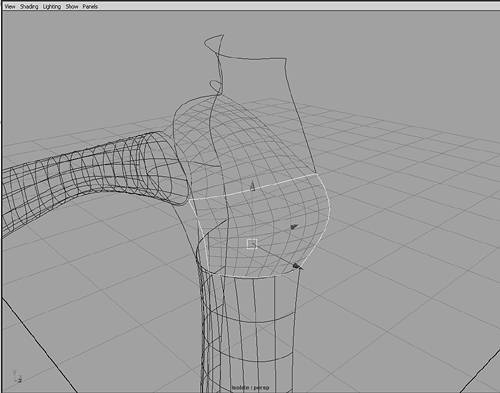
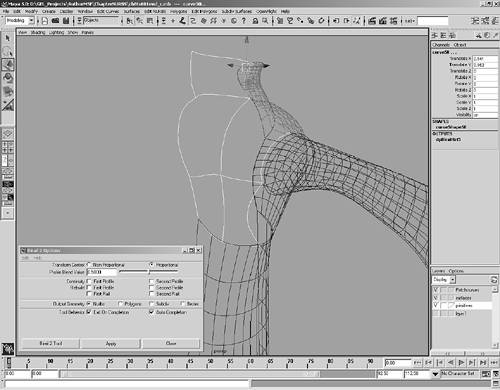
Planning ahead to place four splines for creating each patch enables you to use the Birail 2 tool later. Note that all four splines must have the ends snapped to each other to create a boundary for the surface, and curves that are parallel to one another in a patch must have the same number of vertices in them. Also, the curves for the second patch require only three curves because using one curve from the previous surface ensures that the seams are in exactly the same spot. Follow the same steps to place a new curve (similar to the curve used for the armpit) from the midchest up to the base of the collar, using six vertices. Then, place the fourth curve with four vertices, creating the seam on top of the shoulder to connect the set. After all four curves have their ends snapped together, select their middle vertices, as you did in step 4 for the armpit curve, and move them out in the positive-Z direction. Then, you're ready to create a surface from them. Select the two vertical curves and then the two horizontal ones. To build a surface patch, open the Birail 2 Options dialog box (Hotbox | Surfaces | Birail | Birail 2 Tool | option box). Set the Transform Control option to Proportional and Output Geometry options to NURBS (see Figure 8.5). With the four curves still selected, click Apply. You should see a surface bordered by the four curves. The surface is initially in the least smoothed level of NURBS. Increase the level of smoothing by pressing 3. Now, the surface should seem to fit perfectly within the curves' boundaries. Add the surface to the Surfaces layer, and click the second check box on that layer to display a T (for Template layer) for objects on that layer. You'll still see the surface, but it won't be in the way when you place more curves and select vertices. Also, change the Object selection mode on the toolbar at the top of the interface near the middle from All to None. Then, click the blue spline icon so that only splines can be selected. (Refer to Figure 3.5 in Chapter 3, "Maya Interaction," for more details on changing the selection mode.) For the rest of the chest, you'll draw all the curves before making any more patches. This gives you a better idea of what the overall surfaces will look like before setting things in stone, so to speak. Click Hotbox | Create | CV Curve Tool, and in the Side view, draw a curve with four vertices from the top of the shoulder going back around where the arm will attach. End the curve approximately one third of the way around, assuming this shoulder seam will be nearly the shape of a circle when you add the third spline that completes the armhole (see Figure 8.6). Figure 8.6. Drawing the back side curve for the shoulder. 
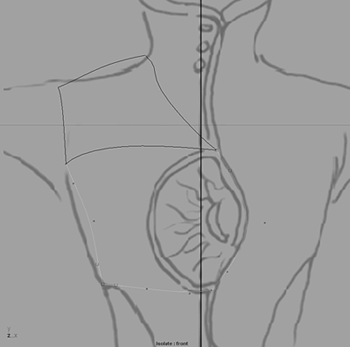
To attach the end of each curve together exactly, select each curve at the seam of the shoulder, right-click on it, and choose Control Vertex. Holding down the Shift key, right-click on the second curve, right-click again, and choose Control Vertex. Make sure you're in Move mode (hotkey: w). Next, select the end you'd like to snap to the other curve and hold down the v key to snap it as you move closer to the other spline's CV. Now, draw the third remaining curve with four vertices for the bottom of the seam where the arm will attach (see Figure 8.7). At this point, draw curves resembling the reference image on just the left side. For the patches in the back, remember that you can create patches with only four curves. Figure 8.7. The curves of the lower front section. 
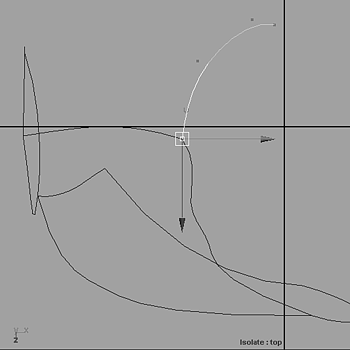
tip When you're moving curves, make sure you press F8 to turn off CV selection mode. Also, when you're moving entire curves into position, you might find that each curve's center is at the zero point in the scene, no matter where you created it. To make the curve easier to select and move, use the center pivot hotkey Ctrl+c. Draw the curves for the lower front panel. Start in the Front view by drawing the two curves that will be on either side of this panel. Each curve will have five vertices. The lower curve that connects them will also have five vertices to match the one above it. In the Side view, adjust the individual vertices on the Z-axis to give them form. Be sure to snap the ends of the curves to the neighboring curve's ends of the upper panel. Draw in the curves for the middle upper-back panel. In the Side view, draw the curve for the back part of the collar. Then, in the Top view, shape this curve by selecting the vertices and moving them on the X-axis (see Figure 8.8). Go back to the Front view and draw the left- and right-side curves that connect to either end of the curve you just drew. To remain consistent, both of these curves will have five vertices. Shape them in the Side view as you have the other curves. Figure 8.8. Shaping the back collar curve on the X-axis. 
Now, you'll continue down the back with another panel. In the Front view, draw both of the two side curves with (you guessed it) five vertices, extending down from the previous curves you drew in the last panel. Shape them in the Side view as in the previous steps. Then, connect them at the bottom with another curve made up of five vertices. This curve should be at the same level as the curve for the lower-front panel from step 12. You need to create the remaining two back panels. First, draw a curve in the Front view that connects from the intersection of the other two back panels to the intersection of the rear shoulder curve. From that intersection, draw another curve that drops down under the shoulder intersection. Finally, create the remaining two panels by drawing two curves that connect around the waist in the Top view. As before, reshape the curves and use five vertices for each curve (see Figure 8.9). Figure 8.9. The last two curves that connect around the waist. 
In the Front view, draw the curve for the front part of the collar. Start by tracing the reference image where the collar starts at the shoulder. Then, draw the next curve starting at the intersection of the two front panels. Reshape the last curve in the Side view. Switch to the Top view and draw a curve that connects those two new curves. While you're in the Top view, draw the second curve that will form the top edge of the collar's back side. Switch to the Side view and move these new curves so that they rest at the top of the previous curves you made. Then, draw the last curve in the Side view. Remember to snap all the curves ends to one another (see Figure 8.10). Figure 8.10. The curves of the collar. 
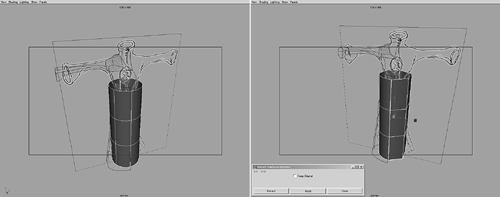
After you complete the front and back of the chest, pull a marquee-selection window over all the splines. Right-click on the Pathcurves layer in the Layers dialog box, and choose Add Selected Objects. Now, you can toggle the curves' visibility. Now, create a NURBS cylinder (Hotbox | Create | NURBS Primitives | Cylinder) to serve as the lower half of the coat. In the Channel Box, set Transform Y to 1.419, Rotate Y to 90, and Scale X, Y, and Z to 0.377, 1.099, 0.377. Under the INPUTS section, change Sections to 6 and Spans to 3. Eventually, you need to select the cylinder surface, so in the selection mode bar on the top toolbar, click the blue patch icon to the right of the blue spline icon. Next, right-click over the cylinder and choose Isoparm. Notice that only one surface has been made from the spline cage so far. Next, you'll use primitive shapes with the cage, and moving the spline ends around to line up is easier than using surfaces. Primitive shapes can be added to models to avoid building every patch. In essence, the primitives are patches that have been attached. Later, you'll see how to break the primitives apart into more usable shapes to incorporate into your model. Select the isoparm at the center front of the cylinder and detach it by choosing Hotbox | Edit NURBS | Detach | option box. In the Detach Surfaces Options dialog box, click Apply. The front isoparm won't look much different. Next, right-click over the cylinder and choose Isoparm. Then, select the isoparm in back at the center. Because you left the Detach Options dialog box open, you can click Apply again. The cylinder has now been split into two pieces. One half is smoothed and the other half isn't (see Figure 8.11 on the right side). When you split a surface, it defaults to a smoothness value of 1, so that's why the two halves don't look the same. Figure 8.11. On the left, primitives are used along with patches; on the right, the primitive has been broken apart to better incorporate it into the model. 
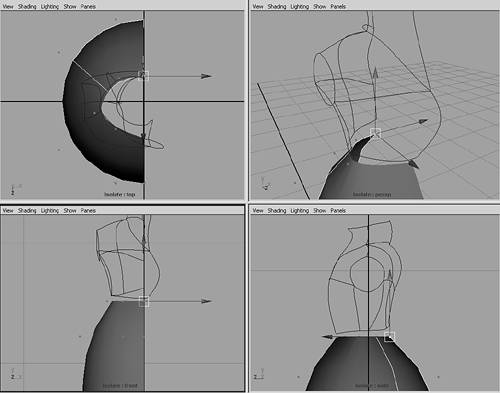
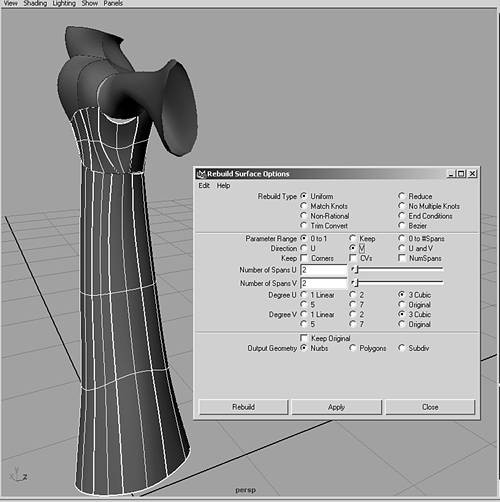
Select only the right side of the cylinder (the half that looks unsmoothed), and delete it. Then, select the left side and delete the history (hotkey: Ctrl+Alt+d). Next, you'll rebuild the NURBS surface, which is a good practice to follow when creating NURBS patches. tip When building NURBS patches, it's a good practice to delete the history and rebuild surfaces after attaching, detaching, and other major operations. The Construction History holds residual information about the mesh after major operations that isn't needed. With the cylinder half still selected, open the Rebuild Surfaces Options dialog box (Hotbox | Edit NURBS | Rebuild Surfaces | option box). Make sure Output Geometry is set to NURBS, and set Number of Spans U and Number of Spans V to 3. Click Apply. To match the cylinder shape with the bottom of the spline cage, right-click over the cylinder and the splines forming the bottom edge of the cage (refer to Figure 8.11 to see where the spline cage should end), and choose Control Vertex. Move the cylinder's CVs into place by snapping the ends together. Then, select the cylinder's top CVs and move them inward approximately under the splines. It doesn't need to be exact at this point. Begin moving the cylinder's CVs into position (see Figure 8.12) using the reference image in the Top and Perspective views. Figure 8.12. Moving CVs in to match the reference image. 
Before switching back to creating surfaces for the chest, create another cylinder that will become the sleeve (Hotbox | Create | NURBS Primitives | Cylinder). In the Channel Box, set Translate X, Y, and Z to 0.815, 2.994, 0; Rotate X, Y, and Z to 0, 0, 90; and Scale X, Y, and Z to 0.078, 0.417, 0.078. You should see the new cylinder in position where the coat sleeve will be. Under INPUTS in the Channel Box, click on makeNurbsCylinder2 and set Spans to 6. Right-click over the new cylinder mesh and select rows of CVs by dragging a marquee window over them. Using the Front and Perspective views, use Move (hotkey: w) and Scale (hotkey: r) modes to position the vertices so that they match the reference image. Leave some space at the shoulder seam, but mimic the sleeve shape in the reference image. You'll be rebuilding the cylinder later to line up the same number of isoparms. After you've positioned all the vertices, switch to the Top view. This view has no reference image loaded, so it's open to your own interpretation. Continue to refine the shape of the sleeve by selecting rows of vertices in the sleeve and using the Scale tool (hotkey: r) to close the distance between them. This is called nonuniform scaling because you're scaling the vertices on only one axis to turn the round shape of the sleeve into an oval shape. Working your way from the shoulder to the elbow, scale the vertices inward just slightly. Then, scale the vertices inward past the elbow, but let the sleeve flare out again near the wrist (see Figure 8.13). Figure 8.13. Shaping the sleeve with CVs. 
tip Another way to enable nonuniform scaling is to select a Scale channel in the Channel Box and then hold the Ctrl key down while MMB-dragging in the viewport. This tells Maya to scale the other two axes together and leave the one you selected alone. Now, it's time to finish the surface patches. Leaving them "as is" to this point made it easier to see and adjust the mesh shape. Set the selection mode to splines by clicking the blue spline icon on the top toolbar. Just below the first patch you created is the area with four connected splines where you'll create a patch. In the Perspective view, select the left vertical curve, which should be one of the two curves running under the sleeve. Next, select the vertical curve running up the center in front, and then select the two horizontal curves between the two you've already selected. tip When creating patches with the Birail tool, it's best to select curves that are parallel to one another in pairs in step 30, for example, select the two vertical curves, and then select the two horizontal curves. Because there are four splines creating an outline, you'll use the Birail 2 tool (Hotbox | Surfaces | Birail | Birail 2 Tool). Make sure the Proportional radio button is selected. Then select NURBS as the Output Geometry, and click Apply so that the dialog box remains open. Right-click in the window and press 3 to turn on a smoothed view of the mesh. It should fit smoothly within the boundaries of the four splines. Switch to the Perspective view and select the vertical curves in the front of the collar. Then, select the horizontal curves, which means you're using one of the splines used to produce the first patch as a shared boundary. (see Figure 8.14). Figure 8.14. Creating patch surfaces for the chest from the spline cage. 
After creating each patch, you can check its look by turning on the smoothed mesh (hotkey: 3). Next, orbit or tumble your view until the Perspective view is facing the back of the coat. Turn off the cameras in this view to reduce the amount of information shown onscreen (choose Show | Cameras from the panel menu). The reference image should disappear from the viewport, leaving you with the image shown in Figure 8.15. Figure 8.15. The remaining curves for the back of the coat. 
Now, you'll start with the top of the collar. Select the two vertical curves and then the two horizontal curves; make sure you follow that order because reversing the order could cause complications in surface directions during the stitching and attaching phase. Click the Apply button in the Birail 2 Options dialog box. Repeat step 34 for the remaining four panels making up the back of the coat. Then, tumble the view so that you're looking under the sleeve toward the armpit, and select the two vertical curves for the last patch. Next, select the curve that completes the bottom of the circle seam for the sleeve and then select the last horizontal curve beneath it. In the Birail 2 Options dialog box, click Apply to finish the patch. You've built all the pieces needed to begin connecting the coat in the next tutorial.
tip Because all the patches you just created have construction history, you can go back and adjust the CVs in the curves used to create them; this updates the resulting patches. Construction history can be quite elaborate and used for complex effects, but usually when you're modeling, you need to periodically delete the history to prevent unexpected results. A large construction history can also slow down performance.
Tutorial: Stitching NURBS Surfaces Load the file noted next to the DVD icon, or continue from the previous tutorial. This tutorial uses the Stitch tool to create a solid model. On the DVD  Chapter_08\movies\ch08tut02.wmv |
On the DVD  Chapter_08\ch8tut01end.mb |
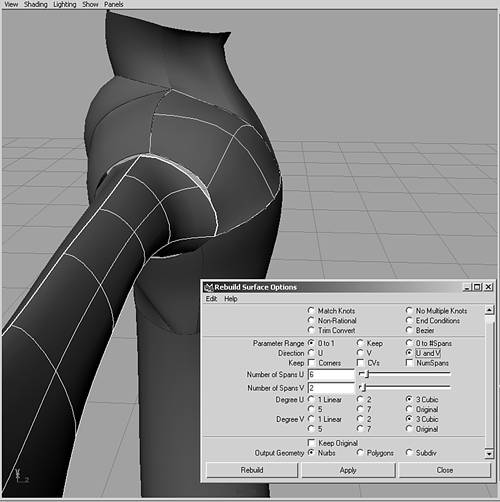
Begin by switching the selection mode to curves by clicking the small blue spline icon. Then, pull a marquee-selection window over the entire mesh to select all the curves. When all the curves are selected, right-click on the Pathcurves layer in the Layers dialog box, and choose Add Selected Objects. Click on the V to the left of the layer name to turn off the curves' visibility. Select the sleeve cylinder and delete its history (Hotbox | Edit | Delete By Type | History; hotkey: Ctrl+Alt+d). Then, rebuild the NURBS surface (Hotbox | Edit NURBS | Rebuild Surfaces | option box). Set Number of Spans U to 6 and Number of Spans V to 3. The three lines (isoparms) that run the length of the sleeve should now line up more closely with the intersections in the panels that form the armhole in the chest section. If you don't notice much difference, that means the alignment was fairly close to begin with. Rebuilding a surface usually relaxes the isoparms (the divisions in the surface) and gives them more consistency. Delete the cylinder's history again (hotkey: Ctrl+Alt+d). Right-click over the cylinder and choose Isoparm. Select the isoparm running the length of the sleeve and detach it (Hotbox | Edit NURBS | Detach Surfaces). Repeat this step for the two remaining isoparms running horizontally down the sleeve. Note that each time you detach the surface, you must right-click on the new object and choose Isoparm. Then, select all three pieces of the sleeve and turn on the smoothed mode (hotkey: 3). You need all adjacent surfaces to have an equal number of isoparms; to do so, select the front top third of the sleeve and rebuild the surface (Hotbox | Edit NURBS | Rebuild Surfaces | option box). The patch that the sleeve connects to has a division of two, so you need to give the sleeve section the same number of divisions. Set Number of Spans U to 6 and Number of Spans V to 2 (see Figure 8.16). Figure 8.16. Rebuilding NURBS surfaces for an equal number of isoparms. 
tip To get an exact number on a surface's divisions or spans, check the Spans UV display by opening the Attribute Editor for patches (hotkey: Ctrl+a). You can also visually calculate this setting by counting the number of isoparms and then subtracting one from the total. If you see three isoparms, there are two divisions. Think of it as reading between the lines. Select the back third of the sleeve and rebuild it, setting Number of Spans U to 6 and Number of Spans V to 2. Delete the history (hotkey: Ctrl+Alt+d). Leave the Rebuild Surfaces Options dialog box open, and select the front collar. Select the front shoulder patch, too, and count the number of isoparms. To stitch the patches together, the number of isoparms must be equal. Because the shoulder's front patch has an number equal to the adjacent patch beneath it, the best method is rebuilding the front collar and working your way around to the back. Check your work and make sure the number of isoparms for all patches in the chest area are equal to the surfaces they're connecting to. Because they should all have the same number of divisions in both the U and V directions, you can select all the patches in the chest and rebuild them simultaneously with Number of Spans U and V equal to 2. Then, delete their history (hotkey: Ctrl+Alt+d). Now, you'll work on the cylinder you created for the lower section of the coat. Right-click on that cylinder, and choose Isoparm. Select the two middle vertical isoparms, and detach them (Hotbox | Edit NURBS | Detach Surfaces). tip When selecting isoparms, it's better to drag a small marquee window over the isoparm than try to click on it. If you try to click on it, you could accidentally create a new isoparm when you detach, thus creating unexpected divisions in the surface. This would throw off your equal divisions and require rebuilding the newly detached surfaces. Using a marquee window to select ensures that you're selecting an existing isoparm instead of creating a new one. The back patch from the cylinder needs to be rebuilt, but only in the V direction. In the Rebuild Surface Options dialog box, select the V radio button for Direction, set Number of Spans V to 2, and click Apply. Right-click on the back panel and choose Isoparm, and select the center isoparm. Detach the isoparm from the patch, creating two new patches in the back. Select all the patches that make up the lower portion of the coat, and rebuild the NURBS surfaces: In the Rebuild Surface Options dialog box, set Number of Spans V to 2 and click Apply. Notice that all the patches in the lower section now have an equal number of isoparms in the direction where they meet the patches of the coat's upper section (see Figure 8.17). Figure 8.17. Rebuilding the patches to match the number of isoparms on the adjoining patches of the coat's upper section. 
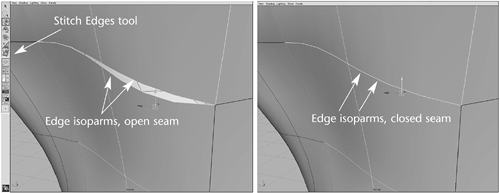
With equal numbers of isoparms in the patches, you can stitch the seams together using the isoparms at the edges (Hotbox | Edit NURBS | Stitch | Stitch Edges Tool).You don't need to select any patches at this point. A stitch icon appears in the Tool Box on the left under the Show Manipulator Tool (see Figure 8.18). Figure 8.18. Closing seams that don't cooperate with the Stitch tool. 
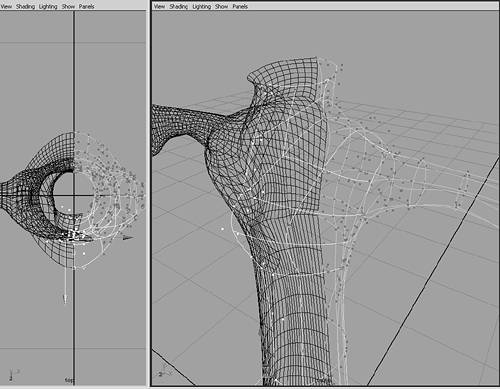
You should have 16 patches at this point. Each patch is connected on at least two edges. Work your way around, stitching every edge of the 16 patches to an adjoining patch. To make this go quickly, use the y hotkey to reinitialize the Stitch tool after each use. To select two edges that you want to stitch, simply drag a marquee window over them with the Stitch tool, and it automatically performs its function on them. Press the y hotkey again, and select the next set of edges until all the panels have been stitched. The Stitch Edges tool blends patches into each other, but occasionally, it needs help. If a seam won't close, instead of restitching where an area is open, as in Figure 8.18, right-click over each patch and choose Control Vertex. Then, find two vertices that look like the isoparms should be lining up. Select one of CVs, switch to Move mode (hotkey: w), and hold down the v key to snap it to the other CV. Immediately, you'll see the seam close, or you'll know it was the incorrect vertex to place there. In the worst-case scenario, you might need to re-create a patch that's misbehaving and won't cooperate with the Stitch tool. To do this, select the isoparms that make up the surface in one direction and then click Surfaces | Loft to create a new patch. Then, delete its history and delete the old patch. If you select the wrong CV, use the Undo function (hotkey: Ctrl+z) and select another CV near the open seam. As you tweak the vertices for the last open seam, the patches should be stitched together and look like a full surface. Pull a marquee-selection window over the entire coat, and group it (Hotbox | Edit | Group; hotkey: Ctrl+g). With the group selected, duplicate it (Hotbox | Edit | Duplicate; hotkey: Ctrl+d). In the Channel Box, set Translate X to 0.011 and Scale X to 1. Using the negative value for Scale is another way to mirror an object. Beginning in back of the coat at the bottom, right-click over the bottom patch on the right side, and choose Control Vertex. Switch modes from Move to Scale (hotkey: r) and select CVs on the edge that falls down the centerline. Note that they should be an exact mirror, so they need to be scaled only in the X-axis so that they're close to one another. Leave the edges barely apart. Work your way up the patches and continue until the seam is relatively closed all the way to the collar. Select the Stitch Edges tool (Hotbox | Edit NURBS | Stitch | Stitch Edges Tool). Start with the bottom two patches in the back, and select the left edge and then the right. Continue stitching the center edges up the middle in the back. Now that the back is stitched together at the seam, you nearly have a full coat. Tumble the Perspective view around to the front. Because the coat is double-breasted, the front sections overlap. After the mirror operation, these surfaces intersect with one another, so you need to move the left panels so that they don't touch the right side. At this point, you can delete all history (Edit | Delete All by Type | History) to clean up the scene. To avoid selecting the right side of the coat, select one patch on the right and then press the up arrow to select the entire group. Create a new layer in the Layers dialog box, double-click the default layer name, and name it Surfaces_right. With the right surfaces group still selected, right-click over the Surfaces_right layer and choose Add Selected Objects. Then, click the middle check box next to the Surfaces layer twice to place an R (for Reference layer) in the check box. Now, the right-side group of surfaces is locked because that group is on the Surfaces layer. Right-click over each patch in the left front, and choose Control Vertex. Select all the patches at once that make up the center edge in front. This is necessary because you're going to move all the CVs along the edge of the left front panels, and at the seams, two CVs would be on top of each other. Selecting one at a time means snapping all the seams together in front again. To avoid that, select them all at once. Switch to Move mode (hotkey: w), and use the manipulator arrows to move the front edge CVs slightly in the Z-axis toward the back of the coat. The surfaces just need to appear to be overlapping. To make it easier to see what you're selecting, choose View | Wireframe from the panel menu, and before you start selecting the CVs, select the left coat group and press 1 to simplify its wireframe display (see Figure 8.19). Figure 8.19. Selecting CVs to move so that the two coat halves don't intersect. 
In the Shaded view, there's an obvious seam in the patches because the tangency (the angle at which the patches meet) isn't equal. Now that you've stitched all the panels and adjusted them, you can apply the Global Stitch tool to smooth out these seams. You need to apply the tool in just a slight amount to smooth out the seams. Click Edit Nurbs | Stitch | Global Stitch | option box, and select the Closest Knot, Equal Params, and Normals options. Set Max Separation to .01 and Modification Resistance to .2, and leave Sampling Density at 1. Click Apply, and observe the changes in the seams. If the results aren't satisfactory, click Apply again, or undo with Ctrl+z and try different settings. tip Global Stitch has another important use besides modeling purposes. When you deform a patch model, only two methods can maintain tangency between patches: Global Stitch or Lattice. Global Stitch is preferable to Lattice because to use the Lattice tool for a character, you have to bind the lattice rather than directly binding the patches. When you use Global Stitch for tangency during deformation, you only need to maintain the tangencies. Therefore, before you apply the Stitch tool, the seams between the patches should already be dead-on. You can now select a patch from each side and press the up arrow to select both groups. To make texturing and moving the coat easier later, group both halves together (hotkey: Ctrl+g).
Tutorial: Detailing the Model Using Extruded Curves Load the file noted next to the DVD icon, or continue from the previous tutorial. On the DVD  Chapter_08\movies\ch08tut03.wmv |
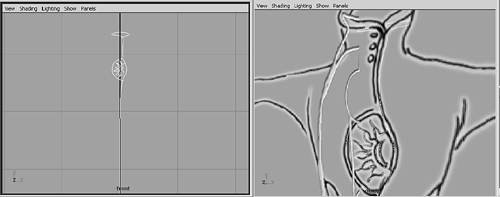
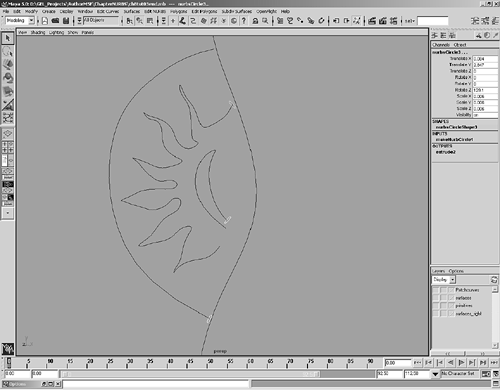
Switch to the Front view and select the CV Curve tool to begin drawing the trim, or front edge, of the coat (Hotbox | Create | CV Curve Tool). Draw the curve using the reference image as a guide. At the top edge of the collar surfaces, draw a circle that will make up the collar's edge (see Figure 8.20). Figure 8.20. Drawing curves over the reference image's detail. 
On the DVD  Chapter_08\ch8tut02end.mb |
Now, trace the half circle and the sun design from the reference image, using the CV Curve tool. Create a NURBS circle that will determine the thickness of the line as it's extruded (Hotbox | Create | NURBS Primitives | Circle). In the Channel Box, set Translate Y to 0.316, and Scale X, Y, and Z to 0.01. Duplicate the circle (hotkey: Ctrl+d), and set Translate X, Y, and Z to 0.084, 2.847, 0. Set Rotate Z to 129.1 and Scale X, Y, and Z to 0.006. Duplicate the circle a second time and place it at the start of the other detail curve that you'll be extruding along (see Figure 8.21). Duplicate the circle again (for a total of four circles) and place it at the beginning of the path that creates the coat edge and collar. Figure 8.21. Placing circles to extrude along curves for the details on front. 
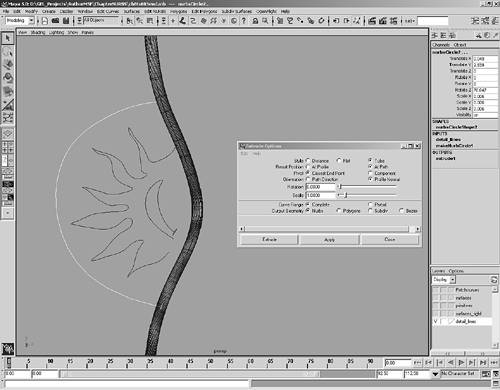
Before extruding the circles along the curves, select all of them and create a new layer named Detail_lines. Then, select nurbsCircle1 and the curve you created running up the front edge. With both selected, open the Extrude Options dialog box (Hotbox | Surfaces | Extrude | option box). Set the Style option to Tube and the Output Geometry option to NURBS (see Figure 8.22). Figure 8.22. Extrude options for the detail curves. 
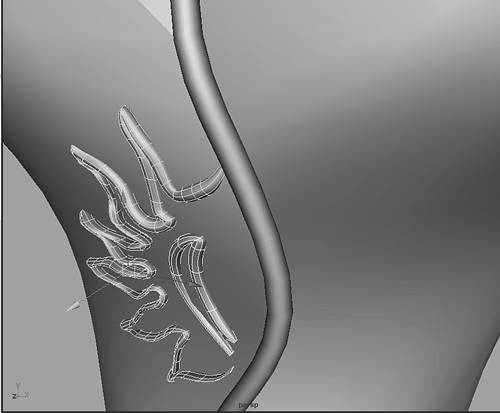
Click the Apply button (so that the dialog box stays open) to extrude the circle along the curve. Select the circle that's at the start of the large half-circle curve (see Figure 8.22), and then click Apply to extrude. Repeat step 6, selecting the circle for the two remaining shapes. After extruding them, click on the V in the Layers dialog box for Detail_lines to turn off visibility of the curve splines. You can start moving the extruded tubes into position at the edge of the coat. Select the details in the middle, leaving the large half-circle shape for later. Center the pivot after selecting the two shapes (hotkey: Ctrl+c). Then, move them to the front surface of the coat in the Z-axis. After the pieces are in front of the coat, right-click over the tubes and select Control Vertex. Move the CVs in the Z-axis so that the three shapes seem to be inlaid into the fabric (see Figure 8.23). Figure 8.23. Moving the detail shapes so that they're inlaid into the coat. 
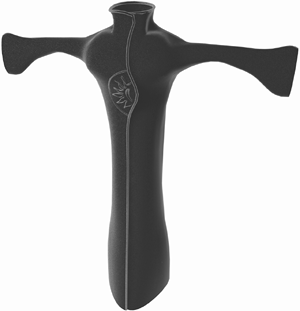
Select the main edge tube. Right-click over it and choose Control Vertex. Move each set of CVs in the Z-axis to the front edge of the coat. You can add more detail, if you like, using the techniques you've learned in previous chapters. You could also return to this coat model after learning new techniques in subsequent chapters. For example, you could texture the surface or even animate it. Figure 8.24 shows the fully rendered coat after applying materials. Figure 8.24. Render of the coat with details after applying materials. 
Going Further Start a new scene file and try to create some similar NURBS objects on your own. Explore the options for the Extrude tools, and see how they work on other types of curves you draw. In most of the tutorial's steps, the curvature was set to 3 to ensure that a minimal curve was produced. See what happens when you draw lines in cubic mode. Try extracting and projecting curves onto other NURBS primitives, such as spheres. You could also add details to the sleeves or the collar. |
|
