| Now we've got the formalities out of the way, let's see how we make channels work for us. First, let's look at Quick Mask, which is somewhere between a selection and an alpha channel. Like a selection, it goes away when not in use; like in an alpha channel, you can see a transparent color overlay on top of your image representing the masked areas of the image. A Quick Mask channel will show up in the Channels palettebut only when it's active. And you can edit the shape of that mask with your painting tools or filters. This is the punch line: when making complicated selections, you can be more accurate using painting tools on a Quick Mask rather than using your basic selection tools. The thing about Quick Mask is that it's, well, quick. And temporary. You turn a selection into a Quick Mask so that you can refine it as a color overlay mask, and then turn it back into a selection when you're done. From there, you can save the refined selection as an alpha channel (or a layer mask). Strictly speaking, Quick Masks don't give us anything we don't already have with alpha channelsthey're just more convenient. Some people love Quick Masks and use them every day. I have to confess that I don't use them often. Quick Masks are stepping-stones to creating something else, most likely an alpha channel or a layer mask. I prefer to cut out the middle step and go directly to one of these optionsboth of which result in a saved maskbecause you never know when you might need to go back and refine that mask. A word of caution about Quick Masks: as handy as painting on a mask can be, I bet that every time you find yourself spending hours on a complex mask you're thinking, "There has to be a better way." Well, usually there is. If you want total control over the shape of your edges, there's no substitute for the Pen tool, covered in Chapter 1, "Selections." And for images with fine-edge detail, like hair, fur, tree branches, and so forth, you're better off making a channel mask, which is covered in Chapter 6, "Channel Masks." As I mentioned in the previous chapter, your basic Selection tools are a starting point; Quick Masks are for refining selections. Once you have made your starting selection, click the Quick Mask button in the Toolbox to switch to Quick Mask mode. In Quick Mask mode, you can partially select areas of your image by painting with gray, as well as feather parts of your selection by varying the softness of your brush as you paint. If you turn off all other channels in the Channels palette, you can view your Quick Mask as grayscale information and continue to refine it there by painting in black or white. Let's take a look at a practical example. 1. | Open the Car image.
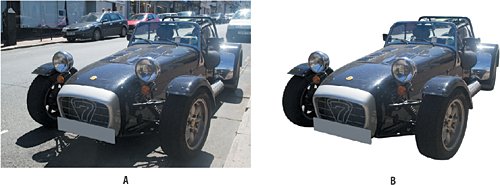
Exhibit 2.14. The original image (example A) and the masked image cut out using a Quick Mask (example B).


| 2. | Begin by drawing a Pen path around the car or click on Path 1 in the Paths palette to use the Pen path that is saved with the image. From the Paths palette menu, choose Make Selection to convert the Pen path to an active selection. I chose a feather radius of 0.5 pixel.
I chose the Pen because of the curves and straight lines that make up most of the car shape. Pen paths are discussed in Chapter 1.
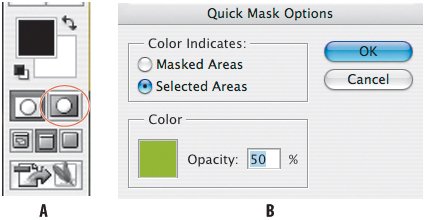
| | | 3. | Click the Quick Mask icon at the bottom of the Tools palette (or press Q). My Quick Mask color was green from the last time I used it, and that works fine; yours will probably be red. If you want to change the color of the mask, double-click the Quick Mask button to bring up the Quick Mask Options dialog. Note that the swatches in the Toolbox automatically become black and white when you switch to Quick Mask mode.
Figure 2.15. Click the Quick Mask icon to enter Quick Mask mode (example A). Double-click the Quick Mask icon to bring up the Quick Mask Options (example B). 
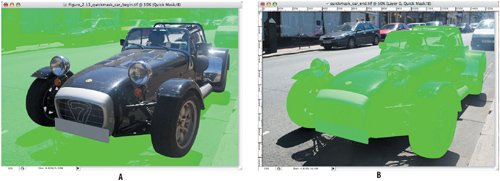
You might like to Option/Alt click the Quick Mask icon to toggle between the overlay color showing the masked areas and the selected areas. Remember, what's most important is that you're making a distinction between the subject and its background.
Figure 2.16. The image in Quick Mask mode with the color showing masked areas (example A) and selected areas (example B). I found it most useful to move back and forth between these two views by Option/Alt-clicking the Quick Mask icon. 
| 4. | Choose the Paintbrush and refine the edges of the mask. Zoom in to a comfortable view size so that you can clearly see the edge detail. If you have the color set to indicate the selection, paint with black or, if the color indicates the masked areas, paint with white to select more of the image (the color overlay is removed from areas painted with white). Painting with gray or another color creates a semitransparent area, useful for feathering or anti-aliased effects. (Semitransparent areas may not appear selected when you exit Quick Mask mode, but they are.)
| 5. | Finally, when you are satisfied with your Quick Mask, switch back to Standard mode. Your mask becomes a selection, and you can save it as an alpha channel or edit it the way you want.
In my case, I converted the selection to a layer mask (see Chapter 4, "Layer Masks") to hide the foreground area. To do this, press Option/Alt and double-click the layer thumbnail of the Background layer and then click the Layer mask icon at the bottom of the Layers palette. As an optional finishing step I added a simple drop shadow by choosing Drop Shadow from the Layer Styles pull-down menu at the bottom of the Layers palette. Layer styles are discussed in Chapter 3, "Layers."
|
|

