Installing the First SharePoint Server 2007 Server in the Farm
Installing SharePoint Server is similar to installing Windows SharePoint Services, but there are some very important differences. For example, the configuration wizard is expanded, and there are many more required post-installation tasks in Central Administration. In addition, even though SharePoint Server installation types are named the same as in Windows SharePoint Services, they are very different. Before beginning the installation process, document your choices thoroughly, and take the time to create all necessary accounts, add IP addresses to your servers, create DNS entries, and install any foundational software. Once again, it is not necessary to install Windows SharePoint Services beforehand because it is installed automatically with SharePoint Server.
The Installation Wizard
By running setup from the installation media, you begin the first of three phases required to install SharePoint Server. Entering the product key is required, and you may copy and paste the product key. After entering your product key, setup requires that you choose either a Basic or Advanced installation. The Basic option always installs SQL Server 2005 Express Edition, in addition to all SharePoint Server services, on a single machine. It does not give you the option to scale in the future or to use robust disaster recovery methods. Therefore, the Basic option is only suitable for very small workgroups or to test functionality. An Advanced installation type is recommended, and although it is possible to host SQL Server Standard/Enterprise on the same server as SharePoint Server, it may be difficult to support or scale out.
Advanced
After selecting an Advanced installation, you are presented with three distinct server installation types:
-
Complete This is the preferred server type for an Advanced installation. This type installs all binaries on the server and gives you the ability to run any Web or application service from this machine. Services are started and stopped via Central Administration, so there is no need to manually disable services after a complete install.
-
Web Front End A WFE in SharePoint Server is very different from the identically named option in the Windows SharePoint Services setup. Unlike in Windows SharePoint Services, the Web front-end server type in SharePoint Server installs only the binaries to support Web application content rendering and Excel Calculation Services Web proxy. Unless drive space is at a premium, you are better off installing the complete set of binaries and leaving the services disabled (default).
-
Stand-alone Selecting a Stand-alone server type gives essentially the same result as a Basic installation type. The primary difference is the requirement to manually set up your first Web application in the farm. Installing Stand-alone is only recommended for very small installations or a lab environment.
SharePoint Products and Technologies Configuration Wizard
After successful completion of the installation, you are prompted to run the SharePoint Products and Technologies Configuration Wizard. If you are imaging systems for rapid restores, you may close the wizard at this point and create your system image. Creating an image from this point allows the server, when restored, to be added to any SharePoint Server 2007 server farm in the event of a machine failure. While the wizard is running, you will be prompted for your database server, database names, and your domain server farm user account. Have this information ready, remembering that the server farm user account must be in the local administrators group.
Because this is the first server in the farm, do not select the default setting, Yes, I Want To Connect To An Existing Server Farm. Instead, select No, I Want To Create A New Server Farm, as shown in Figure 2-10.
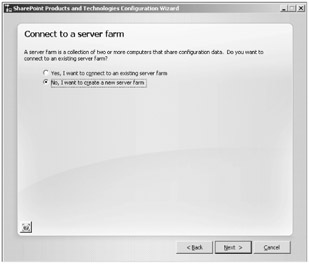
Figure 2-10: Select No, I Want To Create A New Server Farm when installing the first server in a farm. Doing so creates the configuration database.
Configuration Database Settings
Next you must specify your configuration database settings. The database server must be in the same domain as your SharePoint Server server, and its version must be SQL Server 2000 SP3a or later. If multiple SharePoint products are installed to the same SQL Server server, then change the default name of the database to match the server farm purpose, like SharePoint_Config_Sales when installing a server farm to support your sales department. You must provide a username and password to create and permanently connect the config DB. Remember, this account needs to be a local administrator on this machine and have the ability to create and administer databases on the SQL Server instance. Figure 2-11 shows an example of creating a config DB for an organization's enterprise portal.
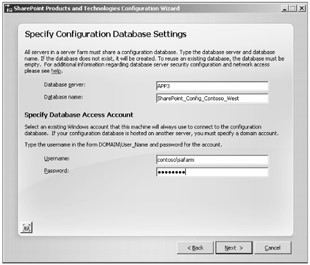
Figure 2-11: Name the configuration database intelligently.
Creating the Central Administration Web Application
There can only be one Central Administration (Central Admin) Web application per server farm. When configuring the SharePoint Central Administration Web application, you must specify the TCP port number used to access the Web application. The number is appended to the NetBIOS server name you are installing on; for example, http://Web1:29528 if your server name is Web1 and the chosen port is 29528. Remember to open any necessary firewall rules if you are managing your farm from remote subnets.
| Tip | The Central Administration port number should never be changed from within IIS Manager. To change the TCP port number, use the CLI tool Stsadm.exe:
stsadm -o setadminport -port <port#> <-ssl> The SSL argument is optional and should only be used if you already have SSL enabled for the Central Administration Web application. |
You must also configure your security settings for the Central Admin Web application. If you plan to always manage your server from a centrally located subnet, you may choose to employ Kerberos authentication. Kerberos marginally increases performance and helps secure your Central Admin Web application. It is generally better to use NTLM to authenticate to Central Administration and to disallow any Internet access to the IP address used for that Web application. By default, Central Administration will use All Unassigned in IIS Manager, as shown in Figure 2-12, but this can be changed to the local machine's IP address if desired for greater security.
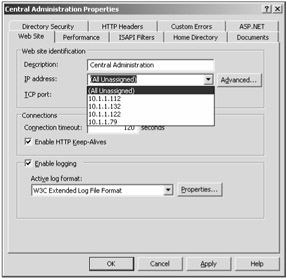
Figure 2-12: Change the default IP address of the Central Administration Web application.
Best practice is to change the Central Administration IP address to the first IP address in the server's IP stack after installation. Leaving the Web application's IP address as All Unassigned opens up the possibility of compromising your administrative interface.
For example, if another Web application is created and its corresponding IP address is open to the Internet through a firewall rule, then your Central Administration TCP port will work on that IP address remotely.
Central Administration Post-Installation Tasks
After the installation wizard completes successfully, you must perform several tasks to have a functional first server in the farm. When you visit Central Administration, you will get a notification that your server farm configuration is not complete. You will also see the administrator task list that can be modified to meet your specific requirements Both Windows SharePoint Services and SharePoint Server search services, along with the Windows SharePoint Services Web application, are required and must be configured. The following are the services available to be enabled:
-
Document Conversions Launcher Services The Document Conversions Launcher services are content management feature services that enable the conversion and load balancing of converted documents or generic XML documents to another type of document, HTML, or graphic. These services aren't mandatory in your new SharePoint Server server farm, but are required when using document conversion in Information Management Policies or Web content management.
-
Excel Calculation Services Excel Calculation Services is a very powerful service that can help many organizations standardize and centralize their Excel spreadsheets. It is not a required service, however, so enable it it at your discretion. It can always be enabled at a later time.
-
Office SharePoint Server Search Before you can create a Shared Services Provider later in the installation process, you must enable SharePoint Server Search. You will also be unable to search any content on your SharePoint Server server(s) unless the search services (Query and Indexing) are enabled. For these reasons, it is best to always enable SharePoint Server Search in the very beginning. When starting the SharePoint Server search service, you must check or answer the following options:
-
Use this server for indexing content Because this is the first server in your farm, enabling this server for indexing should be checked. You can move the indexing service to another server in the future if needed.
-
Use this server for serving search queries This is the only server currently capable of serving search queries, so this should also be checked. In-depth details on scaling search and index can be found later in this book.
-
E-mail address The e-mail address used for e-mail notification should be directed to the person responsible for search and indexing. When search, indexing, or crawling of content fails, this account is notified. This is a farm-wide setting and cannot be changed per query or index server.
-
Farm search service account This should be a domain account and a member of the local administrators group. For account administration and security, it can be the same account used for the server farm (configuration database access).
-
Index server default file location For most installations, the default file location is fine. However, if you have large content indexes, you might decide to use another drive for this purpose. Although you can change this drive later, it is much easier to configure it during setup. Changing the drive later forces a re-crawl of all content sources.
-
Indexer performance If your indexing server hosts other applications, such as Excel Calculation Services (ECS), consider running your Indexer at a Partly Reduced level. Reducing the level further could affect the accuracy and timeliness of query results. If your indexes are quite large, partly reducing the performance level can also help increase the responsiveness of your SharePoint sites by reducing the overhead on the SQL Server instance.
-
Web front end and crawling By default, all WFEs are used to crawl content sources; that is, all WFEs do the actual crawling of content. If your Index server is dedicated, then you should enable it as the dedicated WFE for crawling content. If you have other applications, such as ECS, then you should leave it at the default settings.
Tip You can modify SharePoint Server search settings from the command line:
stsadm -o osearch -action [list | start | stop]
When using start, you can set the farm contact e-mail and service credentials:
-role <index | Query | IndexQuery> -farmcontactemail <emailaddress> -farmperformancelevel <Reduced | PartlyReduced | Maximum> -farmserviceaccount <DOMAIN\username> -farmservicepassword <password> -defaultindexlocation <directory> -propogationlocation <directory>
-
-
Windows SharePoint Services search Windows SharePoint Services search is only used for indexing Help files in SharePoint Server 2.0, and there is only one per SharePoint Server farm.
-
Service account Using the same account as the SharePoint Server search service makes administration easier and is recommended.
-
Content access account We recommend using a dedicated content access account with a broad scope, but with the least possible privileges. Be careful which account you use for Windows SharePoint Services content access, as it will be assigned Read permissions on every SharePoint item indexed. Do not use an administrator account or one that has Write abilities on any SharePoint account.
-
Search database Unless you have very specific requirements, always use the default SQL Server instance. Name the database something easy that differentiates it from other search databases. If you have multiple SharePoint products installed into this SQL instance, name your database to correlate with your SharePoint Server installation. Figure 2-13 shows an example of the Windows SharePoint Services search database configuration on a SharePoint Server server farm that hosts an enterprise portal.
-
Windows SharePoint Services Web application Verify that the Windows SharePoint Services Web application service is started or you will not see new Web applications in IIS Manager, nor will you be able to see new Web applications other than Central Administration.
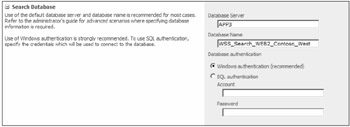
Figure 2-13: When configuring the Windows SharePoint Services search database in a SharePoint Server 2007 server farm, use an easily identifiable name.
Create the Server Farm's Shared Services
SharePoint Server Shared Services are a group of highly specialized, CPU-intensive applications. Shared Services are much like your household utilities, such as electricity, gas, and water. They are required services, but you do not want to serve them from multiple locations because of the required processing and administrative overhead. Much of the SharePoint Server feature set will not function correctly without at least one Shared Services Provider (SSP) installed. For detailed instructions, refer to Chapter 8, "Deploying SharePoint Server Shared Services," on creating and administering SSPs.
Create a Web Application for a Site Collection
When creating the first server in a SharePoint Server server farm it is always a good idea to create at least one Web application, hosting at least one site collection at the root (/). As shown in Figure 2-14, you begin the process in Application Management when creating a new Web application.
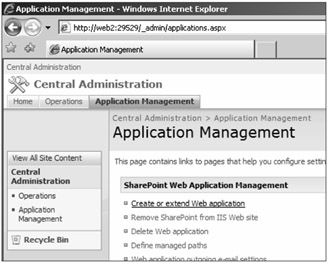
Figure 2-14: You create a Web Application from Central Administration > Application Management > Create Or Extend Web Application.
Select Create Or Extend Web Application. A Web application used to be referred to as a Virtual Server. However, with the advent of Microsoft Virtual Server R2, the naming conventions started to be confusing so they are now called Web applications. To create a Web application from Central Administration, browse to http://centraladminurl:tcp#/_admin/extendvs.aspx. Remember to change the internal URL if installing with other than the default server name. To create a Web application, complete the following tasks:
-
Create IIS Web site Although you can use an IIS Web site created outside of Central Administration, doing so introduces the possibility of user error. For this reason, it is best to create the IIS Web site inside of Central Administration and make changes, such as assigning IP addresses, later.
Caution If you decide to use an existing IIS Web site, it must exist on every Web front-end server in the farm before continuing.
-
Assign description The description you entered also appears as the description in IIS Manager. Because backups, restores, and routine maintenance are performed using this name, choose a description that correctly defines the Web application.
-
Define the TCP port number For most implementations the TCP port number is 80. If you are not using host headers, you may need to define a random port and change it after creation of the Web application. Don't forget to change the internal URL address when modifying Web application port numbers.
Tip To change the internal URL address, open Alternate Access Mappings from Operations > Global Configuration. Once there, select the internal URL you created during Web application creation. Simply modify the URL to match your IIS settings. Don't forget to add the DNS entry for the server!
-
Assign the host header (if required) Many organizations use host headers for Intranet web sites. If using host headers, enter the information here. Using host headers makes it easier to create Web applications, but can make it difficult to manage and secure Web application traffic.
-
Create the path for the IIS Web site It is recommended that you create a dedicated directory for all SharePoint products Web sites. This dedicated directory eases backup, restore, and general maintenance on IIS Web sites.
-
Choose an authentication provider Kerberos is the recommended security configuration for Intranet Web applications. Due to time synchronization issues and the need for clients to see the KDC (Key Distribution Center), many organizations need to enable NTLM for an Integrated Authentication approach in addition to Kerberos. You can enable both Kerberos and NTLM, but you must do so using Adsutil.vbs from the CLI.
-
Allow anonymous access Unless you plan to serve Web content to the Internet, do not select anonymous access. Anonymous access should only be used when creating a public-facing corporate Internet presence. An exception to this is the use of anonymous access for certain lists, such as blogs and wikis.
-
Enable Secure Sockets Layer (SSL) If your organization plans to collaborate via an Internet-facing Web application, enabling SSL is recommended for security.
-
Define a load-balanced URL If you are using Network Load Balancing (NLB), then you must define the URL for the VIP (Virtual IP). The URL should be predefined in DNS and should be the FQDN. For example, if your NLB VIP is 192.168.2.120 and the portal name is portal.contoso.msft, then the load-balanced URL is http://portal.contoso.msft. Don't forget to add the DNS Host Record in DNS Manager for your NLB VIP, or your Web application will fail.
-
Create an application pool As with a Windows SharePoint Services 3.0 application pool, you should create separate application pools when possible to isolate processes for security. Creating additional application pools does increase memory utilization, however, so verify that you have the available resources before creating multiple application pools. In any event, you should never use the application pool associated with Central Administration.
-
Create security account for application pool process You should create a domain account for every application pool you create, unless all Web applications share a common security boundary. The account used for the application pool must be an administrator on every WFE in the farm.
-
Create content database Every Web application must have at least one associated content database to store content. This content database can be shared with several WFEs, giving you the ability to scale your farm to meet your requirements. Unless you have very large and busy Web applications, you should use the default database server. Be sure to name the database so it corresponds with the Web application, and always use Windows authentication.
Create the First Site Collection
When creating a Web application, you should always create a site collection in the root for ease of administration and to lessen the possibility of confusion if end users browse to the namespace root. When installing SharePoint Server, the most common site collection template for the root is a Publishing Collaboration Portal Template. Alternatively, for an Internet-facing portal, you would apply the Publishing Portal Template. Figure 2-15 shows the option to create a site collection after successful creation of a Web application.
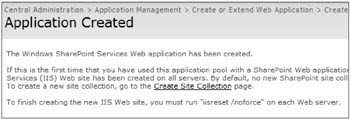
Figure 2-15: After successfully creating a Web Application, select the easily overlooked option to create the first site collection.
For the root site collection, it is advisable to assign a primary and secondary site administrator. Verify that you are creating the site collection in the root of the Web application, and give it a meaningful title and description as shown in Figure 2-16.
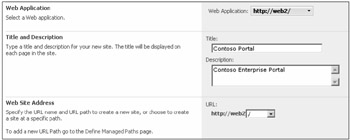
Figure 2-16: When you create Web applications, give meaningful names and descriptions to the root site collection.
Configure E-mail Settings
At a minimum, you should configure the outgoing e-mail settings in Central Administration > Operations > Topology and Service > Outgoing E-mail Settings. The outbound SMTP server that you define must allow mail relaying from all your WFE IP addresses.
SharePoint Server Databases Created During Installation
-
SharePoint configuration (config DB) The SharePoint configuration database hosts the majority of the configuration data in your farm, including site collection, content database, and Web application definitions. Name the config DB according to the primary function of the server farm; for example, SharePoint_Config_Sales, if sales is the primary function of the server farm.
-
Central administration content The Central Administration database is associated with the Web application you created during setup. Take note of the database name created, especially if you are hosting multiple SharePoint installations on this SQL Server instance. The database name looks like SharedPoint_AdminContent_guid.
-
Shared Services Provider content The SSP content database is named during installation. The Shared Services DB hosts all content required to render the http://SSP_name/ssp/admin site collection and associated applications. SSPs provide many services to a SharePoint Server farm, and these services are contained in this database as well:
-
User Profiles
-
Search configuration
-
Compiled Audiences
-
Excel Services settings
-
Business Data Catalog settings
-
-
Shared Services Search This is also called the SharePoint Server search database. The SSP search database hosts all of the metadata for crawled content, as well as a history and search logs. Remember that all indexed content is stored on the query servers' disk drive as an *.edb file.
-
Windows SharePoint Services search In SharePoint Server, the Windows SharePoint Services database only stores the associated metadata for the Help files. It is usually named WSS_Content_Name.
-
First Web application The Web application that you created at the end of setup created an associated database, which should always correlate to the name of the Web application. It should be in the form WSS_Content_Portal, if Portal is the name of the Web application.
Note If you created a portal during setup, the portal usage information is stored in the Shared Services Provider content database, not the Portal Application content database.
IIS Web Applications Created During Installation
The following IIS Web applications are created during installation:
-
Default Web site
-
SharePoint Central Administration
-
Office Server Web Extensions
-
SharePoint Web Application (Portal)
-
Shared Services Provider Web Application
An IIS installation that isolated all facets of SharePoint Server through multiple, dedicated application pools for administration might look like Figure 2-17.
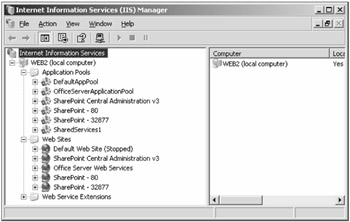
Figure 2-17: Create individual application pools in IIS Manager for a highly secured SharePoint Server installation.
EAN: 2147483647
Pages: 110