| When you conform a work print or negative, you need to provide a list that describes your film sequence in much the same way an EDL describes edits in a video sequence. The first time you export a conform list, it's generally referred to as a cut list. Any subsequent changes to your project are based on changes to the previous cut, so all subsequent conform lists that you provide are called change listslists that detail changes made since the first cut list. It's important to know how Cinema Tools searches and matches records, because it can only produce a cut list if it can locate a record that matches the Final Cut Pro sequence clip. Cinema Tools uses clip-based and timecode-based methods to locate and match records from Final Cut Pro: Clip-based Cinema Tools acquires the clip name from Final Cut Pro, then checks the clip name against the database. It searches for the clip by using the same pathname that was assigned in Final Cut Pro. If that fails, Cinema Tools searches for the clip by name and modification date. Once it locates the clip in the database, it can locate the corresponding record, because each clip is linked to a record. Timecode-based If Cinema Tools can't locate a clip using the clip-based method, it will attempt to check the video reel and timecode against the database.
Cinema Tools tries the clip-based method first, then the timecode-based one. If both methods fail, the record will appear in the film list as <missing >. See the "Finding and Fixing Missing Elements" section later in this lesson. Note If you conform the frame rate of the clips, for example from 30 fps to 24 fps, Cinema Tools can only produce accurate find results with the clip-based method. This is because when you conform a clip, Cinema Tools will produce new timecode for that clip based on the new frame rate. However, with clips that are reverse-telecined, for example from 30 fps to 24 fps, both the clip- and timecode-based methods will produce accurate results, since Cinema Tools tracks the original timecode.
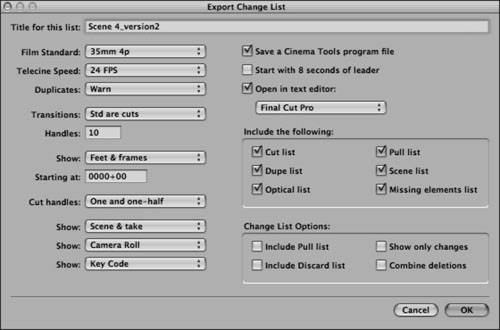
Film Lists Cinema Tools can create a variety of lists from your edited project. These exported lists are all called film lists, and they include the following lists: cut, missing elements, dupe, optical, pull, scene, and change. You export the lists you need using the Film Lists dialog. Let's export a Cinema Tools film list from FCP. While the Film List dialog is open, you'll learn about each setting and take an in-depth look at the types of lists available. 1. | Open the Lesson 06 Project.fcp Final Cut Pro project file.
| 2. | Select the Scene 4 sequence in the Timeline.
| 3. | Click the Timeline Layout pop-up and enable Show Duplicate Frames.
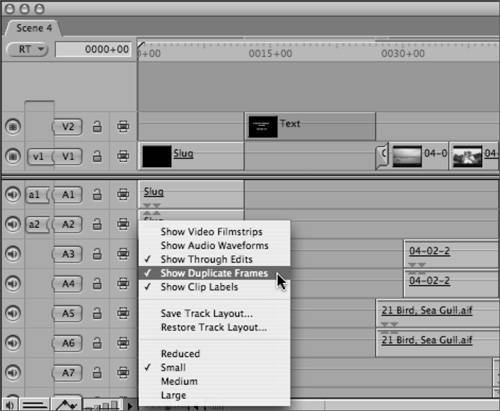 You will notice that there are two transitions and some duplicate frames showing in this sequence. Later in the exercise, you will see how these elements are displayed in the film list. You will notice that there are two transitions and some duplicate frames showing in this sequence. Later in the exercise, you will see how these elements are displayed in the film list.
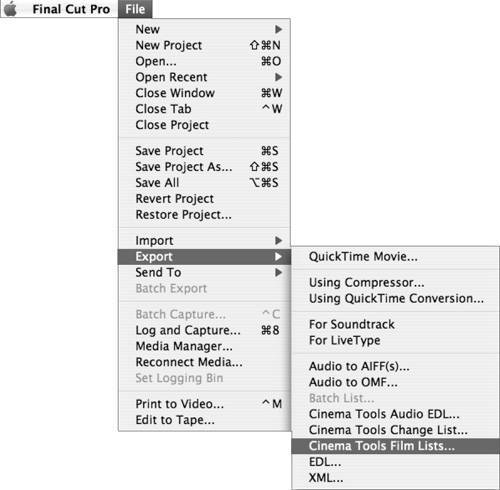
| 4. | Choose File > Export > Cinema Tools Film Lists.
 | 5. | Leave Scene 4 as the Title for this list.
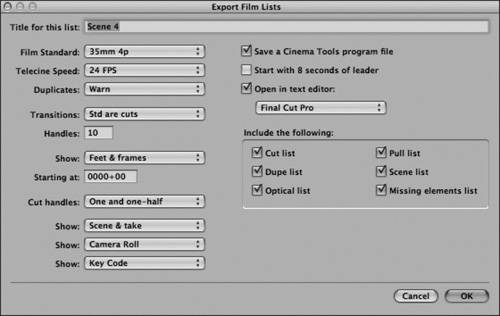 Leaving the name of the sequence as the title will help you identify which sequence you exported this cut list from. Leaving the name of the sequence as the title will help you identify which sequence you exported this cut list from.
| 6. | Choose 35mm 4p as your Film Standard.
This is the same standard you entered for the database you created in Lesson 4.
Note Cinema Tools uses the film standard you choose here to calculate the footage counts in the cut list, so it's important that it matches. If any of the database record film standards differ, you will see a film-standard warning message. If in doubt, open your original source database and double-check. | 7. | Choose 24 fps from the Telecine Speed pop-up menu.
This is the speed at which you transferred the footage.
| 8. | Choose Warn from the Duplicates pop-up menu.
With this option selected, you will see a warning message in your cut list every time a duplicate frame occurs. The message will tell you exactly which frames have been used and where they occur in the sequence. You will also see these details in a double usage warnings list.
Note Double usage warnings lists are especially useful if you want to go back to your edit and revise the duplicated frames within your sequence. For example, you may want to export a cut list with this warning, see where the duplicated instances occur, obtain a cost estimate from the lab, and either absorb the costs or re-edit the sequence. | 9. | Choose Std Are Cuts from the Transitions pop-up menu.
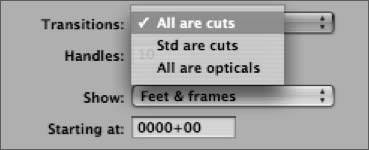
 The three options in this list define whether transitions are listed for contact printing or optical printing:
- All Are Cuts Choose this option if you are exporting a list for conforming a work print. This option will place a cut in the middle of a transition, regardless of whether the transition has an equal amount of frames on either side or if it is a standard-length transition. In the list, you will see notes indicating the start and end of the transition for the outgoing and incoming clips, and you will use the notes as a guide so that you can mark the transitions on the conformed work print.
- Std Are Cuts Choose this option if you are going to have your transitions printed on a contact printer. In this option, standard-length transitions are listed as cuts and will appear in the cut list, and nonstandard transitions are described as opticals.
- All Are Opticals Choose this option if you are having all your transitions printed optically. This option will place all clips that form part of a fade or dissolve in the optical list.
Note Always ask your contact printer how they define standard-length durations and how many handles they want you to set. The regular standard-length transitions for 23.98 fps and 24 fps projects are identified as durations of 16, 24, 32, 48, 64, and 96 frames. For 29.97 fps and 30 fps, standard-length are identified as 20, 30, 40, 60, 80, and 120 frames in duration. | 10. | Enter 10 in the Handles field.
 These handles are applied to transitions only. You will enter a number between 0 and 32. Cinema Tools will apply the number you indicate in this setting plus half a frame to the head and tail of each incoming and outgoing clip.
| 11. | Choose Feet & Frames from the Show pop-up menu.
The Show pop-up options allow you to count your footage using either feet and frames, timecode, or frames. You can use any of these options to verify the accuracy of your cut list against your edited sequence.
Feet and frames is useful when conforming to a film work print because it allows you to check your sync using a synchronizer block. You can also set your edited sequence to show feet and frames and use this option to verify the accuracy of the sequence running time against the cut list.
Note A synchronizer block has a counter connected to several rotating wheels with sprockets and a footage counter. When working with film, you can interlock the film onto the sprockets and check the position of the film by footage and frame number. You can then check the footage and frame against your list and verify that the readings match. Time is useful if you want to compare running times in the cut list with the timecode shown in the sequence. Set your sequence to timecode, and compare the cut list to the timecode in your edited sequence.
Note You may notice that the timecode shown in the cut list may not match the timecode shown in the sequence. This is because you need to calculate from the film frame number. Count is useful if you are printing opticals because you will know how many frames are used between the beginning and the end of an effect.
| 12. | Enter 0000+00 in the Starting At field.
This is where you will enter a starting location for the cut list. For example, if you're exporting the second scene from a film, you would begin the count from the starting position of that scene within the film. If you're generating a cut list with time, enter the starting timecode of your edited sequence in the Starting At field.
| 13. | Choose One And One-Half from the Cut Handles pop-up menu.
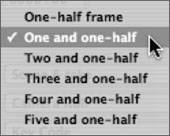 Find out what allowances your negative cutter prefers with cut handles. You can select to allow for up to five and one-half frames of cut handles. Cinema Tools assumes that at least one-half of a frame is destroyed. This allowance is essential information, and is included in the duplicate list and double usage warning list.
 This is an example of a double usage warning list. This is an example of a double usage warning list.
| 14. | Choose Scene & Take from the Show pop-up menu.
 Showing scene and take is more useful than showing clip name because it relates directly to the Cinema Tools database.
Tip Consider naming your clips by scene and take names. This will be especially useful when comparing your clips to the cut list and your Cinema Tools database. | 15. | Choose Camera Roll from the Show pop-up menu.
 Choose the option that matches how your film is stored. If you're unsure, ask your negative or work print cutter which type of roll they want to see displayed.
| 16. | Choose Key Code from the Show pop-up menu.
You only have the option to choose Ink Numbers when the film standard is 35mm 4 perf.
| 17. | Select the Save A Cinema Tools Program File check box.
 You need a program file if you plan to make changes to your Final Cut Pro sequence or if you want to export an audio EDL from Cinema Tools.
| 18. | Deselect Start With 8 Seconds Of Leader.
This option inserts 8 seconds of leader before the start of the sequence. It's best to insert the leader directly into your sequence to maintain sequence timecode accuracy.
| 19. | Select Open In Text Editor so that the film list opens immediately in the specified text editor.
| 20. | Choose Other from the pop-up menu.
 | 21. | Select Final Cut Pro from the Applications folder, and click Open.
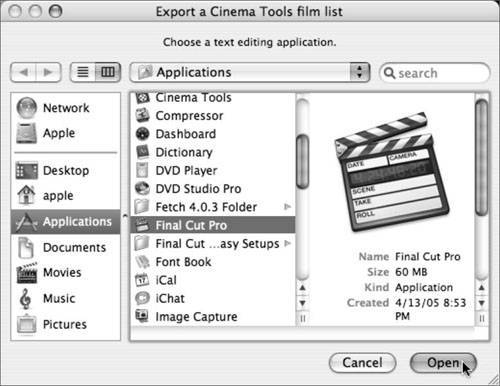 It's easier to view and compare the film list in a Final Cut Pro window. Although you can't print or save changes to the list, you can edit the document and then copy and paste the text to a text application. It's easier to view and compare the film list in a Final Cut Pro window. Although you can't print or save changes to the list, you can edit the document and then copy and paste the text to a text application.
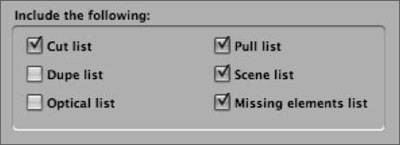
| 22. | Select Cut List.
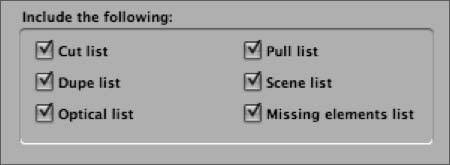 A cut list is also known as your assembly list. It contains all the information you need to cut your film negative or work print. If your edited sequence contains any titles or superimposed images, you will see two lists, a cut list and a foreground layer list. The foreground layer list contains only the title and superimposed image information contained on video track 2.
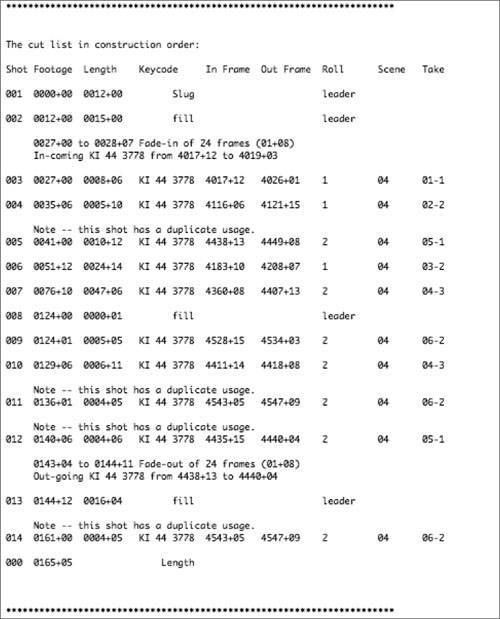 This is an example of a cut list, also called an assembly list. This is an example of a cut list, also called an assembly list.
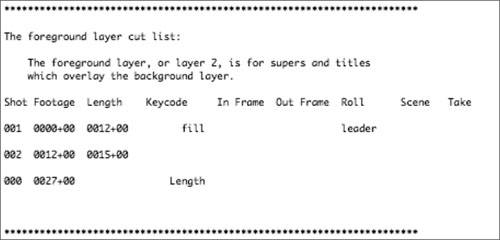 This is an example of a foreground layer cut list. This is an example of a foreground layer cut list.
| 23. | Select Dupe List.
You must give your lab the dupe list so the technicians can pull shots from your negative rolls and make duplicates.
 This is an example of a dupe list. This is an example of a dupe list.
| 24. | Select Optical List.
The optical list is the master list for all transition and motion effects. This list describes how the effects shots are assembled. If you have motion effects or transitions in your edited sequence, you will also get a motion effects and a transition effects list.
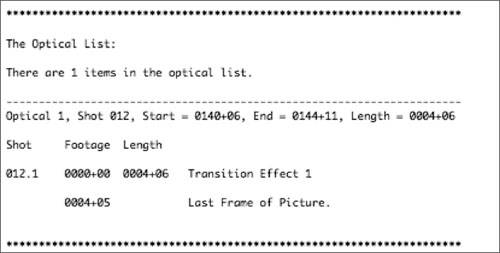 This is an example of an optical list. This is an example of an optical list.
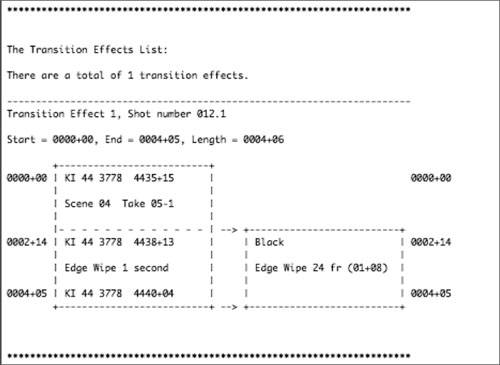 This is an example of a transition effects list. This is an example of a transition effects list.
| 25. | Select Pull List.
The pull list and the cut list both show the shots contained in the edited sequence. Where the cut list defines the sequence order of the shots, the pull list defines the order in which the shots can be found on the negative rolls.
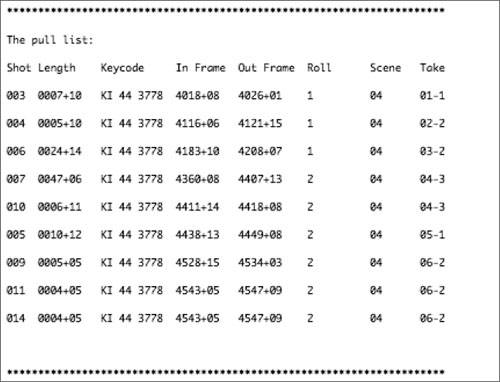 This is an example of a pull list. This is an example of a pull list.
| 26. | Select Scene List.
The scene list contains each shot that is listed in the cut list, except each shot is only listed once. You can also use this list to order prints of the clips in your program so that you can conform a work print.
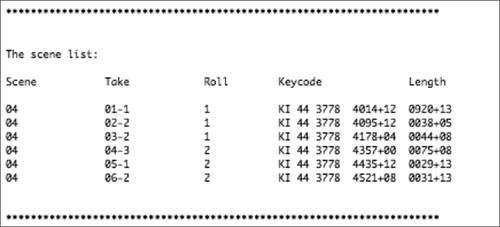 This is an example of a scene list. This is an example of a scene list.
 This is an example of an optical scene list. This is an example of an optical scene list.
Note If you selected Optical List and Scene List, you will see an optical scene list included in the cut list. An optical scene list contains a description of all the shots used in all the opticals and motion effects. Each shot is only listed once. The lab uses the list to pull the negative shots needed to make the opticals. | 27. | Select Missing Elements List.
This essential list shows all the clips that lack the information that the negative cutter will need to conform the negative. The list is useful because the missing information is shown for each missing element.
Each source clip must be connected to a record unless you use the timecode-based method for cut list generation. Generally, this relates only to camera-roll transfers, since you capture an entire camera roll and enter one database record for each complete clip. If you use the timecode-based method, each record must include a video reel, timecode, and duration.
| 28. | Click OK.
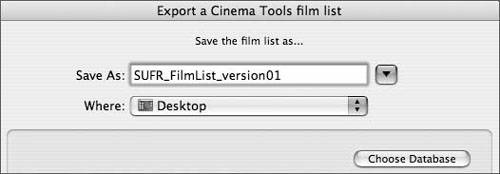
| 29. | Enter SUFR_FilmList_version01 in the Save As dialog.
| 30. | Click Choose Database.
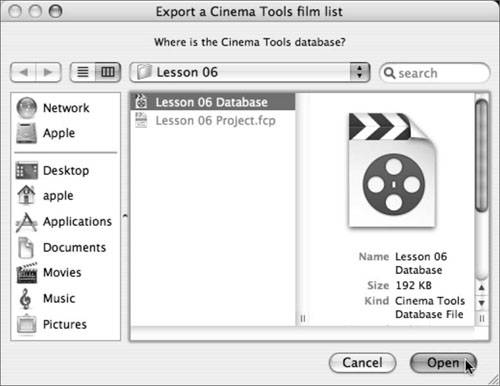
 | 31. | Navigate to the Lesson 06 folder, choose Lesson 06 Database, and click Open.
 | 32. | In the Save The Film List As dialog, click Save.
| 33. | Enter SUFR_Cinema ToolsFL_version01 in the Cinema Tools Program File Save As dialog box, and click Save.
The film list opens in a Viewer window in Final Cut Pro. It is a read-only file, but you can copy and paste the text file into a text application and save and print it.
Tip Information in the lists must be very easy to read, so always use a monospaced font such as Arial or Courier for printing and displaying information. Your negative cutter needs to easily distinguish between letters and numbers. |
Compare and Review Whenever you export your film list, compare the window burns of your key or ink numbers to those in the film list. This is an extremely important step, because it helps you catch errors in the film list. Double-check the codes with special care if you don't plan on conforming a work print. If your sequence includes speed changes, make sure you check the keycode numbers assigned in the motion effects list against the window burn. Where a number is inaccurate, update the film list and save the changes. Open the exported cut list you just made and compare the keycode numbers listed in the cut list against those in the Scene 4 edited sequence. Since you have the Timeline displaying feet and frames, you can also check the running time of your sequence against the cut list. 1. | Scroll down SUFR_FilmList_version01 in Final Cut Pro until you see the heading showing the cut list in construction order.
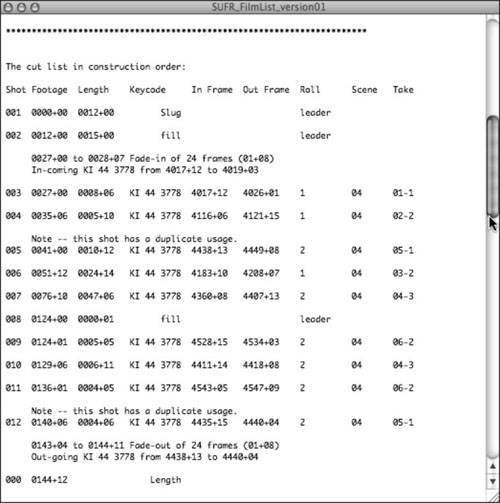 Compare each shot in the Scene 4 Timeline to the shots and information in the cut list. Compare each shot in the Scene 4 Timeline to the shots and information in the cut list.
| 2. | Place your playhead at the beginning of the Timeline.
| 3. | Look at the Shot 001 in the cut list, then look at shot 1 in the Scene 4 sequence.
Does your footage counter in the sequence and in the cut list begin at 0000+00?
| 4. | In the Timeline, press the down arrow key to jump the playhead to the beginning of the next clip.
Is the Timeline feet and frames displaying 0012+00? That should match the length of the first event in the cut list.
| 5. | Continue comparing the events in the cut list to those in your Timeline.
| 6. | Look at the keycode numbers on the window burns of the clips in the Canvas.
Do they match the keycode numbers displayed in your list?
 This type of error checking may seem tedious, but it will ensure a successful conform. This type of error checking may seem tedious, but it will ensure a successful conform.
|
Finding and Fixing Missing Elements If you encounter missing elements in your cut list, you will need to find and enter the missing information. To find the database record, look at your clips in the List View window, and click the Clip name field to sort by the name of the clip, if the clip name appeared in the missing elements list. If your clip names include the scene identifier, you will be able to use Slate to search for the record, as well as use the Find command in Cinema Tools. 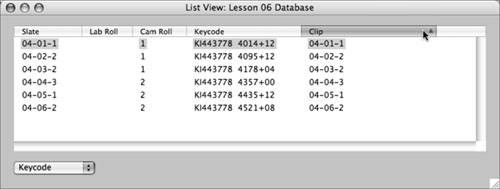 You can use reel and timecode to look for a record. In List view, choose Video from the pop-up window. The timecode in the missing elements list may not match the timecode in the database because the timecode in the database lists the first frame of timecode, but don't worry about it. Just make sure the timecode fits within the range from the In point and doesn't exceed the duration of the clip. 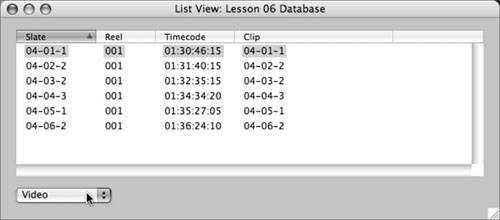 If no database record exists, you will need to create a new record and connect the clip. Just open it in a clip window, click Identify, and enter the information for that clip. 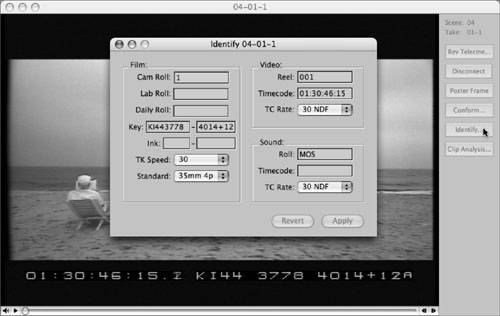 Change Lists In a traditional film workflow, you export an initial film list, assemble a work print, screen the conformed film, and finally decide what changes to the film are needed. In Final Cut Pro, the process is reversed. The edited sequence is changed to reflect the decisions made during the screening, and a change list is exported from the edited sequence. The negative cutter or film assistant then makes changes to the work print. Another screening take places, and further changes to the conformed film are decided on. This process continues until the film is finally locked. The changes made to your edited sequence since your initial film list export appear in the change list. You can also use a change list to generate a change pull list and a discard list. A change list compares the first video track from a previously exported list to the first video track of the changed sequence. It doesn't look at any other track. You will see optical effects and gaps described as leaders in a change list. This description is useful and enables you to keep sync while an optical is being made. Tip If you need to alter a Cinema Tools database between exporting lists, make sure you re-export the list from which you had seen the errors. That way you will ensure your change list integrity. For example, if you exported an initial cut list, found database errors, and fixed the errors in the database, you would need to re-export the cut list again. That way your cut list will include the database fixes, and all subsequent change lists will be accurate.
1. | Duplicate the Scene 4 sequence, and name the duplicated sequence Scene 4 Version 02.
| 2. | Trim some of the edited clips in the duplicated sequence. Exactly what you do isn't important; the goal here is just to make some changes.
| 3. | Type 0161+00 in the feet and frame counter in the Timeline, and press Return.
| 4. | Delete the extra clip at the playhead position.
 | 5. | Choose File > Export > Cinema Tools Change List.
| 6. | Select the SUFR_Cinema ToolsFL_version01 Cinema Tools program file you created earlier.
The Change List dialog opens.
 Note Keep the Film Standard, Telecine Speed, Show Key Code, and Start With 8 Seconds Of Leader values the same as your original cut list. This is essential to exporting an accurate change list. | 7. | Choose All Are Cuts from the Transitions pop-up menu.
 When you export a change list, choose All Are Cuts whether the transitions are of standard length or not. Cinema Tools will insert notes describing the transitions. These notes will include where and how the transitions should be represented on the work print.
Remember, this is a change list; it doesn't need to describe every event that led up to the changes.
| 8. | Deselect the Dupe List and Optical List check boxes from the list selections.
 | 9. | Select all check boxes in the Change List Options:
 - Include Pull List This will include any new shots that need to be added.
- Include Discard List This will list any shots that need to be removed.
- Show Only Changes Select this option to display new edits only. However, if the Cut List check box is selected, the original cut list is included in the Show Only Changes list file. This means all footage from the sequence, both changed and unchanged, will be included.
- Combine Deletions This is a very useful option because it will regard footage deletions that are continuous as one shot instead of a series. A film assistant will remove a series of pieces as one piece and store them intact. This saves you time because you won't need to store a series of shots.
| 10. | Click OK, and enter SUFR_ChangeList_version01 for the change list name.
| 11. | Enter SUFR_Cinema ToolsFL_version02 for the Cinema Tools program file name.
Remember, this is the second version of your Cinema Tools program file.
| 12. | Click Save.
| 13. | Scroll down the change list, and stop when you reach the heading labeled The Cut List In Construction Order.
| 14. | Compare your cut list construction order against your new sequence. Check that everything is correct.
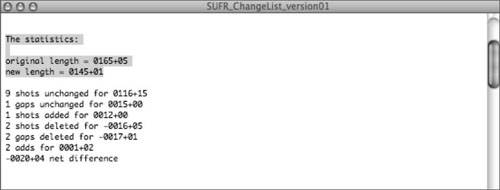
| 15. | Scroll up to the statistics heading. You will see figures for original length and new length.
 | 16. | Compare the new length to the length of your sequence.
Tip As long as you have the exported Cinema Tools program files (.pgm), you can export a change list directly from Cinema Tools. The dialog in the change list from Cinema Tools is more straightforward and only includes Change List options specifically applicable to changes. This is useful if another editor or assistant is working on your Final Cut Pro project, or if you need to re-export a change list without opening FCP. |
Reel Balance You may need to reapportion the footage on your reels to ensure the length of each reel is in the correct range. For 35mm film, the range is 10- and 20-minute reels, which translates into 1,000- to 2,000-foot reels. In 16 mm film, you will work with 10-minute, 400-foot reels. Always ask what length the negative cutter prefers. Whenever you reel balance, you are deleting and adding equal amounts of footage. To maintain an accurate cut list, you need to perform the reel balancing edits separately from other changes you may make. Let's say that during your changes you discover that you need to make a reel adjustment and reel balance. Here is how to move a scene from the tail of one reel to the head of another: Complete your initial changes, and conform the film on the two reels to the change lists exported from their associated sequences. In Final Cut Pro, delete the scene from the tail of sequence 1, and move it to the head of sequence 2. Export new change and cut lists for both sequences. Use the new change and cut lists as guides for balancing the two reels.
|


 You will notice that there are two transitions and some duplicate frames showing in this sequence. Later in the exercise, you will see how these elements are displayed in the film list.
 Leaving the name of the sequence as the title will help you identify which sequence you exported this cut list from.


 This is an example of a double usage warning list.


 It's easier to view and compare the film list in a Final Cut Pro window. Although you can't print or save changes to the list, you can edit the document and then copy and paste the text to a text application.
 This is an example of a cut list, also called an assembly list.
 This is an example of a foreground layer cut list.
 This is an example of a dupe list.
 This is an example of an optical list.
 This is an example of a transition effects list.
 This is an example of a pull list.
 This is an example of a scene list.
 This is an example of an optical scene list.

 Compare each shot in the
  This type of error checking may seem tedious, but it will ensure a successful conform.
