Section 18. Modifying Text Frames
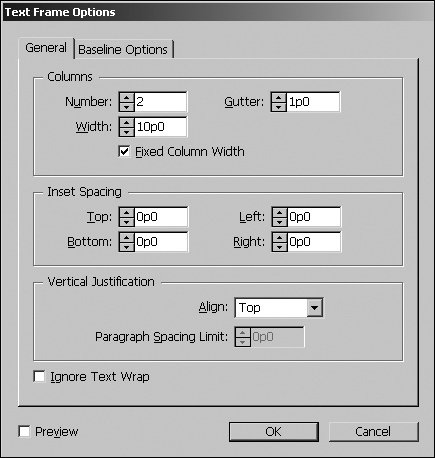
#18. Modifying Text FramesSo what good are text frames, considering that you can't see them? While their primary purpose is to contain text, you can also modify text frames to complement your layout. A magazine article, for example, generally features a rectangular text frame with a stroke around it, two columns of text inset from the edges of the stroke, and possibly a fill (background color). To achieve these effects, you can control the positioning of text within text frames (specifying the number of columns, for example), and you can format text frames like any other object (applying a stroke, fill, and drop shadow, for example). To format text frames, select them with the Type tool, the Selection tool, or the Direct Selection tool. Setting Up ColumnsTo modify the number of columns in a text frame, select the frame and choose Object > Text Frame Options. In the Columns area in the General panel (Figure 18) work as follows: Figure 18. The General panel in the Text Frame Options dialog box lets you specify the position of text within the frame.
Specifying Text Inset and Vertical AlignmentThe General panel in the Text Frame Options dialog box (Object menu) also lets you adjust the amount of space between the edges of a text frame and the text. The need for this value is not apparent, however, until you stroke the edges of a frame or apply a fill to it and realize that the text is touching the edges of the frame. To adjust text inset, type values in the Top, Bottom, Left, and Right fields in the Inset Spacing area. Note For nonrectangular text frames, such as elliptical text frames, you can only have one inset value. For even more control over the placement of text within a frame, you can specify how the text is placed vertically in the General panel in the Text Frame Options dialog box. For example, you can specify that text is centered vertically within the framean option that works well for cards, invitations, ads, and so on. Formatting Text FramesTo see a text frame in a layout, you can apply a stroke to its edges, apply a fill or gradient, add a drop shadow, and more. For more information, see #60, #61, and #64. Using the Baseline GridA baseline grid consists of horizontal lines that text "sits" on. Setting up a baseline grid for an entire document or an individual text frame makes it easy to align text horizontally across columns regardless of varying leading and spacing values before and after paragraphs. Generally, the distance specified between gridlines in the baseline grid is the same as the leading value for body text (around 12 points, for example). Some graphic designers swear by the baseline grid for carefully positioning text, whereas others sneer at its use, likening it to a paint-by-the-numbers painting. You can set up a baseline grid for a document in the Grids panel in the Preferences dialog box. In addition, individual text frames can have their own grids set up in the Baseline Options panel in the Text Frame Options dialog box (Object menu). Once you set up a baseline grid, you still need to "snap" paragraphs to it by selecting them and clicking Align to Baseline Grid in the Paragraph palette or Control palette. The View > Grids & Guides submenu lets you show and hide the baseline grid. |
EAN: 2147483647
Pages: 142
