|  Viewing the Planning Center 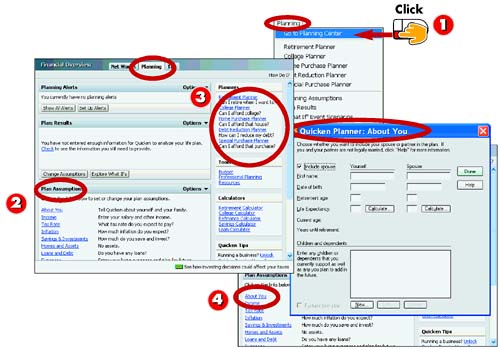 -
 | Choose Planning, Go To Planning Center . | -
 | Quicken opens the Planning Center window. The Plan Assumptions area displays information about you and your finances and links to enter more information. | -
 | All of Quicken's built-in planner tools are listed in the Planners area. | -
 | You can click a link to open a dialog box for entering detailed information for goals and events. | INTRODUCTION Quicken's Planning Center provides access to a variety of planners, such as the Tax Planner and the Retirement Planner, as well as specialized calculators and other tools to help you make the most out of your financial goals and plans. After setting up a plan, you can view up-to-date information on the Planning Center page to find out how well your plan is working. |
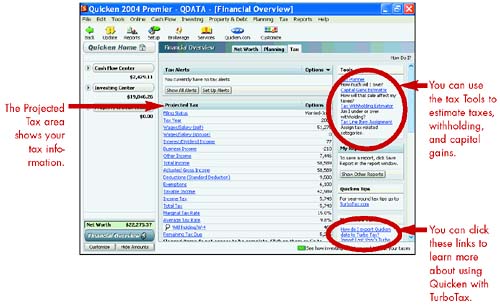
Viewing the Tax Center 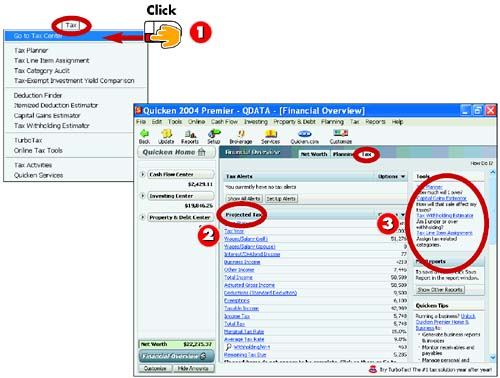 -
| | Choose Tax, Go to Tax Center . | -
| | Quicken opens the Tax Center window. The Projected Tax area summarizes your tax information. Be sure to scroll down to view all the information. | -
| | You can access Quicken's tax tools in the Tools area on the right. | INTRODUCTION You can use the Tax Center to access a variety of tax-related tools and features in Quicken. The page offers several areas for viewing tax-related data, such as a tax calendar, tax- related expenses, taxable income, and more. Take time to explore all the features to find out which ones will be of most benefit to you. |
HINT Planning Center You can also access the Tax Center from the Planning Center page; just click the Tax tab. |
Estimating Taxes Using the Tax Planner 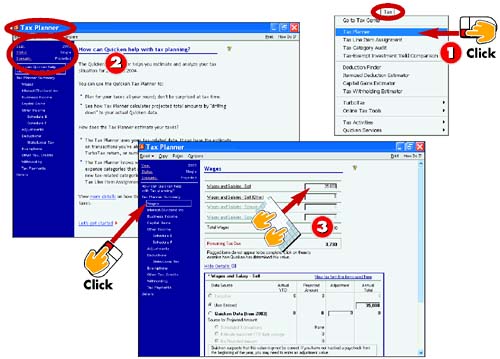 -
| | Choose Tax, Tax Planner . | -
| | Quicken opens the Tax Planner window. Check to make sure the correct tax year and filing status are displayed. | -
| | Click the Wages link and type in your wages. You may need to click the Show Details link to view all the settings. | INTRODUCTION You can use Quicken's Tax Planner to estimate your federal taxes. The Tax Planner can help you estimate the amount you owe or the amount of refund you can expect. You can enter data into the Tax Planner using three methods : You can manually enter the data, use Quicken data already earmarked by tax-related categories, or download the data from TurboTax. The steps in this task focus on manually entering your own tax data into the Tax Planner. |
TIP TurboTax ? When you first start the Tax Planner, you may encounter a dialog box asking if you want to download TurboTax data. You can choose to do so if you already use TurboTax to calculate your taxes. |
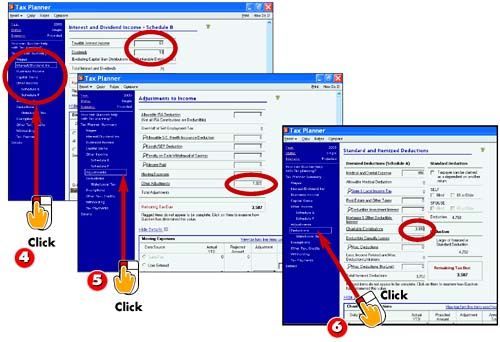 -
| | Click the Interest/Dividend Inc, Business Income, Capital Gains, or Other Income links to record any income you receive from other sources. | -
 | To make any adjustments to your gross income, click the Adjustments link and add any changes. | -
 | To calculate itemized deductions, click the Deductions link and estimate your deductions for expenses. | TIP Using Quicken Data If you've been faithfully recording tax-related transactions in Quicken, the program estimates your taxes based on previously recorded entries. When Tax Planner annualizes a category, it projects a full-year total for that entry based on the sum of the amounts for transactions entered to date. You can override any of the information by clicking a form link and changing the data. |
TIP Download Tax Data To import a TurboTax data file from a previous tax return, click File, Import, TurboTax . Select the file you want to import and click OK . Quicken asks you to confirm the data. |
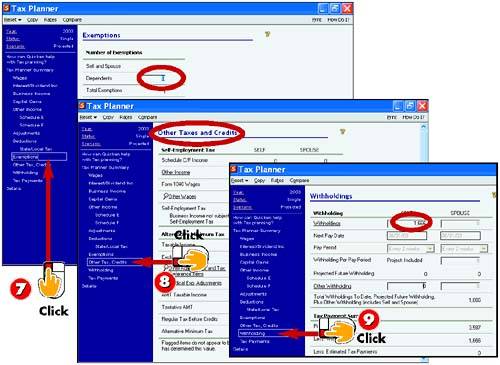 -
 | Click the Exemptions link and specify the number of dependents you want to claim. | -
 | Click the Other Tax, Credits link to enter any other taxes you intend to pay in addition to federal income tax. | -
 | Click the Withholding link and record how much money you have paid through federal withholding. | INTRODUCTION To enter data into the Tax Planner, you can use the links in the left pane of the Tax Planner window to open forms for recording data. You can randomly view forms by clicking a link, or you can proceed through each form in order by clicking the Next link that appears at the bottom of each form. |
HINT Viewing Scenarios You can use the Scenario link in the Tax Planner window to enter data for different tax scenarios and save the scenarios. You can then use the Compare button at the top of the Tax Planner window to compare your scenarios. |
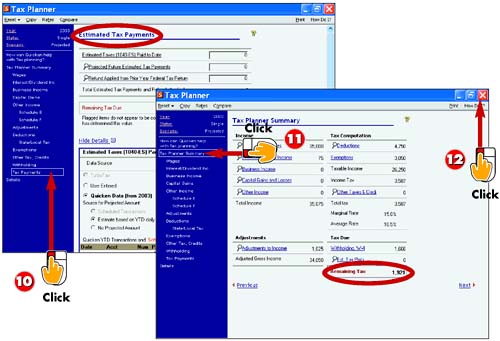 -
 | If you pay estimated taxes, click the Tax Payments link and record your estimated payments. | -
 | After completing each form, as needed, click the Tax Planner Summary link. You can review your estimated taxes. | -
 | When you finish using the Tax Planner, click the Close button to close the window. | TIP Starting Again When you exit the Tax Planner and later restart it, the Planner displays any tax-planning information you previously entered. To start fresh again, click Reset and click the appropriate reset setting in the list. |
TIP Tax Report To display the report of all tax-related income and expense transactions, choose Reports, Tax, Tax Summary . |
Setting Up Tax-Related Categories 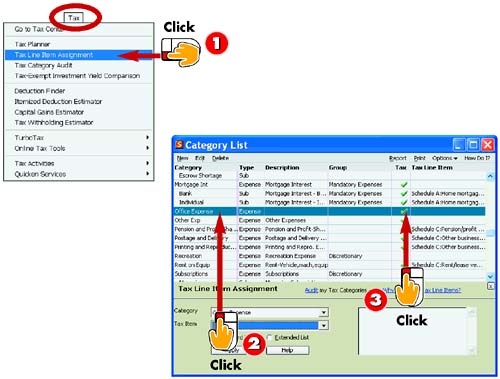 -
| | Click Tax, Tax Line Item Assignment . | -
| | Quicken opens the Category List window. Click the category you want to mark as tax related. | -
| | Click the Tax column and Quicken adds a checkmark to indicate that the category is tax related. | INTRODUCTION For Quicken to track federal tax information accurately, you must select the transaction categories to identify tax information and the correct tax form and line associated with the item. After you identify tax-related categories, Quicken can display a report showing all transactions using these categories. Use this information to reduce your tax preparation time. |
TIP The Tax Center Access all of Quicken's tax features in the Tax Center page. Click Tax, Go to Tax Center . To edit tax-related categories as shown in this task, you can click the Tax Line Item Assignment link. To open the Tax Planner, click the Tax Planner link. |
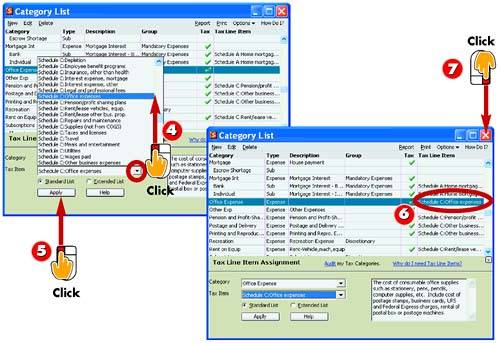 -
| | Click the Tax Item drop-down list and click the tax form and line to which the category applies. | -
| | Click the Apply button. | -
| | Quicken applies the form to the category. | -
| | Click the Close button to close the Category List window. | HINT Category Check By default, Quicken identifies many categories as tax related, such as the Salary and Charity categories. You should double-check to ensure all tax-related categories are marked properly, especially if you've created any categories or subcategories . |
Finding More Tax Deductions 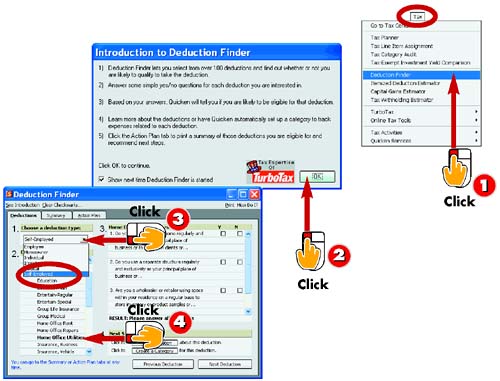 -
| | Choose Tax, Deduction Finder . | -
| | If you see the Introduction to Deduction Finder dialog box, click OK . | -
| | Make a choice from the 1. Choose a Deduction Type drop-down list. | -
| | Click a choice under 2. Choose a Deduction . | INTRODUCTION You can use Quicken's Deduction Finder to look for potential tax deductions; you may find that you should have been itemizing your deductions all along! The Deduction Finder asks you a series of questions. You respond to the questions to find deductions for which you may be eligible ”called your action plan. |
TIP Oops! You can click the Clear Checkmarks button at the top of the window to clear all your answers and start again. |
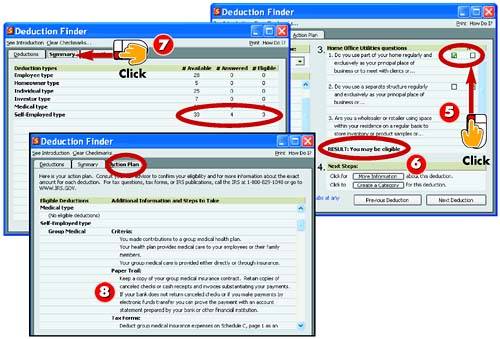 -
| | Click the Y or N check box to respond to each of the questions listed. | -
| | Quicken evaluates your answers. Repeat steps 3 “5 to research additional deductions. | -
| | Click the Summary tab to review a tally of available deductions. | -
| | Click the Action Plan tab to review your action plan. When finished, click the Close button. | HINT More Info To learn more about a deduction, click the More Information button at the bottom of the Deduction Finder window. |
TIP The Action Plan The Action Plan tab in the Deduction Finder window lists potential deductions for you. Review each of these deductions and click the Print link to print the action plan for tax time. |
Organizing Emergency Records 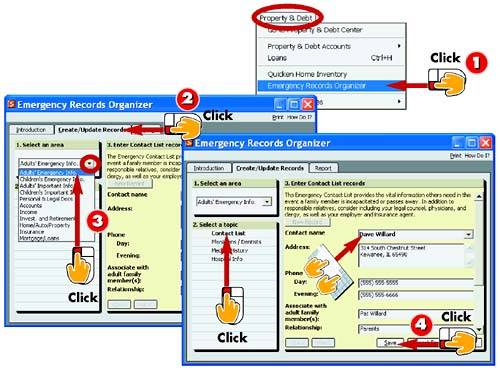 -
| | Choose Property & Debt, Emergency Records Organizer . | -
| | Click the Create/Update Records tab. | -
| | Make a choice from the Select an Area drop-down list. | -
| | Click a Select a Topic choice, enter record information, and click Save . | INTRODUCTION Quicken's Emergency Records Organizer tracks information about people to contact in case of emergency, medical history information, locations of legal documents, details about property you own, and so on. Start by entering a record for each piece of information, as follows . |
HINT Privacy Alert The records you enter might contain very sensitive or private information. To keep it secure, create a new Quicken data file, enter the Emergency Records Organizer information, and assign a password to the Quicken file. |
TIP Editing a Record To find a particular record, click the Next or Back button on the Create/Update Records tab. Make your changes and then click Save . |
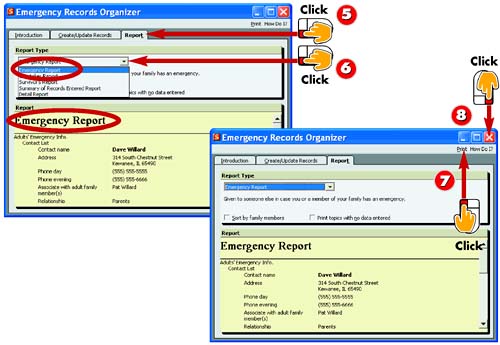 -
| | After repeating steps 3 and 4 to add all records, click the Report tab. | -
| | Select a report type. The report appears at the bottom of the tab. | -
| | Click Print to print the report. | -
| | Click the Close button to close the Emergency Records Organizer window. | TIP Update You should update your emergency information at least twice a year or whenever you make a change, such as opening a new bank account. To delete a record, display the topic and click the Delete button. |
TIP Organize Household Items Quicken has another tool you can use to organize assets in your home. Choose Property & Debt, Quicken Home Inventory to open the Home Inventory database to list items, their value, and replacement costs. |
 |