10.2. Bitmap Filter Effects Although the performance bump you gain from using bitmap caching would be enough for many to justify the feature, there are additional benefits that stem from its use. For example, once you start treating your movie clips like bitmaps, it's possible to apply real bitmap effects to those movie clips. Flash 8 contains seven bitmap filter effects: Drop Shadow Blur Glow Bevel Gradient Glow Gradient Bevel Adjust Color
If you have a reasonable amount of experience with bitmap-editing applications, such as Adobe Photoshop, you will likely be familiar with these types of effects. (In Photoshop, these features are called Layer Styles.) Applying them in Flash is an easy process that involves selecting an appropriate movie clip (runtime bitmap caching must be enabled), choosing the effect of your choice, and assigning its parameters. More than one filter can be applied to a single movie clip. For maximum flexibility, filters can be created, changed, or removed at runtime using ActionScript. If preferred, filter parameters can also be assigned without any scripting using the Filters tab of the Properties panel. 10.2.1. Using the Properties Panel Start out by adding a drop shadow to the Box Guy animation you created in Chapter 6: Open box_guy_complete.fla, located in the 06 folder of your working directory. To keep your files separate and grouped by topic, save the open file as box_guy_shadow.fla in the 10 folder. In frame 1 of the box_guy layer, select the Box Guy movie clip. In the Properties panel, enable runtime bitmap caching. This is not strictly necessary, because adding a filter to a movie clip automatically enables this feature. However, it is not reflected in the interface, and this step may help you remember that, although you're working with a movie clip, this is still a bitmap rendering process. Select the Filters tab in the Properties panel. In the upper-left corner, click and hold the plus sign (+) to open the Add Filter menu. Select Drop Shadow from the menu. The editable area of the Filters tab will refresh to show you the parameters available to the Drop Shadow filter, as seen in Figure 10-2. The standard Color chip allows you to set the color of the shadow. Distance represents the number of pixels the shadow will be from the movie clip. The Angle parameter dictates the angle at which a virtual light source will shine, thereby casting the shadow. Blur X and Blur Y are the amount of spread, or blurriness, of the shadow along each axis. Strength is similar to alpha opacity, and determines how dark the shadow will be. Finally, in simple terms, Quality determines how accurately the shadow will render. (Don't worry about the three checkbox settings on the right. You'll learn about those in a moment.) Configure your settings to match Figure 10-2. Save your work and test your movie.
Figure 10-2. The Filters tab of the Properties panel, showing the parameters of a Drop Shadow filter 
When previewing your movie, the first thing you should notice is that Box Guy not only has a shadow, as seen in Figure 10-3, but it animates right along with him. The filter is rendered every step of the way, making the shadow appear accurate in each frame of the movie clip. Figure 10-3. Box Guy with a standard drop shadow applied 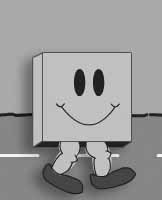
If you followed the prior steps exactly, you may also notice an unexpected occurrence: the shadow disappears over the duration of the animation. This is because filter effects themselves can also be tweened. This feature makes it possible to create interesting, more realistic effects with moving light sources, distance, and so on. In this example, make sure the filter stays consistent: Select Box Guy in the last keyframe of the tween and again match the Drop Shadow settings to those seen in Figure 10-2. Save your work and test your movie.
Now Box Guy's shadow should remain consistent throughout the animation. The shadow adds depth, but it's not very realistic unless Box Guy happens to be walking very close to a wall. Since there's no wall in your animation, the shadow seems unnatural. However, a great filter option allows you to greatly improve this effect. Previously, you temporarily disregarded a trio of additional features of the Drop Shadow filter. These three features, indicated by the checkboxes on the right in Figure 10-2, allow you to create additional special effects using Drop Shadow, as well as a few other filters. Figure 10-4 shows examples of the use of three filters and their special features. Rows A, B, and C show the Drop Shadow, Glow, and Bevel filters, respectively. Figure 10-4. Examples of common options available to three filters 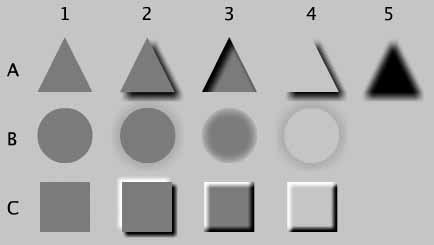
Here are the effects applied in each column of Figure 10-4: Column 1 shows the original, unaffected movie clips. Column 2 shows the basic Outer effect: shadow, glow, and bevel are applied outside the original clip. This is the default behavior for the Drop Shadow and Glow filters. Column 3 shows the Inner effect, where the filter treatment is applied inside the movie clip dimensions. Column 4 shows the Knockout effect. In this case, the filter is rendered using your Inner or Outer effect preference, but the original movie clip is removed, knocking out any underlying effect. This is best illustrated by the partial shadow in row A. The angle setting of the filter displays the shadow down and to the right. The Knockout effect removes any shadow that would have been hidden beneath the original clip. This effect is great for creating instant accents from bitmaps. A knockout drop shadow atop a bitmap would make it appear as though a portion of the bitmap had been extruded. A knockout glow could be used to highlight an area of an image or interface. A knockout inner bevel creates an instant button when placed on top of a bitmap, making it possible to reuse the shape over and over without any additional bitmap overhead. Finally, column 5 shows the Hide Object effect, unique to the Drop Shadow filter. Similar to the aforementioned Knockout effect, Hide Object hides the original movie clip, but it does not further affect the shadow. This makes it possible to create standalone shadows from any movie clip, as you'll see in the next part of this project.
10.2.1.1. Shadows with perspective In the previous exercise, a standard filter application gave Box Guy a distinct 2D shadow appearance. In the next exercise, you will duplicate Box Guy and apply filter effects to the duplicate. In this way, you can make the character and his shadow independent of each other and distort the shadow to give the appearance of perspective. In just a few steps, you will skew a copy of the movie clip, give the copy a drop shadow, and then hide the object in the copy, leaving only the shadow behind. These steps are illustrated in Figure 10-5. You can then create a new symbol from the two copies of Box Guy and tween it as before. Within the new symbol, both copies of Box Guythe traditional movie clip and its shadow-only counterpartwill move, creating a more realistic synchronized shadow animation. Figure 10-5. Three stages of Box Guy's improved shadow: after skewing and positioning (left), with drop shadow enabled (middle), and with the Hide Object option enabled (right) 
Here's how to create the effect shown in Figure 10-5: Begin by closing any previous files and opening box_guy_shadow_p_01.fla, located in the 10 folder. The p stands for perspective, and by starting this project anew, you will be able to compare the two shadow techniques. As you can see, this file is the same as the previous files, except that there is no motion tween. Save this file as box_guy_shadow_p.fla in the 10 folder. Select the Box Guy movie clip in the first frame and duplicate it using Ctrl/Cmd-D. Using the Free Transform tool, select the duplicate and skew it. (You can skip ahead and do this numerically in step 6 if you wish, but it helps to practice with the tools until you feel very comfortable with them.) Position your cursor near the top center handle. You will see the skew cursor feedback, in the form of two parallel horizontal arrows, as seen in Figure 10-6. Position your cursor just to one side of the top center handle to avoid the familiar scale cursor of two vertical end-to-end arrows. Similarly, avoid the cursor feedback of the circular rotation arrow, which means you've strayed too near a corner handle. Once you're satisfied with your cursor position, drag the cursor to the left until your mouse reaches the former position of the left corner handle. (Don't worry; it doesn't have to be exact.) Figure 10-6. Using the Free Transform tool to skew the duplicate of Box Guy that will eventually become his shadow 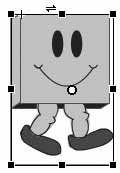 Next, scale the movie clip vertically. This time grab the top center handle closely, being sure you see the vertical end-to-end scale arrows. Scale down the movie clip to approximately two-thirds its prior height. Reposition the duplicate so its feet touch the feet of the unaltered Box Guy. If necessary, use Modify  Arrange Arrange  Send Backward to put the skewed copy below the original clip. Send Backward to put the skewed copy below the original clip. Save your movie. If you want to check your work, your file should now resemble box_guy_shadow_p_02. All that remains is to add the shadow effects and tween a new symbol. Select the duplicate clip and the Filters tab in the Properties panel. Match the settings to those in Figure 10-2 again, but this time enable the Hide Object feature. Your character and shadow should now look like the final stage in Figure 10-5, and your file should be similar to box_guy_shadow_p_04. Select both the original and shadow clips and use Insert  Convert to Symbol to create a new movie clip. Convert to Symbol to create a new movie clip. When you're finished, save your work and test your movie. It should now resemble box_guy_shadow_p_complete. Box Guy will walk down the street again, this time accompanied by his animated shadow in a more realistic perspective.
Now that you know how to add filter effects using the interface, move on to the ActionScript needed to do so on the fly at runtime. 10.2.2. Using ActionScript Having access to filter effects through the interface is great for non-scripters and rapid prototyping by designers. However, like many other Flash features, manipulating the filters at runtime, using ActionScript, can add a whole new dimension to your projects. Unlike with anything you've done so far, the first step required when scripting filters is to import the filters class you want to work with. A class is a way of defining a custom data typein this case, a filterwith the related functions, properties, variables, and similar code structures that go along with it. Some classes are built into Flash, but others, including all classes you define yourself, exist in external class files or packages, which are collections of more than one class. With a little time, and additional resources, you will soon become comfortable with the object-oriented structure of ActionScript 2.0 and later. A detailed look into ActionScript is beyond the scope of this book, but the newest editions of Colin Moock's Essential ActionScript and ActionScript: The Definitive Guide (O'Reilly) are highly recommended. An in-depth look at ActionScript will reveal more about its underpinnings, but for the time being, think of external classes and packages this way: no additional steps are required to use the MovieClip class because it's already tightly integrated into the Flash environment in which you're working; however, some featuresparticularly new and user-defined featuresmust be loaded before they become available to the programmer. | Arrays | Up to this point, you've only been able to store one value in a given variable. Moreover, if another value was applied to the variable, the previous value was discarded (or overwritten, if you will). Consider this example: var myNum:Number = 1; myNum = 2;
The final value of the myNum variable is 2, because its value was reassigned in the second line of the example code. However, there are many situations in which you would be better off if you could store multiple values in a single variable. Consider lists that you make in everyday life, such as shopping lists. Think of the listor the paper it's written on, if you preferas a variable. The shopping list contains many different items. Now imagine if you had to create a separate variable to hold every item. That is, imagine if you had to write each item that you would otherwise have put in a single list on a separate piece of paper. In one small way, this analogy illustrates the usefulness and efficiency of lists. In ActionScript, as in most languages, a list is called an array. Any time you want to store more than one value in a variable, that variable must be an array. For example, the bitmap filter effects discussed in this chapter are applied in an array. If you only wanted to apply one filter at a time, it might make sense to say something like: myMovieClip.filters = myDropShadow;
But this simple syntax would not work if you wanted to apply two filters. For instance, what if you wanted to apply both a drop shadow and a bevel to the same movie clip? To accomplish this, you need to use an array. Using an array allows you to say something like: myMovieClip.filters = [myDropShadow, myBevel];
The brackets in this syntax enclose the array items. Once a variable is defined, you can also use brackets to set or get an array's values, as shown here: var my_array:Array = new Array(); my_array[0] = "Flash"; trace(my_array[0]);
The first line creates a new array object using the same static data typing approach that you have used in the last few chapters. The second line sets the first value of the array as the string "Flash." Finally, the third line gets the first value from the array and displays it in the Output window. You may have noticed the 0 in the brackets in the preceding code example, and wondered why a 1 wasn't used instead. This is because ActionScript arrays are zero-based, meaning that the first value is referenced by an array index of 0, not 1. If a 1 were used in the prior example, it would refer to the second item in the array. Most programming and scripting languages use this approach, including C, C++, C#, Java, JavaScript, Perl, PHP, and more. There are a few benefits of zero-based arrays, but space limitations don't allow a detailed look into the topic. The most common rationale is that an array index describes the number of items offset from the first item in the array. Therefore, the first item must have an index of zero. This can take a bit getting used to if you have experience in languages that use one-based arrays (such as BASIC, Lingo, or AppleScript), or if you haven't yet thought beyond simple everyday counting, where the "first item" is item one. However, if you embrace zero-based arrays, you will find it much easier to code in languages that you may want to use in conjunction with your Flash projects (such as JavaScript and PHP). At the time of this writing, one property and a dozen methods were used to work with arrays in ActionScript, in addition to the bracket-index syntax described previously. In the interests of space, only the four most commonly used are discussed here. The lone property, length, is a read-only property used to determine how many items are in an array. Counting the number of items in an array is not affected by the fact that the array is zero-based. For instance, a three-item array would have indices 0, 1, and 2, but it would still have three items. Continuing with the previous code, tracing the length of the array my_array would put 1 in the Output window, because the array has one value: the string "Flash." The following code samples will use comments to indicate Output window results. You can trace the length of an array like this: trace(my_array.length); //1
You can add an item to the end of an array using the push() method: my_array.push("ActionScript"); trace(my_array); //Flash, ActionScript
And you can sort an array using the sort() method: my_array.sort(); trace(my_array); //ActionScript, Flash
By default, the sort() method sorts arrays alphabetically. This can yield unexpected results when sorting numbers. Consider the numbers 3, 20, and 100. Sorted alphabetically, these numbers would be ordered 100, 20, and 3. Case sensitivity can also play a role when sorting strings. For a deeper understanding of these issues, look into array constants such as Array.NUMERIC and Array.CASEINSENSITIVE. Finally, you can remove the last item of an array, and return its value, by using the pop() method: trace(my_array.pop()); //Flash trace(my_array); //ActionScript
In this final example, pop() removed "Flash" because it was the last item in the sorted, two-item example array, leaving only "ActionScript." Arrays are very useful and make a powerful addition to your programming skills. If you want to learn ActionScript, take some time to practice with arrays at your earliest convenience. |
You can work directly with a specific external class by specifying its fully qualified name, which includes a path to the external file where the class is defined. However, you can simplify this by importing the class, or one or more packages of classes, so that you can thereafter refer to the class only by its class namejust as you would a function. For example: Open dynamic_filters_01.fla, located in your 10 folder, and save it as dynamic_filters.fla in the same folder. This file contains two copies of a movie clip that will serve as buttons, created dynamically via filters. They each already have instance names. In frame 1 of the actions layer, add the following script. This imports the BevelFilter class and allows you begin working with it: import flash.filters.BevelFilter;
Next, create a filter object, or instance of the BevelFilter class, by defining its parameters: var bvFilter:BevelFilter = new BevelFilter(5, 135, 0xFFFFFF, .8, 0x000000, .8, 10, 10, 1, 1, "inner", false);
This creates a bevel distance (or depth) of 5 pixels, an angle of 135 degrees, a highlight color of white with an alpha of 90%, a shadow color of black with an alpha of 80%, a blur x and blur y of 10 (softening the bevel edges a bit), and a strength and quality of 1 (or 100%). Finally, it specifies a bevel type of inner, and no knockout effect. If it were only possible to add one filter to a movie clip, assigning it to the clip would be relatively straightforward. However, it's quite common to use more than one filter. For example, you may want to blur or bevel a clip and still have it cast a shadow. To accommodate the need to add more than one filter to a clip, you must make use of an array. As described in the " Arrays" sidebar, an array is a type of data that can contain more than one value. Think of a database, phone book, or shopping list as an array. These everyday things would be unmanageable if a separate data structure, like a lone variable, was required to store each piece of relevant information. An array lets you store many pieces of information, of many different types, in a single object, like a variable. For a closer look at this data type, take a look at the sidebar. All you need to know about array syntax for this example is how to store information in an array. There is more than one way to do this, but this project will use arrays that you write out explicitlymultiple items, separated by commas, enclosed in brackets. Because it's possible to use more than one filter, the array syntax is used even when only one filter is required. This makes the syntax consistent, and makes it is easier to add additional filters later. To see how arrays work, pick up where you left off: Assign the new filter object created in step 3 to the filters property of the first button, filterButton1_mc: filterButton1_mc.filters = [bvFilter];
This starts the button off with the bevel properties you assigned when creating the filter object in step 3. Next, create button event handlers that will trap the mouse press and release events. Within each, change the angle property of the Bevel filter. This will cause the highlight and shadow areas to change, making it look like the button has been pushed in from an up bevel state to a down bevel state. In addition, because you are changing a property of the bevel object, be sure to update the filters property of the movie clip: filterButton1_mc.onPress = function():Void { bvFilter.angle = 270; this.filters = [bvFilter]; }; filterButton1_mc.onRelease = function():Void { bvFilter.angle = 135; this.filters = [bvFilter]; };
Save your work and test your movie. If you want to compare your work to the source provided, your movie should now be similar to dynamic_filters_02.fla.
You should see a beveled button on the left, and a normal movie clip on the right. Pressing the button on the left should cause the bevels to invert, making it look like the button is being pressed into the Stage. 10.2.2.1. Adding a second filter Now it's time to see what is required to add more than one filter to a movie clip. In the next portion of the project, you will add a shadow and a bevel to the second button. Because you're now also working with the Drop Shadow filter, this, too, will have to be imported. One of the conveniences of bundling more than one external class in a single package is that you can import the entire package at once. And, since only those classes used in your file will be compiled into your final .swf, it's not inefficient to import all the filters even though you're not using Blur, Glow, or the others. To import all the classes in a single package, use an asterisk (*) in place of a specific class name, as a wildcard. In the first step of this next section, you'll change the first line of your existing script. For the remaining steps, add all code to the end of your script: Change line one of your current script to import all filters, rather than just the bevel filter. import flash.filters.*;
Continuing on at the end of the existing script, create a shadow filter object and assign its properties: var dsFilter:DropShadowFilter = new DropShadowFilter(7, 135, 0x000000, .5, 10, 10, 1, 1, false, false, false);
This creates a shadow distance of 7 pixels, an angle of 135 degrees, a shadow color of black with an alpha of 50%, a blur x and blur y of 10 (softening the shadow edges a bit), and a strength and quality of 1 (or 100%). Finally, it specifies not to use the inner type, not to use a knockout effect on the clip, and not to hide the clip.
Note: Steps 24 are very similar to the previous BevelFilter instructions. In fact, there are only three departures: the variable name and parameters will change, you will be manipulating a different property, and you will be adding two filters instead of one. However, the processes for each of these steps remain the same as in the previous example.
Add both filters (using the same array syntax, separating them with commas) to the second button: filterButton2_mc.filters = [dsFilter, bvFilter];
Finally, create the same button event handlers, remembering to reapply the changes to the filters property each time. However, this time, change the distance of the shadow: filterButton2_mc.onPress = function():Void { dsFilter.distance = 0; this.filters = [dsFilter, bvFilter]; }; filterButton2_mc.onRelease = function():Void { dsFilter.distance = 5; this.filters = [dsFilter, bvFilter]; };
Save your work and test your movie. If you want to compare your work to the source provided, your movie should now be similar to dynamic_filters_03.fla.
The second button, when pressed, should reduce its shadow distance, making it appear as though the elevated button is being pushed against the flat Stage. Figure 10-7, Figure 10-8, and Figure 10-9 show the successive stages of the buttons. Respectively, they show no effects applied, initial up states, and down states on mousePress. Figure 10-7. Two buttons as they appear in authoring mode with no filter effects applied 
Figure 10-8. The same buttons seen in Figure 10-7, now showing their default states at runtime 
The left button has a Bevel filter applied with an angle of 45 degrees, while the right button has the same Bevel filter, but also a Drop Shadow filter applied. Figure 10-9. The same buttons seen in Figure 10-7 and Figure 10-8, now showing their appearance when clicked by the mouse 
|


 Arrange
  Send Backward to put the skewed copy below the original clip.