Easy VPN Remote Support for 6.x
Starting in FOS 6.2 and 6.3, a PIX 501 or 506/506E can perform the function of an Easy VPN Remote, initiating client connections to an Easy VPN Server, like a VPN 3000 concentrator, a Cisco IOS router, or another PIX or ASA security appliance. If you recall from Chapter 14, "3002 Hardware Client," and Chapter 18, "Router Remote Access Connections," the 3002 and 800, ubr900, and 1700 routers are also hardware clients. One advantage of setting up a low-end PIX as a Remote is that minimal configuration is needed on the PIX to establish an IPsec session to an Easy VPN Server; policies are centralized on the Server and pushed down to the Remote during IKE Mode Config, and individual users behind the PIX do not need to load an IPsec software client on their desktops.
Tip
A low-end PIX is an ideal hardware client for SOHO environments where you have a cable or DSL modem connection and need to use split tunneling; the PIX provides many security features to deal with the traffic that is not protected. It's my preferred hardware client in this situation. Also, the low-end PIXs can perform Server functions to handle a small number of Remote connections, which is ideal for the 23 users that need to work from home.
The PIX Remote supports many of the features of the Cisco VPN Client software and the VPN 3002, including:
- Pre-shared key and certificate device authentication
- Client and network extension modes
- Split tunneling and split DNS
- Backup server lists (6.3)
- AES encryption (6.3) and DH group 5 (6.3)
- Unit authentication (6.2), individual user authentication (6.3), and secure unit authentication (6.3), which is similar to Interactive Unit Authentication on the 3002
The following two sections will discuss the commands to configure a low-end PIX as a Remote and also an example configuration.
Note
Version 7.0 is not supported on the 501 and 506/506E PIX firewalls; only on the PIX 515/515E, 525, and 535. Therefore, it is not currently possible to configure a PIX (or ASA) running 7.0 as an Easy VPN Remote device.
6.x Easy VPN Remote Configuration
Like a low-end IOS router Remote device, configuring a low-end PIX Remote is straightforward and requires few commands. Use the following commands to set up the PIX Remote to connect to the Easy VPN Server:
pix(config)# vpnclient vpngroup group_name password preshared_key
pix(config)# vpnclient username XAUTH_username
 password XAUTH_password
pix(config)# vpnclient server Server_IP_address_1
 [Server_IP_address_2 ...Server IP address_11]
pix(config)# vpnclient mode{client-mode| network-extension-mode}
pix(config)# vpnclient mac-exempt MAC_addr_1 MAC_mask_1
 [MAC_addr_2 MAC_mask_2]
pix(config)# vpnclient management tunnel IP_address_1 subnet_mask
 [IP_address_2 subnet_mask]
pix(config)# management-access interface_name
pix(config)# vpnclient nem-st-autoconnect
pix(config)# vpnclient enable
pix(config)# vpnclient connect
pix(config)# vpnclient disconnect
The vpnclient vpngroup password command is used if the group on the Server is using pre-shared keys for device authentication; if you are using certificates, this command is omitted (requires FOS 6.3). Group names cannot exceed 63 characters and cannot contain any spaces; the pre-shared key cannot exceed 127 characters. For user authentication/ XAUTH (assuming it is enabled on the Server, which it probably is), if device, or unit, authentication is being used, you must define the Remote's username and password with the vpnclient username command. Neither the username nor the password can exceed 127 characters.
The vpnclient server command specifies one or more Server addresses the Remote should use to connect to the central site. The first address is the primary address, which can be followed by up to ten backup Server addresses (in 6.3, only). If the Server has a defined backup list, the PIX Remote will replace its list of backup servers with that given to it by the Server during IKE Mode Config. When connecting to a Server, if a Server is not reachable within five seconds, the Remote will try the next server in the list.
The vpnclient mode command specifies whether the PIX should use client or network-extension mode for the connection to the Server. When you configure client mode, your PIX must be a DHCP server for its inside interface, handing out addressing information to the connected SOHO devices. With client mode, the PIX also will perform PAT automatically on the SOHO IP addresses to the internal address assigned by the Server, for all local LAN traffic that needs to be protected across the tunnel to the central site. If you have IP Phones behind the PIX Remote, you must use network extension mode for the connection type. And if you've enabled either user authentication or IUA/SUA for the group the PIX Remote belongs to, on the Remote, you'll need to exclude any MAC addresses of IP phones and printers that need to initiate or send traffic across the tunnel, which is accomplished with the vpnclient mac-exempt command. However, this command requires FOS 6.3 on your PIX Remote. You can list two MAC addresses and masks. To match on all Cisco IP Phones, you would specify the following MAC address and mask: 0003.E300.0000 FFFF.FF00.0000 (all Cisco IP Phones' MAC addresses begin with "0003.E3").
Note
If your PIX Remote is connecting to a VPN 3000 concentrator and you'll be using network extension mode, this policy must be enabled on the concentrator also; this is not true if the Easy VPN Server is an IOS router or a PIX/ASA appliance.
If you use network extension mode, you can manage your PIX Remote from the central site across the tunnel. To do this, you need to configure two commands: vpnclient management tunnel and management-access. The first command specifies IP addresses that are allowed to manage the Remote, via the tunnel, from the Server's network. The second command specifies which interface should be used to terminate the management connections; for tunnel connections, this should be "inside." To manage the PIX Remote, you can then use Telnet, SSH, HTTPS (PDM), SNMP polls, and ping to access the IP address of the configured management interface in the management-access command.
The vpnclient nem-st-autoconnect command specifies that the Remote should automatically bring up an IPsec session, when using network extension mode, to the Server whenever the split-tunneling policy has been enabled on the Server and pushed to the Remote. This command is necessary only for network extension mode; in client mode, all traffic is sent to the Server and thus there is little likelihood of the IPsec tunnel timing out to the Server. In network extension mode, this is more likely when split tunneling is enabled and more traffic is going to other places on the Internet than to the Server site.
The vpnclient enable command allows an IPsec session to be initiated to the configured Server(s). To bring a tunnel up manually, use the vpnclient connect command; user traffic, however, will do this automatically, so this command typically is used for testing purposes. To terminate a tunnel, use either the no vpnclient connect or the vpnclient disconnect command.
Note
Just as with routers functioning as Remote devices, you don't need to configure ISAKMP policies, crypto ACLs, transform sets, and crypto maps on the PIX Remote. Also, to remove the VPN client configuration on your PIX Remote completely, use the clear vpnclient command, which removes all of the vpnclient commands.
Using Certificates for Remote Access
In 6.3 the Easy VPN Remote and Server functions on PIX security appliances support X.509 digital certificates via ISAKMP/IKE main mode for device authentication. In 6.2, only pre-shared keys were supported via aggressive mode. If you omit the vpnclient vpngroup command from the last section on configuring a PIX Remote, digital certificates will be used for device authentication.
How you obtain a certificate on a PIX Remote is the same as if it were terminating an L2L session. This was discussed in the last chapter. However, when a PIX is configured as a Remote, it will not check a CRL to see if the Server's certificate has been revoked, which could be used in a man-in-the-middle attack! Because of this security concern, Cisco has added a command you can configure on the Remote to examine certain fields on the certificate to determine if the Remote will accept the Server's certificate:
pix(config)# ca verifycertdn X.500_string
The X.500 string is a list of fields and values that must appear on the Server's identity certificate. On the Server, view the personal identity certificate to determine which fields you want to validate on the Remote. For example, this command, "ca verifycertdn cn*server, ou=perimeter, o=cisco, st=ca, c=us", would match on a CN containing "server" and on the rest of the certificate fields exactly matching the above parameters.
Note
Remember to put the group name of the PIX Remote in the OU/Department field of its identity certificate so that the Easy VPN Server knows what policies to apply to the Remote.
Verifying Your 6.x Remote Configuration and Connection
The show vpnclient command, shown in Example 22-2, displays the Easy VPN Remote's configuration and any policy information downloaded from the Server. To see more details about the configuration of the Remote, add the detail parameter to the preceding command.
Example 22-2. Remote Configuration Verification
Remote# show vpnclient
LOCAL CONFIGURATION
vpnclient server 192.1.1.1
vpnclient mode network-extension-mode
vpnclient vpngroup client-access password ********
vpnclient username RemotePIX password ********
vpnclient management tunnel 192.168.0.0 255.255.255.0
vpnclient enable


DOWNLOADED DYNAMIC POLICY
Current Server : 192.1.1.1
Default Domain : cisco.com
PFS Enabled : No
Secure Unit Authentication Enabled : No
User Authentication Enabled : No
Backup Servers : None
Example 22-3 illustrates the use of the detail parameter. The beginning output is the same as the show vpnclient command; however, two additional sections are added: STORED POLICY displays any policies the Remote has received from the Server that it has saved locally and the RELATED CONFIGURATION section has the related commands the Remote created dynamically to build an IPsec tunnel to the Server. Reference numbers in parentheses are listed to the right of the output, which is explained after the example.
Example 22-3. Remote Configuration Verification Details
Remote# show vpnclient detail LOCAL CONFIGURATION vpnclient server 192.1.1.1 vpnclient mode network-extension-mode vpnclient vpngroup client-access password ******** vpnclient username userX password ******** vpnclient management tunnel 192.168.0.0 255.255.255.0 vpnclient enable DOWNLOADED DYNAMIC POLICY Current Server : 192.1.1.1 Default Domain : cisco.com PFS Enabled : No Secure Unit Authentication Enabled : No User Authentication Enabled : No Backup Servers : None STORED POLICY Secure Unit Authentication Enabled : No Split Networks : None Backup Servers : None RELATED CONFIGURATION sysopt connection permit-ipsec (1)output omitted
images/U2192.jpg border=0> nat (inside) 0 access-list _vpnc_acl (2)
Here is an explanation of the references in Example 22-3:
|
1. |
IPsec traffic is exempted from ACL checking from the Remote's outside interface. |
|
2. |
Any traffic from the Remote's local network, 192.168.1.0/24, including the Remote's inside interface address, 192.168.1.1, is exempt from address translation for the tunnel; in this example, the Remote is using network extension mode. |
|
3. |
Eleven transform sets are created automatically to protect the data connection: one of these has to match a transform set on the Easy VPN Server. |
|
4. |
A static crypto map entry is created automatically for the Server connection; you can see that the "vpnc_acl" ACL is used to specify traffic to protect and the 11 transform sets created are referenced in the crypto map entry. |
|
5. |
ISAKMP is enabled and a pre-shared key is created dynamically for the Server; 18 different ISAKMP policies are created for possible use in protecting the management connection to the Server, where at least one of these has to exist on the Server for the management connection to be built. |
6.x Easy VPN Remote Example Configuration
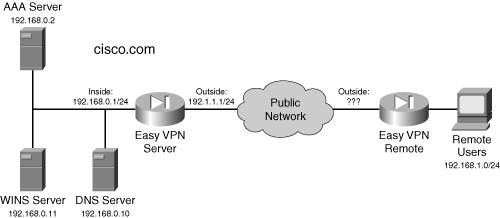
To show you how easy it is to set up a PIX as an Easy VPN Remote, I'll illustrate an example configuration. Figure 22-2 displays the network I'll use and Example 22-4 shows the Remote's configuration. In this example, the Remote belongs to a group called "hwclients," which uses pre-shared keys. The XAUTH username and password are defined, as is the Easy VPN Server address. The connection mode is network extension, where management access is allowed from the central site to the inside interface of the Remote. If a split tunneling policy is enabled for the "hwclients" group on the Server, the vpnclient nem-st-autoconnect command ensures that an IPsec tunnel remains up between the Remote and the Server. Last, I enabled Easy VPN on the Remote and then manually brought up the tunnel to test the connection.
Figure 22-2. 6.x PIX Easy VPN Remote Example
Example 22-4. PIX Remote Configuration Example
Remote(config)# vpnclient vpngroup hwclients password secretpass
Remote(config)# vpnclient username RemotePIX password PIXpass
Remote(config)# vpnclient server 192.1.1.1
Remote(config)# vpnclient mode network-extension
Remote(config)# vpnclient management tunnel 192.168.0.0 255.255.255.0
Remote(config)# management-access inside
Remote(config)# vpnclient nem-st-autoconnect
Remote(config)# vpnclient enable
Remote(config)# vpnclient connect
You can use the debug crypto isakmp command on the Remote or Server to troubleshoot the establishment of the management connection, and the debug crypto ipsec command for the data connections. Plus, you can use the show vpnclient detail command to display the Remote's configuration, policies downloaded from the Server, and all commands the Remote created dynamically to allow for the IPsec session to be built to the Server. The two debug commands are discussed in more depth in Chapter 23, "Troubleshooting PIX and ASA Connections."
Part I: VPNs
Overview of VPNs
- Overview of VPNs
- Traffic Issues
- VPN Definition
- VPN Components
- VPN Designs
- VPN Implementations
- VPNs: Choosing a Solution
- Summary
VPN Technologies
IPsec
PPTP and L2TP
SSL VPNs
Part II: Concentrators
Concentrator Product Information
- Concentrator Product Information
- Concentrator Models
- Concentrator Modules
- Concentrator Features
- Introduction to Accessing a Concentrator
- Summary
Concentrator Remote Access Connections with IPsec
- Concentrator Remote Access Connections with IPsec
- Controlling Remote Access Sessions to the Concentrator
- IPsec Remote Access
- Network Access Control (NAC) for IPsec and L2TP/IPsec Users
- Summary
Concentrator Remote Access Connections with PPTP, L2TP, and WebVPN
- Concentrator Remote Access Connections with PPTP, L2TP, and WebVPN
- PPTP and L2TP Remote Access
- WebVPN Remote Access
- Summary
Concentrator Site-to-Site Connections
- Concentrator Site-to-Site Connections
- L2L Connectivity Example
- ISAKMP/IKE Phase 1 Preparation
- Adding Site-to-Site Connections
- Address Translation and L2L Sessions
- Summary
Concentrator Management
- Concentrator Management
- Bandwidth Management
- Routing on the Concentrator
- Chassis Redundancy
- Administration Screens
- Summary
Verifying and Troubleshooting Concentrator Connections
- Verifying and Troubleshooting Concentrator Connections
- Concentrator Tools
- Troubleshooting Problems
- Summary
Part III: Clients
Cisco VPN Software Client
- Cisco VPN Software Client
- Cisco VPN Client Overview
- Cisco VPN Client Interface
- IPsec Connections
- VPN Client GUI Options
- VPN Client Software Updates
- VPN Client Troubleshooting
- Summary
Windows Software Client
- Windows Software Client
- Windows Client
- Configuring the Windows VPN Client
- Configuring the VPN 3000 Concentrator
- Microsoft Client Connections
- Troubleshooting VPN Connections
- Summary
3002 Hardware Client
- 3002 Hardware Client
- Overview of the 3002 Hardware Client
- Initial Access to the 3002
- Authentication and Connection Options
- Connection Modes
- Administrative Tasks
- Summary
Part IV: IOS Routers
Router Product Information
Router ISAKMP/IKE Phase 1 Connectivity
- Router ISAKMP/IKE Phase 1 Connectivity
- IPsec Preparation
- ISAKMP/IKE Phase 1 Policies
- ISAKMP/IKE Phase 1 Device Authentication
- Monitoring and Managing Management Connections
- Routers as Certificate Authorities
- Summary
Router Site-to-Site Connections
- Router Site-to-Site Connections
- ISAKMP/IKE Phase 2 Configuration
- Viewing and Managing Connections
- Issues with Site-to-Site Connections
- Summary
Router Remote Access Connections
- Router Remote Access Connections
- Easy VPN Server
- Easy VPN Remote
- IPsec Remote Access and L2L Sessions on the Same Router
- WebVPN
- Summary
Troubleshooting Router Connections
- Troubleshooting Router Connections
- ISAKMP/IKE Phase 1 Connections
- ISAKMP/IKE Phase 2 Connections
- New IPsec Troubleshooting Features
- Fragmentation Problems
- Summary
Part V: PIX Firewalls
PIX and ASA Product Information
- PIX and ASA Product Information
- PIX Deployment Scenarios
- PIX and ASA Feature and Product Overview
- Summary
PIX and ASA Site-to-Site Connections
- PIX and ASA Site-to-Site Connections
- ISAKMP/IKE Phase 1 Management Connection
- ISAKMP/IKE Phase 2 Data Connections
- L2L Connection Examples
- Summary
PIX and ASA Remote Access Connections
- PIX and ASA Remote Access Connections
- Easy VPN Server Support for 6.x
- Easy VPN Remote Support for 6.x
- Easy VPN Server Support for 7.0
- Summary
Troubleshooting PIX and ASA Connections
- Troubleshooting PIX and ASA Connections
- ISAKMP/IKE Phase 1 Connections
- ISAKMP/IKE Phase 2 Connections
- Summary
Part VI: Case Study
Case Study
Index
EAN: 2147483647
Pages: 178
