Creating a Database
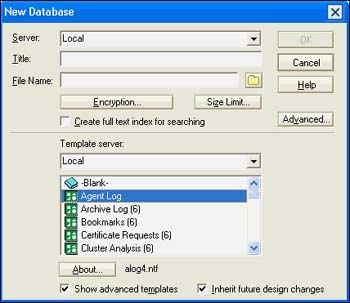
Creating a database in Domino is a fairly simple task. Databases can be created from scratch, from templates, or by creating a copy of another database. When you choose File, Database, New from the menu options at the top of the Notes client or the Domino Designer client, you are presented with the New Database dialog box displayed in Figure 2.6. You begin by choosing a location for the database, either on your local workstation or on a server. Following that, you assign a name and a title to the database. Next to the filename is a folder icon that enables you to select the folder or directory in which the database will be stored. The rest of the choices are optional; some of them I'll cover in this section (the Advanced button is covered later in this chapter).
Figure 2.6. When creating a new database, you can create a blank database or base the design on a template.
You should create a new database on a local hard drive and then create a replica copy on the server when you are ready to test the database. This reduces network traffic and conserves server resources. It is also good to have multiple replica copies of databases for backup. Most of the examples given here show Local as the choice for location of the database; this is the default.
Using Templates
A template is a special type of Domino database that contains only design elements. New databases created from a template contain the same design elements. You can also choose to have the design of your new database inherit future design changes from the template. Template files can be distinguished from databases by their extensions: Templates are saved with an extension of .ntf, for Notes Template Facility, whereas databases are nearly always saved with the extension .nsf, for Notes Storage Facility.
To create a new database from a template, press Ctrl+N or choose File, Database, New from the menu at the top of the Notes client or Domino Designer client. A list box at the bottom of the New Database dialog box contains a list of available templates. To see advanced templates, click Show Advanced Templates. Additional templates might be available on a server; to change to another server or to a local drive, click the Template Server button.
From the list of templates, you can choose a template to use for the design of your new database. You can find information describing the purpose of the template by clicking the template name and then clicking the About button. This displays the About document for the database (as long as one has been provided). Templates can be distinguished from databases in the list by the icons displayed in the left of the list window. Database icons are a blue book, and template icons are a green square with geometric cutouts .
Figure 2.6 shows the New Database dialog box with a template chosen .
To create a Project Discussion database from the Discussion template supplied with Lotus Notes, follow these steps:
- Choose File, Database, New from the menu bar of the Notes client or the Domino Designer client.
- In the Server drop-down list, leave Local selected.
- Enter the title, Notes Project Discussion.
- Enter the filename, ProjDisc.nsf, or accept the default. If you type the title first, Notes automatically fills in the filename.
- Choose the Discussion Notes and Web (6) template.
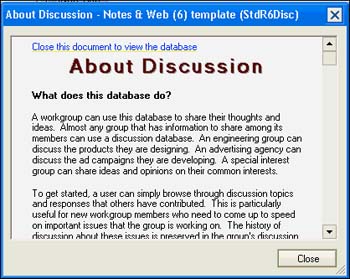
- Click the About button to read a description of the purpose of the database contained in the database's About document, as shown in Figure 2.7.
Figure 2.7. The About document has a description of the database and its purpose.
- To change the design, uncheck Inherit Future Design Changes. Otherwise , leave it checked.
- Finally, click the OK button to save your new database.
CAUTION
Although the Windows operating systems accept file names that are longer than 8.3 (eight characters plus a three-character extension) and accept spaces in filenames, it is still a good practice to avoid spaces in the filename and to follow the 8.3 convention.
Templates are special design copies of a database. They do more than provide a basis for your database's design; you can use templates to update the design of the database and propagate design changes throughout your organization.
NOTE
When you base the design of one or more databases on a template, the Design server task, which runs at 1 a.m. by default, maintains the design of your databases. Of course, both the template and your databases must be on a server for this to work (all templates supplied by Notes do, by default). When you mark a database to inherit future design changes, you will be warned that your changes might be overwritten if you try to change the design of a database.
TIP
You can use this technique to control the design of custom-built databases by creating a template when you have completed the design of your database. Simply create a copy of your database and save it with the .ntf extension. Next, check Database File Is a Master Template on the Design tab of the Database properties box. Place your new template on the same server as your new database. Whenever you need to make a change to the design of your database, simply make the change to the template; the Domino server will make the changes in the databases that have their designs based on your template.
Copying a Database
Sometimes you can't find a template that suits you, but you can find a database that is exactly what you need. You can easily copy the design elements to a new database by following the procedure outlined here:
- Right-click the Database bookmark, and choose Database, New Copy from the context menu. You will see a dialog box similar to the one shown in Figure 2.8.
Figure 2.8. The original database name is in quotes in the window title of the Copy Database dialog box.
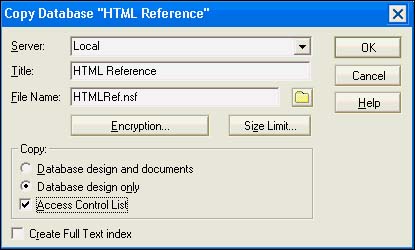
- Leave the Server drop-down list Local.
- Change the title and filename, and click Database Design Only.
- (Optional) Uncheck Access Control List.
- Click OK to save your new database.
Now you have a new database that is a completely functional design copy of the original database.
Creating a Replica Copy
Despite the fact that this book is about application designwhich, of course, involves creating new databasesyou must understand a special type of database copy called a replica copy before you can understand this section. Replication is at the very heart of Domino. It is the process by which information is exchanged between servers and users to synchronize the data between replica copies of databases over time. Each database that is created contains a unique database identifier called the replica ID. The replica ID determines whether a database on one server should replicate or be synchronized with a database on another server. This capability is one fundamental aspect of Domino that sets it apart from other database systems. The approach has been so successful that other companies have added this feature to their systems.
Domino is a true distributed client/server application. Replica copies of databases can exist on multiple servers and on multiple workstations. There can be replicas of the same database on the same computer. Domino identifies replicas by a replica ID that is a part of the Domino database file. You can see the replica ID for a database by opening the database and then choosing File, Database, Properties from the menu, or by right-clicking the bookmark and choosing Database Properties from the context menu.
NOTE
You must have sufficient access privileges to the database to create a replica copy of a server database. Similarly, you must have sufficient access privileges to the server to place a replica of a database on the server.
To create a replica copy, follow these steps:
- Right-click the database bookmark from which you want to create a replica copy, and choose Replication, New Replica from the menu.
- The Create Replica dialog box shown in Figure 2.9 is displayed.
Figure 2.9. The Create Replica dialog box is significantly improved in Notes and Domino 6. Clicking the twisty beside Replica Settings expands the dialog box.
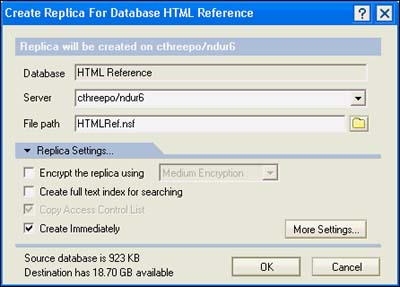
- Leave Local selected and click the Create Immediately check box.
- You can leave the title and filename as they are (or change them if you want).
- Unless you need to change the ACL and know what you are doing, leave Copy Access Control List checked.
- Click OK.
CAUTION
Don't inadvertently overwrite another database when you create a database replica. In particular, if you create a local replica of the Domino directory, the default filename supplied is Names.nsf. This is also the filename of your personal address book; if you accept the default, you will lose your personal address book. Your Notes client will no longer function properly, and you will have to reinstall Notes. All person documents, group documents, and location documents in your personal address book will be lost.
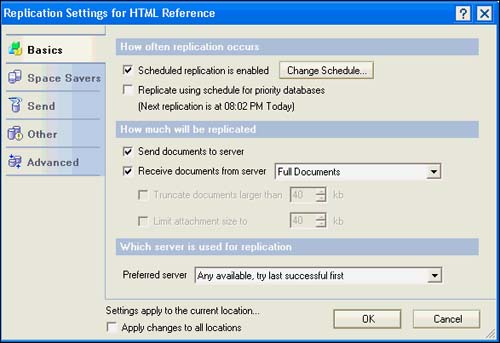
Additional settings are available by clicking the More Settings button. In the Replication Settings dialog window, you can set replication schedules and preferred servers, define what specifically gets replicated, limit what you receive and what you send, and handle many more useful settings. See Figure 2.10.
Figure 2.10. The Replication Settings dialog box has many useful settings for replicas.
Now that a replica is on your local hard drive, you can replicate with the server, either on demand or on a schedule. People with workstation-based email typically work on local replica copies of their mail database and have a replication schedule set up, with times typically ranging from 5 to 30 minutes. Scheduled replication takes place in the background, with little or no impact on performance.
TIP
Working on a local replica is also a convenient way to work on application design. For reasons outlined earlier, I almost always work on a local replica when I design or change designs. I can then test my work locally without affecting the server copy of the database. When I'm satisfied with the design, I replicate the changes to the server. Then I can test the security aspects of my application. Except for mail, I do not normally use scheduled replication on my workstation; otherwise, untested design features might make it to the server copy of the database.
Securing a Local Database Through Encryption
The option for encryption is included to provide security for databases stored on local workstations, particularly laptop computers. You set the encryption level by checking the Encrypt the Replica Using check box and selecting the encryption level. The encryption is based on the user ID of the current user or a user ID that you choose. The levels of encryption to apply are simple, medium, or strong encryption, as shown in Figure 2.11. The level chosen affects database access speed, as well as whether the database can be compressed using a compression tool. With simple encryption, access to the database is fast, and the database can be compressed. However, the capability to break the encryption is far easier than with medium or strong encryption. Even though medium encryption does not allow compression, it is often preferred because it provides fast database access and is difficult to break. Strong encryption is the most difficult to break, does not allow compression, and is slower to access. Consequently, it should be used only on databases for which the tightest security is required.
Figure 2.11. Encryption for databases that will be stored locally can be set in the Create Replica dialog box under the Replica Settings tab.

NOTE
The maximum size of an Notes and Domino 6 database is 64GB for both UNIX and Windows operating systems. An administrator can set a quota and threshold for a database, but under certain circumstances, documents can still be added to a database even after the quota is reached. For example, administrators often set a size quota for email databases that typically ranges between 50MB and 100MB. When the mail database reaches its quota, mail will still be delivered, but the owner of the mail file will not be able to send mail, although certain other actions can be performed.
Adding Databases to a Domino Server
You must have sufficient rights to create either a database or a replica on the server. Your Domino administrator specifies who has these rights in the server document in the Domino directory. In the Server Access section of the Security tab of the server document, you must be specifically listed or be a member of a group listed in the Create New Databases field to create a database on the server. You must be listed in the Create Replica Databases field to create a replica on the server. Similarly, if you want to add a template to the server, you must be listed in the Create Templates field. Frequently, application designers in an organization belong to a group that is placed in all three of these fields. If you have trouble creating databases or templates on your server, check with your Domino administrator.
Particularly on a Domino server, the database ACL is very important. When you copy a database to a Domino server, you must understand the database Access Control List. The default setting for a new database is No Access; in previous editions, it was higher. Unless you change the ACL before you place your new application on the Domino server, people might have inappropriate accessor no access. To change the ACL of a database, you must be a manager. To change the design of a database, at a minimum, you must have Designer access either through a group in the ACL or as an individual listed in the ACL. Designers often find it useful to assign roles to groups in the ACL of a database. These roles can be used to further refine the ACL; access to design elements can be restricted using roles. These and other topics are discussed in Chapter 23, "Security and Domino Applications."
For these and other reasons, I strongly encourage you to familiarize yourself with system administration. It will help you immensely with application design. This book is not about system administration, but good books are available. An excellent place to start is with Lotus Domino Administrator 6 Help, which can be found on the server in the Help directory or in the local Help directory if you have the Domino Administrator client installed (the filename is help6_admin.nsf).
Part I. Introduction to Release 6
Whats New in Release 6?
- Whats New in Release 6?
- A Brief History of Lotus Notes
- Major Features of Lotus Notes
- Types of Applications
- Whats New in Domino Designer?
- New Design Element Features
- New Language Features
The Release 6 Object Store
- The Release 6 Object Store
- Defining a Domino Database
- Understanding the Database Structure
- Creating a Database
- Working with Database Properties
- Understanding Design Templates
- Creating Your Own Templates
- Inheriting Designs from Templates
- Using Templates to Replicate Design Changes
- Using Templates as Design Libraries
- Archiving Versions with Templates
The Integrated Development Environment
- The Integrated Development Environment
- Working in the Application Design Environment
- Working with the Properties Box
- Understanding the Work Pane
- Using the Programmers Pane
- Understanding the Info List
- Understanding the Action Pane
- Customizing the Tools Menu
- Printing Source Code
- Using the HTML Editor
- Locking Design Elements
Part II. Foundations of Application Design
Forms Design
- Forms Design
- Designing Forms
- Setting Form Properties
- Working with Text Properties
- Working with Fields
- Writing Formulas in Fields
Advanced Form Design
- Advanced Form Design
- Working with Tables
- Using Graphic Objects on Forms
- Working with Form-Level Events
- Using Form Actions
- Working with Hotspots
- Understanding Sections and Section Properties
- Using Layout Regions
- Working with Special Forms
- Creating Reusable Design Objects
- Using Embedded Elements
- Using the Form Design Document
Designing Views
- Designing Views
- Defining the Elements of a View
- Creating a View
- Setting View Properties
- Creating Advanced View Selections
- Adding and Editing View Columns
- Using View Column Properties
- Adding Actions to a View
- Creating Calendar Views
- Understanding Folders
Using Shared Resources in Domino Applications
- Shared Resources
- Sharing Images Within a Database
- Creating Shared Files
- Creating Shared Applets
- Shared Code
- Creating Subforms
- Creating Shared Fields
- Creating Shared Actions
- Script Libraries
- Database Resources
Using the Page Designer
- Using the Page Designer
- Understanding Pages
- Working with the Page Properties Box
- Using the Page Designer
- Adding Layers to Your Pages
Creating Outlines
- Creating Outlines
- Creating an Outline
- Working with Outline Entries
- Embedding Outlines
- Adding an Outline to a Frameset
Adding Framesets to Domino Applications
- Adding Framesets to Domino Applications
- Creating a Frameset
- Using the Frameset Designer
- Working with Frames
- Viewing the HTML Source of Your Frameset
- Launching the Frameset
Automating Your Application with Agents
- Automating Your Application with Agents
- Working with Agents
- Creating an Agent
- Working in the Agent Builder Design Window
- Using @Commands in Agents
- Putting Your Agent to Work
- Creating a Complex Agent
- Using LotusScript in Agents
- Creating Web Agents Using Formulas and LotusScript
- Using Java in Agents
- Testing and Debugging Agents, the Agent Log, and Agent Properties
- Agent Properties via the Agent InfoBox
Part III. Programming Domino Applications
Using the Formula Language
- Using the Formula Language
- Overview of the Formula Language
- Knowing Where to Use @Functions and @Commands
- Formula Syntax
- Limitations of the Formula Language
- Working with Statements
- Using Logical @Functions
- Working with Date and Time @Functions
- Working with Strings
- Getting Session and User Information
- Working with Documents
- Retrieving Data with @DbColumn and @DbLookup
- Working with Lists
- Getting User Input
- Controlling the Flow of a Formula
- Error Handling
Real-World Examples Using the Formula Language
- Real-World Examples Using the Formula Language
- Programming Practices
- Using Formulas in Forms and Subforms
- Writing Field Formulas
- Writing View Formulas
- Using Hide When Formulas
- Working with Forms, Views, and Shared Actions
Writing LotusScript for Domino Applications
- Writing LotusScript for Domino Applications
- Software Construction
- Fundamental Elements of LotusScript
- New Technologies and LotusScript
Real-World LotusScript Examples
- Real-World LotusScript Examples
- Real-World Example 1: Importing a Delimited Text File
- Real-World Example 2: Delete a Parent Document and All Its Children: DeleteParentAndChildren
- Real-World Example 3: Schedule an Agent Robot to Refresh All the Documents in a View: Robot-DailyRefreshAllDocs
- Real-World Example 4: Return a Web User to the Place Where He Started After a Document Is Submitted: WebQuerySave-DocSubmit
Writing JavaScript for Domino Applications
- Writing JavaScript for Domino Applications
- What Is JavaScript?
- JavaScript Is Not Java
- JavaScript and the Domino IDE
- The Document Object Model
- JavaScript Support in Domino 6
- When to Use JavaScript
- A Look at JavaScript in Domino
- JavaScript Libraries in Domino
- JavaScript Principles 101
- Syntax and Command Blocks
- Statements
- Output
- Functions
- Objects
- Input Validation
- Validating Check Boxes
- Validating Radio Buttons
- Validating Selection Lists
- Calculations
- JavaScript Application
Real-World JavaScript Examples
- Real-World JavaScript Examples
- Real-World Example 1: Dynamic Drop-Down Lists on the Web
- Real-World Example 2: Dialog Boxes and window. opener on the Web
- Real-World Example 3: Dynamic Tables
- Real-World Example 4: Useful JavaScript Utilities
Writing Java for Domino Applications
- Writing Java for Domino Applications
- Introduction to Java
- Choosing a Java Solution in Domino
- Understanding the Notes Object Interface
- Writing Java Agents
- Using Other Java IDEs
- Other Uses for Java
Real-World Java Examples
Enhancing Domino Applications for the Web
- Enhancing Domino Applications for the Web
- Whats New in Designer 6
- Understanding the Domino Web Application Server
- Understanding the Basics of HTML
- Using HTML in Domino Designer
- Adding Power with Domino URLs
- Views and Forms Working Together on the Web
- Incorporating Flash into Your Web Pages
- What Its All About: XML Exposed
- How Does Domino Use XML?
Part IV. Advanced Design Topics
Accessing Data with XML
Accessing Data with DECS and DCRs
- Accessing Data with DECS and DCRs
- What Is DECS?
- The External Data Source
- DECS Administrator
- Creating the Activity
- Accessing the Application
- DECS Summary
- Data Connection Resources
- DCR Example
- Tips on External Data Access
Security and Domino Applications
- Security and Domino Applications
- How Does Domino Security Work?
- Enabling Physical Security
- Setting Server Access
- Database Access Control Lists
- The Role of the Domino Directory in Application Security
- ACL Privileges
- Enabling Database Encryption
- Using Roles
- Implementing View-Level Security
- Implementing Form-Level Security
- Implementing Document-Level Security
- Applying Field-Level Security
- Hiding the Design of Your Application
Creating Workflow Applications
- Creating Workflow Applications
- The Evolution of Groupware
- Introducing Workflow
- Creating Mail-Enabled Applications
- Using Triggers to Send Email
- Sending Mail with LotusScript
Analyzing Domino Applications
Part V. Appendices
Appendix A. HTML Reference
Appendix B. Domino URL Reference
EAN: 2147483647
Pages: 288
- Cryptography
- Understanding Certification and Accreditation
- Appendix C The Information System Security Architecture Professional (ISSAP) Certification
- Appendix D The Information System Security Engineering Professional (ISSEP) Certification
- Appendix E The Information System Security Management Professional (ISSMP) Certification
