| In the previous chapter, you positioned the playback head in the timeline, toggled a specific track to a desired Automation mode in the Audio Mixer panel, clicked play and panned the audio of the track dynamically as you watched the video playback. Automation in a surround sound project is exactly the same; you simply have more speaker choices for panning. Continuing to use the Bleach project, you can now experiment with surround sound automation to change the spatial properties of the audio mix. Using mono (single channel) audio as source material for the sound mix allows you to more accurately distribute the sounds within your surround sound environment. Think of a mono track as a thin line; if you point the line at a precise point, hitting that point is relatively easy. Now imagine a stereo track as a line that is twice as thick; if you point it at the same point, the outer edges of the stereo track will expand slightly beyond the point. Likewise, with mono audio elements it is easier to control your mixing and your mix will yield better results. Using some of the mono sound effects in the scene, let's quickly pan the audio and remix it in 5.1 surround sound. For this lesson, you'll need the Surround_Mix_START.prproj project in the APPST2 Lesson Files/Chapter 21 folder. Be sure that your workspace layout includes an expanded Audio Mixer, Timeline panel, and Program Monitor. | | 1. | Watch the entire sequence and take note of sound effects and the potential for modifying their spatial property. In the timeline, pay close attention to the audio tracks ADAM MIRROR and CAR DOOR.
You should hear that the sound design is generally in order. The atmosphere is there and all the necessary sound effects are in the scene from the keys jingling as the car engine is turned on to the creaking of the side mirror as the character adjusts it. In the next step, you are going to make a static adjustment of the side mirror track so that the audio comes from the front right speaker.
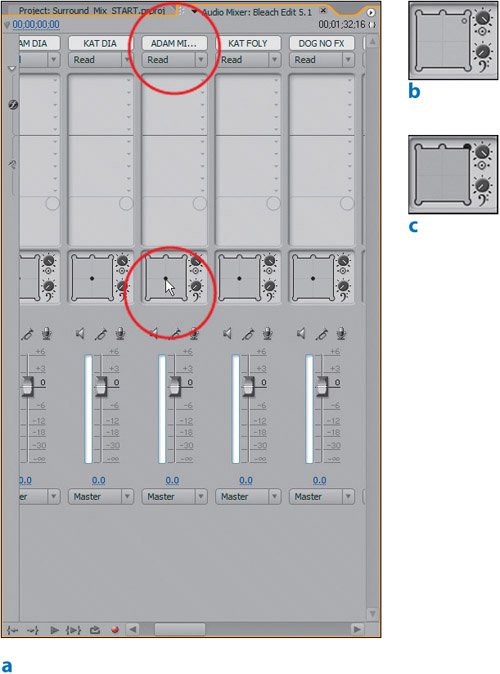
| | | 2. | In the Audio Mixer panel, reveal the ADAM MIRROR track. Below the Volume fader of the track find the square with three dots along the top, two on the bottom and a small circle (called the puck)in the middle. This square reflects your 5.1 speaker configuration, and the puck dictates where the sound is panned. In the 5.1 Panner area of the track (Figure 21.5a, b, and c), drag the panning puck to the front right speaker (top-right corner). Play the sequence back and notice from where the sound originates.
Figure 21.5. You begin with the Audio Mixer and the ADAM MIRROR track set to Read mode (a). Notice the surround sound panning area in the middle of the track. The puck in the center represents where the sound plays from in your mix. By default all panning in 5.1 is in the center and plays equally on the stereo (left and right) speakers in the front and back. Clicking and dragging the puck to the top right (b and c), you pan the track to the front-right speaker 
Although a stereo sequence reveals left/right panning capabilities, any track in a 5.1 sequence reveals 5.1 panning capabilities. Because the visual image for the sound effect shows the side mirror being on the passenger side of the car, you dragged the panning puck into the top-right corner of the 5.1 Panner to place all the audio for the panned track into that speaker.
The benefit of creating an audio mix with so many tracks is that it eases the process of mixing. Being able to isolate sound elements gives you faster and more accurate control over your mix. With no other sound effects on the ADAM MIRROR track and the Automation mode set to Read, you quickly panned the track to the speaker destination that matched the visual. If there were other effects on this track that didn't have the same visual location, you would have to keyframe the panning (also known as Automate).
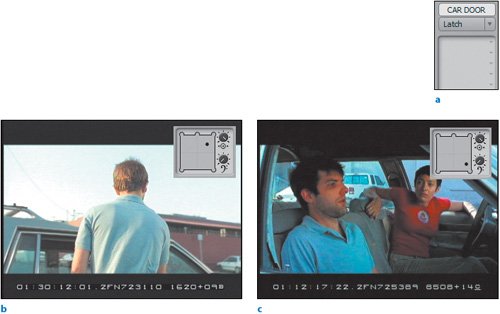
| | | 3. | In the Audio Mixer panel, set the Automation mode for the CAR DOOR track to Latch. Press the Home key on your keyboard and position the panning puck in the upper-right corner of the 5.1 Panner; however, do not stick it entirely in the top-right speaker (Figure 21.6). Play the timeline. As the first video shot completes (the actor opens the door), click and drag the puck down and to the lower right so that when the door closes in the next shot the puck is in the lower-left region. Press Home again, and play the sequence to hear and see your results.
Figure 21.6. Setting the Automation mode to Latch allows you to place the puck in any region of the Panner where it will remain until you manually drag it to a new position. After you drag it and move the mouse off, it stays in that new position. For the first door open moment, the puck is in the top-right corner, but not completely tucked into a speaker. For the door close, the puck is moved to the lowerright, which is accurate to the character's interpretation of where the sound is coming from 
At the beginning of the sequence when the actor opens the car door, the door is oriented in the front area of the frame and on the right side of the car. In the next shot, the door closes in the back right (as oriented to the actor). To have the sound effects reflect the spatial properties of the shots, you use the automation features to start the puck in the front right, then drag it to the back right. Because the track is made up of two sound effects and not one continuous track, you do not hear the sound panning from the front to the back speakers.
|
Mixing and automating in 5.1 is just as straightforward as these quick steps. Keep in mind, however, that the ease of mixing will be based on the complexity and breakdown of the tracks and effects in your sequence. You can continue to automate and mix other effects, such as the ADAM FOLY track panning the sound to match the actor walking into frame and sitting down in the car. You can also adjust the panning of the car effects as the car drives away. I have gone ahead and applied a few more pans to the final project that are referenced in the remaining lessons. To look at the panning properties, play around the entire sequence with the Audio Mixer open. Audio mixing is an organic and feedback-based (audible feedback) experience. Once you understand how the tools work, you may want to play around to find and achieve the results you desire. |

