Editing Polylines
You can edit polylines with many of the standard editing commands. To change the properties of a polyline, double-click the polyline to open the Properties palette. You can use the Stretch command on the Modify toolbar to displace vertices of a polyline, and the Trim, Extend, and Break commands on the Modify toolbar also work with polylines.
In addition, many editing capabilities are offered only for polylines. For instance, later in this section you will see how to smooth out a polyline by using the Fit option in the Pedit command and the Modify Polyline dialog box.
In this exercise, you'll use the Offset command on the Modify toolbar to add the inside portion of the joint:
-
 Click the Offset tool in the Modify toolbar or type O
  .
. -
At the Specify offset distance or [Through] <1.0000>: prompt, enter 1 .
-
At the Select object to offset or <exit>: prompt, pick the U-shaped polyline you just drew.
-
At the Specify point on side to offset: prompt, pick a point toward the inside of the U. A concentric copy of the polyline appears (see Figure 13.4).
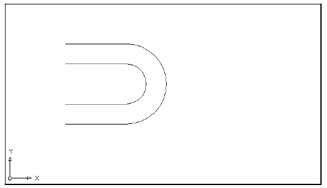
Figure 13.4: The offset polyline -
Press
 to exit the Offset command.
The concentric copy of a polyline made with Modify Offset can be useful when you need to draw complex parallel curves like the ones in Figure 13.5.
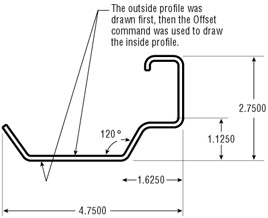
Figure 13.5: Sample complex curves drawn by using offset polylines
Next , complete the top view of the joint:
-
Connect the ends of the polylines with two short line segments (see Figure 13.6).
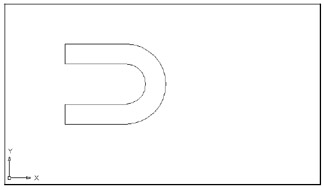
Figure 13.6: The joined polylineWarning If the objects to be joined don't touch, you can use the "fuzzy"join feature. Type Pe
 M
M  to start the Pedit command with the Mulle option, then select all the objects you want to join. If you see a convert message, enter Y
  . At the Enter fuzzy distance or [Jointype]: prompt, enter a distance that approximates the size of the gap between objects. By default, AutoCAD will extend the lines to so they join end to end. You can use the Jointype option to have Pedit join segments with an additional segment.
 -
 Choose Modify Object Polyline or type Pe
  . You can also choose Edit Polyline from the Modify II toolbar.
 -
At the Select polyline or [Multiple]: prompt, pick the outermost polyline.
-
At the prompt
Enter an option [Close/Join/Width/Edit vertex/Fit/Spline/Decurve/Ltype gen/Undo]:
enter J
 for the Join option.
 -
At the Select objects: prompt, select all the objects you have drawn so far.
-
Press
 to join all the objects into one polyline. It appears that nothing has happened , although you will see the message 5 segments added to polyline in the Command window.
 -
Press
 again to exit the Pedit command.
 -
Click the drawing to expose its grips. The entire object is highlighted, indicating that all the lines have been joined into a single polyline.
By using the Width option under Edit Polyline, you can change the thickness of a polyline. Let's change the width of your polyline, to give some thickness to the outline of the joint:
-
Type Pe
 or click the Edit Polyline tool on Modify II toolbar again.
 -
Click the polyline.
-
At the [Close/Join/Width/Edit vertex/Fit/Spline/Decurve/Ltype gen/Undo]: prompt, enter W
 for the Width option.
 -
At the Enter new width for all segments: prompt, enter .03
 for the new width of the polyline. The line changes to the new width (see Figure 13.7), and you now have a top view of your joint.
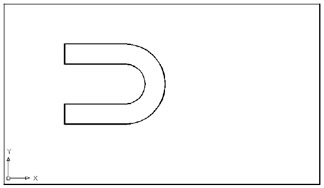
Figure 13.7: The polyline with a new thickness -
Press
 to exit the Pedit command.
 -
Save this file.
Setting Pedit Options
Now here's a brief look at a few of the Pedit options you didn't try firsthand:
Close Connects the two endpoints of a polyline with a line segment. If the polyline you selected to be edited is already closed, this option changes to Open.
Open Removes the last segment added to a closed polyline.
Spline/Decurve Smooths a polyline into a spline curve (discussed in detail later in this chapter).
Edit Vertex Lets you edit each vertex of a polyline individually (discussed in detail later in this section).
Fit Turns polyline segments into a series of arcs.
Ltype Gen Controls the way noncontinuous line types pass through the vertices of a polyline. If you have a fitted or spline curve with a noncontinuous line type, turn on this option.
| Tip | You can change the thickness of regular lines and arcs by using Pedit to change them into polylines and then using the Width option to change their width. |
Smoothing Polylines
You can create a curve in AutoCAD in many ways. If you don't need the representation of a curve to be accurate, you can use a polyline curve. In the following exercise, you will draw a polyline curve to represent a contour on a topographical map:
-
On the CD Open the Topo.dwg drawing from the companion CD. The first image in Figure 13.8 contains the drawing of survey data. Some of the contours have already been drawn in between the data points.
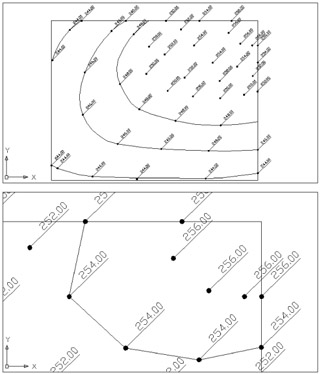
Figure 13.8: The Topo.dwg drawing shows survey data portrayed in an AutoCAD drawing. Notice the dots indicating where elevations were taken. The actual elevation value is shown with a diagonal line from the point. -
Zoom in to the upper-right corner of the drawing, so your screen displays the area shown in the second image in Figure 13.8.
-
Click the Polyline tool in the Draw toolbar. Using the Center Osnap, draw a polyline that connects the points labeled 254.00. Your drawing should look like the second image in Figure 13.8.
-
Press
 .
. Tip If Running Osnaps are not set, you can choose Tools Drafting Settings or type Os
 to open the Drafting Settings dialog box. From there, select the Object Snap tab and turn on the Center option. See Chapter 3 for more on this dialog box.
 -
Next, you will convert the polyline you just drew into a smooth contour line. Choose Modify Object Polyline or type Pe
 .
. -
At the PEDIT Select polyline or [Multiple]: prompt, pick the contour line you just drew.
-
At the prompt
Enter an option [close/Join/Width/Edit vertex/Fit/Spline/Decurve/Ltype gen/Undo]:
press F
 to select the Fit option. This causes the polyline to smooth out into a series of connected arcs that pass through the data points.
 -
Press
 to end the Pedit command.
Your contour is now complete. The Fit option under the Pedit command causes AutoCAD to convert the straight-line segments of the polyline into arcs. The endpoints of the arcs pass through the endpoints of the line segments, and the curve of each arc depends on the direction of the adjacent arc. This gives the effect of a smooth curve. Next, you'll use this polyline curve to experiment with some of the editing options unique to the Pedit command.
| |
At times you will want to convert regular lines, arcs, or even circles into polylines. You might want to change the width of lines or join lines to form a single object such as a boundary. Here are the steps to convert lines, arcs, and circles into polylines:
-
Choose Modify Object Polyline. You can also type Pe
 at the command prompt.
 -
At the Select polyline or [Multiple]: prompt, pick the object you want to convert. If you want to convert a circle to a polyline, first break the circle (using the Break option on the Modify toolbar) so that it becomes an arc of approximately 359 °.
-
At the prompt
Object selected is not a polyline. Do you want to turn it into one? <Y>:
press
 twice. The object is converted into a polyline.
If you have several objects that you want to convert to polylines, type M ![]() at the Select polyline or [Multiple]: prompt; then select the objects you want to convert. You will then see the Convert Lines and Arcs to polylines [Yes/No]?: prompt. Type Y
at the Select polyline or [Multiple]: prompt; then select the objects you want to convert. You will then see the Convert Lines and Arcs to polylines [Yes/No]?: prompt. Type Y ![]() , and all the selected objects will be converted to polylines. You can then go on to use other Pedit options on the selected objects.
, and all the selected objects will be converted to polylines. You can then go on to use other Pedit options on the selected objects.
To turn a polyline into a true spline curve, do the following:
-
Choose Modify Object Polyline or type Pe
 . Select the polyline you want to convert.
 -
Type S
 to turn it into a polyline spline; then press
  to exit the Pedit command.
 -
Click the Spline tool in the Draw Toolbar or type Spl
 . You can also choose Draw Spline from the pull-down menu.
 -
At the Specify first point or [Object]: prompt, type O
 for the Object option.
 -
At the Select objects: prompt, click the polyline spline. Though it may not be apparent at first, the polyline is converted into a true spline.
You can also use the Spline Edit tool (choose Modify Spline or enter Spe ![]() ) on a polyline spline. If you do, the polyline spline is automatically converted into a true spline.
) on a polyline spline. If you do, the polyline spline is automatically converted into a true spline.
| |
Editing Vertices
One of the Pedit options that I haven't yet discussed, Edit Vertex, is almost like a command within a command. Edit Vertex has numerous suboptions that enable you to fine-tune your polyline by giving you control over its individual vertices.
To access the Edit Vertex options, follow these steps:
-
First, turn off the Data and Border layers to hide the data points and border.
-
Issue the Pedit command again and then select the polyline you just drew.
-
Type E
 to enter the Edit Vertex mode. An X appears at the beginning of the polyline, indicating the vertex that will be affected by the Edit Vertex options.
 Warning When using Edit Vertex, you must be careful about selecting the vertex to be edited. Edit Vertex has six options, and you often have to exit the Edit Vertex operation and use Pedit's Fit option to see the effect of Edit Vertex's options on a curved polyline.
Edit Vertex Suboptions
After you've entered the Edit Vertex mode of the Pedit command, you have the option to perform the following functions:
-
Break the polyline between two vertices
-
Insert a new vertex
-
Move an existing vertex
-
Straighten a polyline between two vertices
-
Change the tangential direction of a vertex
-
Change the width of the polyline at a vertex
These functions are presented in the form of the following prompt:
[Next/Previous/Break/Insert/Move/Regen/Straighten/Tangent/Width/eXit] <N>:
This section examines each of the options presented in this prompt, starting with the Next and Previous options.
The Next and Previous Options
These options let you select a vertex for editing. When you start the Edit Vertex option, an X appears on the selected polyline to designate its beginning. As you select Next or Previous, the X moves from vertex to vertex to show which one is being edited. Let's try this:
-
Press
 a couple of times to move the X along the polyline. (Because Next is the default option, you only need to press
  to move the X.)
 -
Type P
 for Previous. The X moves in the opposite direction. Notice that now the default option becomes P.
 Tip To determine the direction of a polyline, note in which direction the X moves when you use the Next option. Knowing the direction of a polyline is important for some of the other Edit Vertex options.
The Break Option
The Break option breaks the polyline between two vertices:
-
Position the X on one end of the segment you want to break.
-
Enter B
 at the command prompt.
 -
At the Enter an option [Next/Previous/Go/eXit] <N>: prompt, use Next or Previous to move the X to the other end of the segment to be broken.
-
When the X is in the proper position, choose Edit Vertex Go or enter G
 to break the polyline (see Figure 13.9).
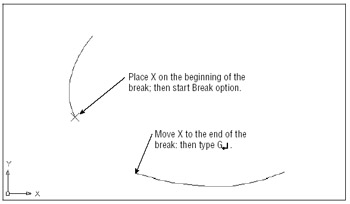
Figure 13.9: How the Break option worksTip You can also use the Break and Trim options on the Modify toolbar to break a polyline anywhere , as you did when you drew the toilet seat in Chapter 3.
The Insert Option
Next, try the Insert option, which inserts a new vertex:
-
Type X
 to temporarily exit the Edit Vertex option. Then type U
  to undo the break.
 -
Type E
 to return to the Edit Vertex option, and position the X before the new vertex.
 -
Press
 to advance the X marker to the next point.
 -
Enter I
 to select the Insert option.
 -
When the prompt Specify location for new vertex: appears, along with a rubber-banding line originating from the current X position (see Figure 13.10), pick a point indicating the new vertex location. The polyline is redrawn with the new vertex.
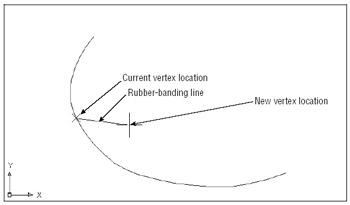
Figure 13.10: The new vertex location
Notice that the inserted vertex appears between the currently marked vertex and the next vertex, so the Insert option is sensitive to the direction of the polyline. If the polyline is curved, the new vertex will not immediately be shown as curved (see the first image in Figure 13.11). You must smooth it out by exiting the Edit Vertex option and then using the Fit option, as you did to edit the site plan (see the second image in Figure 13.11). You can also use the Stretch command (on the Modify tool- bar) to move a polyline vertex.
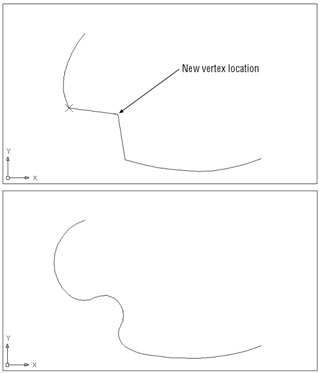
Figure 13.11: The polyline before and after the curve is fitted
The Move Option
In this brief exercise, you'll use the Move option to move a vertex:
-
Undo the inserted vertex by exiting the Edit Vertex option (enter X
 ) and typing U
  .
. -
Restart the Edit Vertex option, and use the Next or Previous option to place the X on the vertex you want to move.
-
Enter M
 for the Move option.
 -
When the Specify new location for marked vertex: prompt appears, along with a rubber- banding line originating from the X (see the first image in Figure 13.12), pick the new vertex. The polyline is redrawn (see the second image in Figure 13.12). Again, if the line is curved, the new vertex appears as a sharp angle until you use the Fit option (see the final image in Figure 13.12).
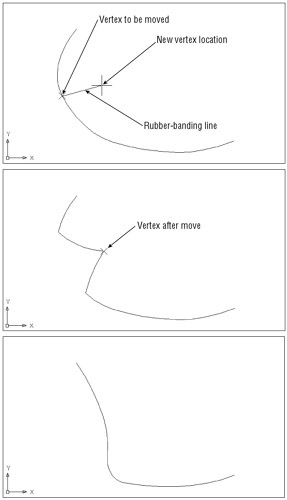
Figure 13.12: Picking a new location for a vertex, with the polyline before and after the curve is fittedTip You can also move a polyline vertex by using its grip.
The Straighten Option
The Straighten option straightens all the vertices between two selected vertices, as shown in the following exercise:
-
Undo the moved vertex (from the previous exercise).
-
Start the Edit Vertex option again and select the starting vertex for the straight line.
-
Enter S
 for the Straighten option.
 -
At the Enter option [Next/Previous/Go/eXit] <N>: prompt, move the X to the location for the other end of the straight-line segment.
-
After the X is in the proper position, enter G
 for the Go option. The polyline straightens between the two selected vertices (see Figure 13.13).
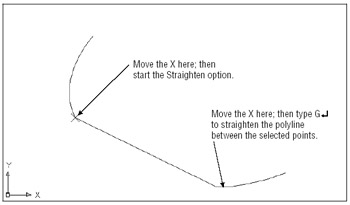
Figure 13.13: A polyline after straighteningTip Using the Straighten option is a quick way to delete vertices from a polyline.
The Tangent Option
The Tangent option alters the direction of a curve on a curve-fitted polyline:
-
Undo the straightened segment from the previous exercise.
-
Restart the Edit Vertex option and position the X on the vertex you want to alter.
-
Enter T
 for the Tangent option. A rubber-banding line appears (see the top image in Figure 13.14).
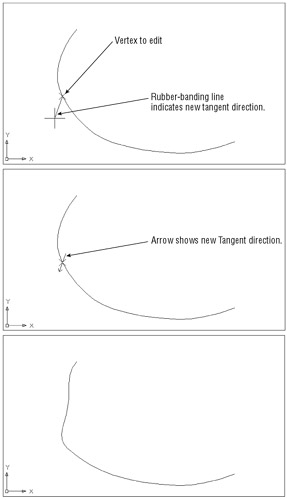
Figure 13.14: Picking a new tangent direction -
Point the rubber-banding line in the direction for the new tangent and click the mouse. An arrow appears, indicating the new tangent direction (see the second image in Figure 13.14).
Don't worry if the polyline shape does not change. You must use Fit to see the effect of Tangent (see the final image in Figure 13.14).
The Width Option
Finally, try out the Width option. Unlike the Pedit command's Width option, the Edit Vertex/Width option enables you to alter the width of the polyline at any vertex. Thus, you can taper or otherwise vary polyline thickness. Try these steps:
-
Undo the tangent arc from the previous exercise.
-
Return to the Edit Vertex option and place the X at the beginning vertex of a polyline segment you want to change.
-
Type W
 to issue the Width option.
 -
At the Specify starting width for next segment <0.0000>: prompt, enter a value, 12 for example, indicating the polyline width desired at this vertex.
-
At the Specify ending width for next segment <12.0000>: prompt, enter the width, 24 for example, for the next vertex.
Again (as with Tangent), don't be alarmed if nothing happens after you enter this Width value. To see the result, you must exit the Edit Vertex command (see Figure 13.15).
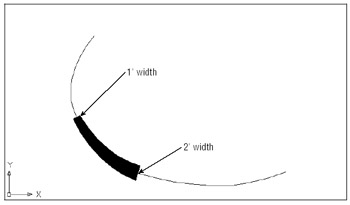
Figure 13.15: A polyline with the width of one segment increased
| Tip | The Width option is useful when you want to create an irregular or curved area in your drawing that is to be filled in solid. This is another option that is sensitive to the polyline direction. |
As you have seen throughout these exercises, you can use the Undo option to reverse the last Edit Vertex option used. And you can use the Exit option to leave Edit Vertex at any time. Just enter X ![]() to display the Pedit prompt:
to display the Pedit prompt:
Enter an option [Close/Join/Width/Edit vertex/Fit/Spline/Decurve/Ltype gen/Undo]:
EAN: 2147483647
Pages: 261