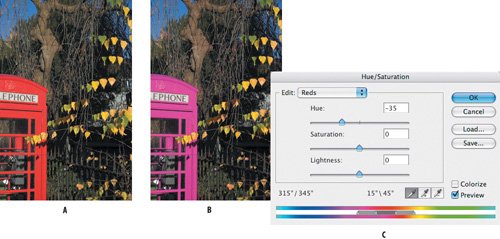
Selecting and Shifting Color with Hue/Saturation To change the color of the subject of your image, your first instinct might be to select the subjectwhich, depending on its complexity, could be time-consuming. It could also be unnecessary. Sometimes the selection you're after is implicit in the image itself and you can use Hue/Saturation to adjust specific color in an image without so much as a trace of a marching ant. Figure 5.14. The original image (example A), and the color shifted using a Hue/Saturation adjustment layer (examples B and C).


1. | Open the Phone Box image. To change the color of the phone box it isn't necessary to first select it.
| 2. | Add a Hue/Saturation adjustment layer and choose Reds from the Edit pop-up menu. Because the reds of the phone box are the only reds in the image, shifting the Reds will affect only the phone box. But before we do that, "Reds" is a very subjective termwe need to be more precise. Take your Hue/Saturation eyedropper and click an area of the phone box. The sliders on the color bar at the bottom of the Hue/Saturation box may shift slightly, indicating the exact range of colors you are about to affect. To extend the range of red, hold down the Shift key and sample from other parts of the phone box.
| 3. | Move the Hue slider to the left or the right to change the color of the phone box. "Selections" don't come any easier!
|
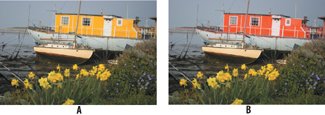
So far, so good, but the cynics among you are probably thinking, Yeah, but what if there were other reds in the image that we didn't want affected? Once again layer masks are the answer. Take a look at this example: Figure 5.15. The original image (example A) and the finished version with the color of the houseboat shifted (example B). 
1. | Open the Houseboat image. Here we want to shift the yellows of the houseboat, but obviously the yellows are not confined to the boat. No worries.
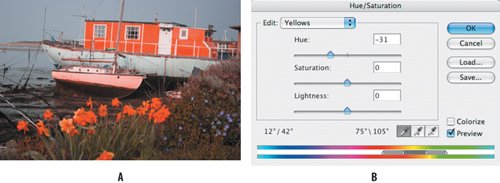
| 2. | In the Hue/Saturation dialog box, choose Yellows from the Edit menu. Sample the color of the houseboat with the eyedropper, and then move the Hue slider to the left or the right until you find a color you like. Don't worry that the daffodils in the foreground are also affectedwe'll fix that in the next step.
Figure 5.16. Shifting the yellows also affects the daffodils in the foreground (examples A and B).


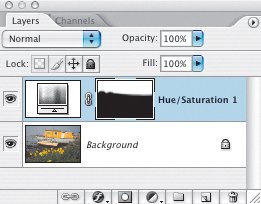
| 3. | To restore the foreground to the way it was, choose a nice big, soft brush and paint on the layer mask of the Hue/Saturation adjustment layer in black.
|
Figure 5.17. Painting on the layer mask restores the foreground to its original colors. 
Will this approach work for any kind of image? Well, no. But it's worth a shot if your subject is a clearly identifiable primary color and is the only example of that color in the image, or at least can be easily isolated from other items of the same color. |
