Step 6.2 Using Port Forwarding Within PuTTY to Read Your E-mail Securely
Overview
Problem: Many Windows e-mail programs send account ID, password and e-mail content over the network in clear-text.
Today there are a number of solutions available to provide protection against someone sniffing your credentials and data from the network, including VPN, SSL and SSH.
In this section, we will show how to utilize SSH port forwarding to securely send and retrieve email using IMAP and SMTP. Port forwarding allows you to run TCP based services in an SSH session from your local machine to a remote machine. By running the TCP based services in the SSH tunnel, all data going from your local machine to the remote machine endpoint is encrypted.
| Note |
Keep in mind that by utilizing OpenSSH port forwarding, you are only encrypting the data as it goes from your local machine to your email server. The email is unencrypted as it travels from your email server to its destination server. To encrypt the contents of your email in this way, a program such as PGP or GPG is required. |
Action 6 2 1 Configure the initial PuTTY settings required for port forwarding
We first need to set up the initial connection settings to the remote mail server within PuTTY.
- First, double-click on the icon that was created for PuTTY or select it from the Start Menu .
- In the Session category, enter the hostname or IP address of the remote mail server to which you wish to connect in the Host Name field.
- Make sure SSH is selected under the Protocol field by clicking on the SSH radio button.
Action 6 2 2 Configure IMAP port forwarding
- Select the Connection->SSH->Tunnels category on the left side window of the PuTTY configuration screen
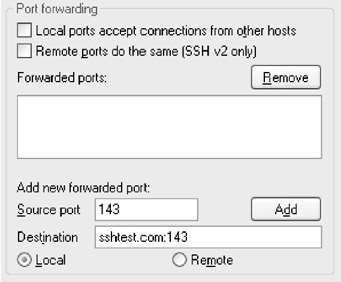
- In the Port forwarding section of the right hand window, make sure the Local radio button is selected. To do this, click on Local at the bottom of the PuTTY Configuration screen, below the field marked Destination.
- Next, in the field marked Source port , enter 143, the default port for IMAP. Enter the hostname of the server on which your e-mail server is located in the field marked Destination , followed by a colon and 143, as shown below.
Note The server and port of the machine you enter here does not have to be the machine to which you will be creating the SSH connection. If you enter a machine different from the one to which will connect via SSH, your data will be secured between the client and the SSH server, but not between the SSH server and the final destination. Only ports forwarded to the SSH server itself are encrypted.
- Now click the Add button. As shown below, the box under the window marked Forwarded ports will show the address and port you entered earlier.
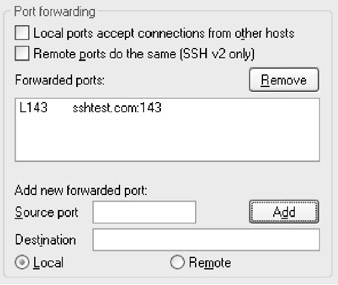
Action 6 2 3 Configure SMTP port forwarding
Now we need to add the address of the computer to which we send our outgoing mail, utilizing SMTP. The default port for SMTP is 25.
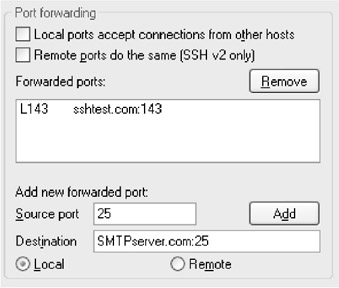
- Enter 25 in the Source port field of the port forwarding section, as you did for IMAP.
- Next, in the Destination field, type the hostname or IP address of the computer where your SMTP server is located, followed by a colon and 25 , as shown below.
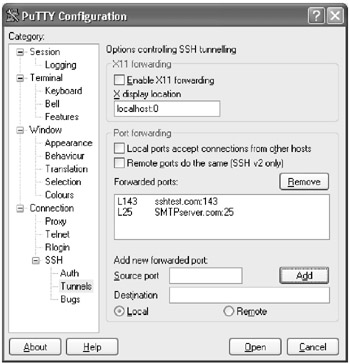
- Next, click the Add button - the address and port for the SMTP server will appear in the Forwarded ports box.
The Port Forwarding section of the PuTTY configuration should look like the screen below:
Action 6 2 4 Create and verify the SSH connection and port forwarding
Now that PuTTY is configured to allow port forwarding, we need to connect to the remote server and verify that the local machine is listening on the correct ports.
- Click on the Open button at the bottom of the PuTTY configuration screen to open the connection to the remote machine.
- If the connection is successful, you will be prompted for authentication information. After you successfully enter your authentication credentials, you will be put at a shell prompt, just as if you had opened a normal SSH session to the remote machine.
(In fact, that is exactly what you have done - while the SSH port forwarding session is open, you are also connected interactively to the remote machine.)
Now that the connection is open, we need to verify that the local machine is listening on the ports we specified earlier:
- Click on the Start Menu and select Run . Enter cmd if you are running Windows NT/2000/XP or command if you are running Windows 9x/ME into the prompt given and click on the OK button. A Windows command prompt should appear.
- At the Windows command prompt, type in the command netstat “an and hit enter . Netstat is a program which will display statistics of the current TCP/IP connections on the local machine. The “an options tell netstat to display all connections and listening ports on your local machine. The output should be similar to that shown below.
(If the output scrolls by too quickly to read, pipe the command through more by running netstat “an more . This will allow you to see the output one page at a time.)
Active Connections

 Proto Local Address Foreign Address State
 TCP 0.0.0.0:135 0.0.0.0:0 LISTENING
 TCP 0.0.0.0:445 0.0.0.0:0 LISTENING
 TCP 0.0.0.0:1025 0.0.0.0:0 LISTENING
 TCP 0.0.0.0:1037 0.0.0.0:0 LISTENING
 TCP 0.0.0.0:1040 0.0.0.0:0 LISTENING
 TCP 0.0.0.0:1043 0.0.0.0:0 LISTENING
 TCP 0.0.0.0:1388 0.0.0.0:0 LISTENING
 TCP 0.0.0.0:9420 0.0.0.0:0 LISTENING

TCP 192.168.1.10:1388 192.168.1.1:22 ESTABLISHED
 TCP 127.0.0.1:25 0.0.0.0:0 LISTENING
 TCP 127.0.0.1:143 0.0.0.0:0 LISTENING

UDP 0.0.0.0:53 *:*
 UDP 0.0.0.0:135 *:*
 UDP 0.0.0.0:445 *:*
 UDP 0.0.0.0:1026 *:*
 UDP 0.0.0.0:1028 *:*
 UDP 0.0.0.0:1326 *:*
 UDP 0.0.0.0:44333 *:*
 UDP 127.0.0.1:123 *:*
As you can see, the output shows the open and listening connection for the local machine. You will want to look for lines similar to the ones highlighted above. The first highlighted line:
TCP 192.168.1.10:1388 192.168.1.1:22 ESTABLISHED
is the SSH connection from your local machine to the remote machine. You can tell this is an established connection by the ESTABLISHED state displayed in the fourth column.
The next two highlighted lines:
TCP 127.0.0.1:25 0.0.0.0:0 LISTENING
 TCP 127.0.0.1:143 0.0.0.0:0 LISTENING
show us the port forwarding connections we have set up. The LISTENING state in the fourth column tells us that our local machine is listening on the ports specified in the second column. In this case, our local machine is listening on port 25, SMTP, and port 143, IMAP, at IP address 127.0.0.1. IP address 127.0.0.1 is the IP address of the loopback interface for our machine, also known as localhost.
Action 6 2 5 Configure your email client
Now that we have port forwarding for SMTP and IMAP configured and the connection has been verified , we need to configure our email client to take advantage of port forwarding.
For this example, we will use Outlook 2000 as our email client. However, the process should apply to other email clients as well.
- Open Outlook, then click on the Tools menu and select Accounts .
- The window that appears is the list of all the accounts that are set up within Outlook. Click on the Mail tab.
- Select the mail account associated with the user account which is located on the server for which we have created the SSH connection and click on the Properties button.
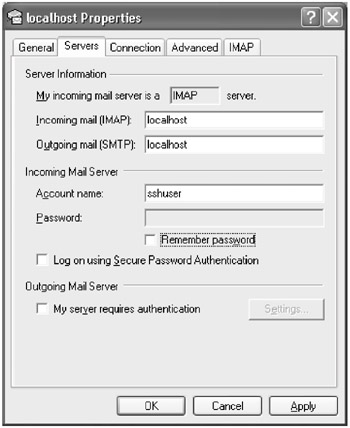
- In the window that appears, select the Servers tab. This will display the servers that are configured for this email account.
- In the Incoming Mail (IMAP) field, enter localhost . This will tell Outlook to contact the local machine for which we have configured port forwarding to get email.
- In the Outgoing Mail (SMTP) field, enter localhost . This will tell Outlook to contact the local machine for which we have configured port forwarding to send email.
The properties for the mail account should now look like the screen shown below:
- Click the OK button to return to the list of accounts.
- Click the Close button to return to the main screen of Outlook.
- Send yourself an email to verify email is functional with the newly configured port forwarding and SSH tunnel.
SECTION I - Obtaining, Compiling and Installing OpenSSH
- Step 1.1 Install OpenSSH to Replace the Remote Access Protocols with Encrypted Versions
- Step 1.2 Install SSH Windows Clients to Access Remote Machines Securely
SECTION II - How to Use OpenSSH Clients for Unix-to-Unix Connectivity
SECTION III - How To Use PuTTY/WinSCP For PC-To-Unix Connectivity
- Step 3.1 Use PuTTY as a Graphical Replacement for telnet and rlogin
- Step 3.2 Use PuTTY / plink as a Command Line Replacement for telnet / rlogin
- Step 3.3 Use WinSCP as a Graphical Replacement for FTP and RCP
- Step 3.4 Use PuTTYs Tools to Transfer Files from the Windows Command Line
SECTION IV - Using Public Key Authentication
- Step 4.1 Authentication with Public Keys
- Step 4.2 Passphrase Considerations
- Step 4.3 How to Generate a Key Pair Using OpenSSH
- Step 4.4 How to Generate a Key Using PuTTY
- Step 4.5 How to use OpenSSH Passphrase Agents
- Step 4.6 How to use PuTTY Passphrase Agents
- Step 4.7 Using Public Key Authentication for Automated File Transfers
SECTION V - Troubleshooting SSH Connections
SECTION VI - Advanced SSH Topics
- Step 6.1 Port Forwarding
- Step 6.2 Using Port Forwarding Within PuTTY to Read Your E-mail Securely
- Step 6.3 X11 Forwarding
Conclusion
Appendix - Sample sshd_config File
EAN: 2147483647
Pages: 90
