| Photoshop's feature called Photomerge allows you to easily create panoramas by stitching together a series of images into an (almost) seamless whole. A successful panorama requires a bit of planning. For best results use a tripod, preferably with a level, and shoot each frame verticallyneither of which I did in the following example. If that's not possible, you can still create panoramas, but you (and Photoshop) are going to have to work harder to get a good result. When shooting the individual frames make sure you have a generous overlap25 to 30% works well. Figure 4.39. The original pieces from which the panorama is assembled (examples A through E). 
Figure 4.40. The completed panorama, sharpened and color corrected. 
| | 1. | In this exercise, you'll use your own images. From within Adobe Bridge, select the thumbnails of the images you want to make up your panorama and choose Tools > Photoshop > Photomerge. (You can also use Photomerge directly from within PhotoshopFile > Automate > Photomergebut you have to either open all the images first or navigate to the images from within the Photomerge dialog.)
| 2. | Photomerge gives its best shot at joining the images together. Any images it doesn't know what to do with appear at the top of the Photomerge dialog box.
| 3. | If you're dissatisfied with Photomerge's attempts, position the individual images yourself. Using the Arrow tool drag the thumbnail(s) to the top of the Photomerge window, then turn off Snap to Image and drag them into position in the main window.
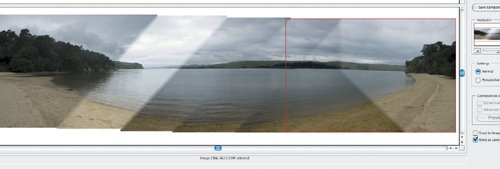
| 4. | As necessary, use the Rotate Image tool to rotate pieces, although for fine-tuning you're better off using Free Transform in Photoshop. In this example, because I used automatic exposure on my camera, some segments are lighter than others; Photomerge's attempt at blending these different exposures results in the segments looking like triangles stitched together. Ideally I should have used manual exposure to begin withtaking the exposure readings from the first segment and using them for the subsequent segments; because I didn't, I'm going to have work harder to make my blends seamless.
Figure 4.41. The Photomerge dialog box: Be sure to check Keep as Layers so that you can easily edit the result. 
| | | 5. | Rather than settle for Photomerge's blending, which is never perfect, for better results, blend the images yourself usingyou guessed itlayer masks. Be sure to check Keep as Layers. If you choose Advanced Blending, you cede control of the blending to Photomerge, which is a bit of a crapshoot; personally, I've never had good results with this option and unfortunately it can't be combined with the Keep as Layers option.
| 6. | When you're satisfied with the result, click OK to leave Photomerge and return to Photoshop, where you now have a layered image.
| 7. | Add a layer mask (revealing all) to all except the bottom layer.
The next part is tricky. Note, I am working left to right (that's how the panorama was shot) and from the bottom up through the layers.
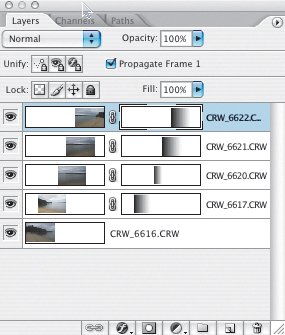
| 8. | Make an intersecting selection of the layer overlap and then paint within this selection on the layer mask with a Foreground to Transparent gradient. Here's how it works: Command/Ctrl-click the layer thumbnail of the bottom layer to turn its opaque pixels into a selection, then Command/Ctrl-Shift-click the thumbnail of the layer above to make a selection where the two layers overlap. Target the layer mask of the upper layer. Make black the foreground color. Choose the Gradient tool (g) and with a Foreground to Transparent linear gradient drag from left to right within this selection. I got the best results by beginning my gradient just outside the selection border and swiping the full width of the selection.
| | | 9. | Repeat the previous step for each remaining layer in turn.
Figure 4.42. The Layers palette showing the layer masks, each with a Foreground to Transparent gradient applied. 
| 10. | Inspect the panorama closely to see what details do not marry up exactly from layer to layer. To fix these problems paint on the layer masks with a soft-edged brush. I also used the Healing Brush (j) on a separate layer to fix some problems with the sky.
Figure 4.43. Some doubling of the detail on the horizon can be seen. This can be fixed with a combination of painting with a brush on the layer masks and using the Healing Brush tool. 
| 11. | Complete any retouching. As finishing touches, I applied tonal and color correction as well as sharpening.
|
|


