Editing the Classic Transition


Classic transitions work with or without keyframes, and so editing them follows the same procedure as editing Realtime transitions.

Keyframe Interpolation

One of the most interesting parameters available to non-Realtime transition users is Keyframe Interpolation. This governs the speed at which the effect happens between any two keyframes.

Note that this is the "speed at which the effect happens," not the "speed of the actual clip." The speed of a media clip can only be altered using the Timewarp non-Realtime filter (see Chapter 9 for details).

You use Keyframe Interpolation simply to alter the pace of an effect. The following example shows a 2D Editor using this parameter to zoom in on the incoming clipfirst slowly, then, when it reaches the halfway mark, the zoom increases in speed until it reaches full speed at the end of the clip.

To alter Keyframe Interpolation

1.

Add one of the Classic transitions to the Timeline.

2.

Scrub to a keyframe on the Timeline and alter the interpolation in one of the following ways:

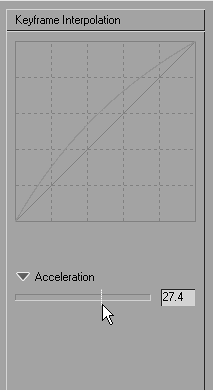
  • Drag the acceleration line toward a positive (faster) or negative (slower) amount (Figure 8.47).

    Figure 8.47. Dragging the acceleration setting of the Keyframe Interpolation…


  • Double-click inside this box and enter a number.

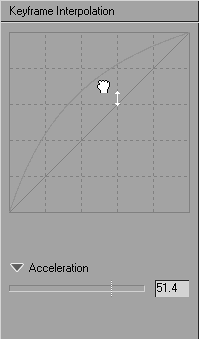
  • Click inside the parameter curve area and drag the keyframe toward the value you require (Figure 8.48).

    Figure 8.48. …can also be accomplished using the Parameter Curve Editor.


3.

Exit the editor by clicking the Running Man button in the top-right corner of the editor.

The editor exits and the transition begins to render in the background.

4.

Once it has finished rendering, set a mark-in and mark-out point on the Timeline on either side of the transition (Figure 8.49).

Figure 8.49. Place a mark-in and mark-out point on the Timeline to preview your new transition.


5.

Then play back the transition by clicking the Play from Mark-In to Mark-Out button .

Experimentation is the key for this effect because you can customize transitions to look highly original just by using this underused parameter.

Tips

  • Remember that the parameters of the Transition Editor always affect the incoming clip unless the transition is reversed using the Revert button.

  • If you add an acceleration of 100 to the first keyframe, the effect happens immediately.


Rendering a Classic Transition

You must render all Classic transitions before you can see them on the PC or through the MovieBox Pro or the AGP Pro card from Pinnacle.

Once you add a Classic transition to the Timeline and you finished editing it, the slice above that transition goes red. Unless you have turned off background rendering, the slice immediately begins to render and gradually changes from red to green. During this render stage, you can still edit the Timeline.


Pinnacle Liquid Edition 6 for Windows
ISBN: 0321269160
EAN: 2147483647
Year: 2003
Pages: 245
Authors: Paul Ekert

flylib.com © 2008-2017.
If you may any questions please contact us: flylib@qtcs.net