Creating a Shared Services Provider
SharePoint Server 2007 requires an SSP to provide functionality to site collections, such as global audiences, Search, Indexing, Excel Calculation Services, and more. Before creating your first Web application to host site collections, always create your default SSP. At the server level, an SSP consists of a Web application, associated content database, search database, SSP configuration database, and preferably a dedicated Web application for My Sites.
Web Application Creation
To create your first (default) SSP, browse to Central Administration > Application Management > Office SharePoint Server Shared Services > Create Or Configure This Farm's Shared Services, as shown in Figure 8-1.
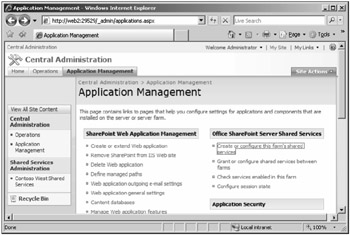
Figure 8-1: You create a Shared Services Provider in Central Administration, under Application Management.
On entering the SSP management page, you should select New SSP. The following items must be configured:
-
SSP name The name for your SSP should be easily recognizable and correlate to the purpose of this SSP; for example, Contoso West SSP. Although it is possible to create the IIS Web application beforehand, it is usually best to create it from Central Administration. If you decide to use a pre-existing Web application, the application pool identity cannot be Network Service. To create a new Web application, select the hyperlink, as shown in Figure 8-2.
You should follow the instructions for creating a Web application as defined in Chapter 2, "Deploying SharePoint Products and Technologies," but at a minimum, the following options should be configured:
-
IIS Web site Intelligently name your IIS Web site, port, and host header, as shown in Figure 8-3. Fill out the host header information, even if you plan to use assigned IP addresses. If required, the IP address and host header information can be altered in IIS Manager after creating the Web application.
-
Security configuration If you plan to provide or consume Shared Services over untrusted networks, seriously consider using SSL for this Web application. In addition, you can use Kerberos to enhance your security posture and improve performance. Remember that you must still add an SSL certificate in IIS Manager if choosing SSL. Selecting SSL here only changes the Web application scheme (https://) in the configuration database.
Tip You can use stsadm -o setsspport -httpport (or -httpsport for SSL) <portnumber> to change the TCP port number after SSP creation.
-
Load-balanced URL The load-balanced URL is the default internal URL for this Web application, even if you do not load balance the Web application. Verify that the automatically inserted text is correct and make any changes as required. If you plan to use a standard TCP port, you do not have to include the :<PORT> at the end of the URL.
Tip If multiple administrators will access your Shared Services administration from geographically disperse locations, strongly consider using a standard port for access, such as 80 or 443. Be careful when publishing externally, however, as inadvertently publishing your SSP administration page to the Internet could be catastrophic, should a hacker gain access.
-
Application pool Always create a dedicated application pool and identity for every SSP. This dedicated pool allows for isolation of the Web application and associated services, thereby improving performance and security. Note that SSP administration can now be performed by non-farm administrators, enabling the granular delegation of tasks, such as Search and Indexing. A dedicated application pool also allows for the recycling and monitoring of your SSP without affecting other Web applications in IIS. Recycling the application pool for your SSP, for example, does not affect the rest of your server farm's Web applications. You cannot use Network Service for this Web application and should always use an Active Directory account when possible.
-
Database name and authentication It is possible to use a different database server than was specified for Central Administration and the configuration database, but only do so in large or specialized environments. The best practice is to use the same SQL Server installation for all databases. You should name the database according to the purpose of the SSP, and the name should match closely the name of the IIS Web application. Figure 8-4 shows an example of database naming for Contoso, Ltd.'s West SSP.
-
My Site location After creating the SSP Web application and content database, you must decide if you will use a dedicated Web application for hosting My Sites. Although it is easier to simply use the SSP Web application just created, doing that makes disaster recovery more difficult. If you have more than just a few My Site users, create a dedicated Web application for My Sites. This allows for application pool isolation, troubleshooting, disaster recovery, and, most important, the ability to independently load balance your My Site Web application. Use best practices when creating this Web application and databases, and use a standard URI scheme such as HTTP:// or HTTPS:// for a consistent end user experience.
Figure 8-5 is an example of the Web application settings for a dedicated My Site Web application.
-
SSP service credentials Using Farm service credentials should be sufficient for the level of security and performance found in most organizations. If you have specialized security or programmatic requirements, however, you can create a dedicated service account. If you decide to create a dedicated service account, it must be an administrator on every server in the farm.
-
SSP database Once again, you should use the default database server when possible. If you are hosting multiple SSPs on this database server, it is very important to name your databases intelligently. Figure 8-6 shows an example of naming when multiple SSPs are on the same server. Using Windows Authentication is the default for creating this database, but you can alternatively use SQL permissions for database creation and access.
-
Search database The Search database hosts content, such as indexed metadata and crawl histories, and is required for Search and Indexing to function properly. Name it carefully as it cannot be changed in the future. The name should include the farm description and SSP name for ease of disaster recovery and management. Because multiple SSPs can share the same Index Server and SQL Server installations, your database name and Index Server directories should match when possible.
-
Index Server You must have started at least one Index Server in the farm before continuing past this configuration item. If you only have one Index Server in the farm, the option is grayed out. If you have multiple Index Servers in the farm, you will notice the limitation of only using one in the drop-down menu. If this Index Server hosts multiple indexes (multiple SSPs), renaming the Index file directory to match the SSP database name simplifies future administration. Figure 8-7 shows an example of matching SSP database names and index locations.
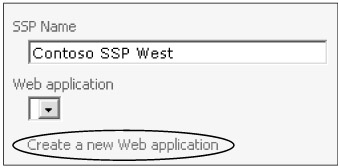
Figure 8-2: Create a new Web application in Central Administration for your Shared Services Provider.
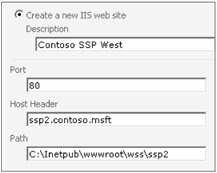
Figure 8-3: Complete the host header information, even if you plan on using assigned IP addresses.

Figure 8-4: Carefully name your SSP content databases because they cannot be renamed.
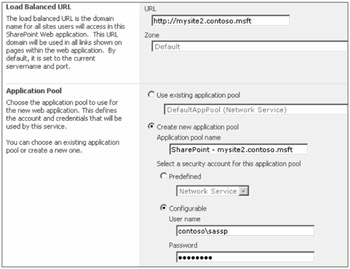
Figure 8-5: Use a standard URI scheme and naming convention to make access easy for your users.
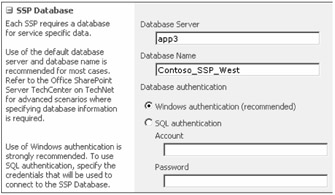
Figure 8-6: Name each SSP database so it can be identified easily for backup, restore, and management functions.
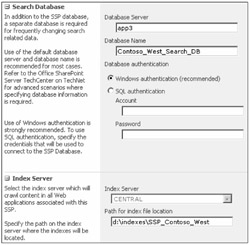
Figure 8-7: Give the Index directory a name that is similar to the SSP Search database name.
Editing a Shared Services Provider
You can edit the existing SSP Web application and services settings from Central Administration > Application Management > Office SharePoint Server Shared Services > Create Or Configure This Farm's Shared Services. To edit the Web application settings, hover the mouse and select Edit Properties in the drop-down menu. On entering the edit page, notice that many of the settings you configured during creation can be changed, whereas others cannot. A description of editable items and recommended practices follows:
-
SSP name You can change the name at any time, but doing so does not change all instances of the name, such as Portal Connections in Site Collections. You cannot change the Administration Site URL, as it is embedded in the code. You also cannot change the Web application that would require a fresh SSP to be created. To change the My Site Location URL, you must configure settings in SSP Administration.
Note You cannot delete the default SSP. You must create a new SSP, make it the default, and then delete the previously defined Default SSP. You can change the default SSP from the GUI or from the command line with stsadm -o setdefaultssp -title <SSPName>. Web applications do not re-associate when the default SSP is changed; only new Web applications are affected.
-
SSP service credentials Use caution when changing the SSP service credentials. This step should only be considered as a last resort, such as in the event of a domain re-name or account compromise. Be sure to add any new accounts to the administrators group on every server in the farm, as well as to check SQL permissions, as noted in Chapter 2.
-
SSP and Search database authentication Only change this feature in highly specialized environments. Changing it is not recommended for most implementations.
-
Index Server SharePoint Server increases your flexibility by allowing you to rehost your indexing function on any Index Server in the farm. You can select a new Index Server in the drop-down menu and/or change the Index File Location. You might want to change the Index location should your index size become quite large. You must rebuild all of your Indexes from SSP Search Administration afterward, or indexing will cease to function. Don't forget to run a full backup after a rebuild!
-
Process accounts with access to this SSP By default, all Web applications in this farm have access to this SSP. However, to associate this SSP with Web applications outside this farm or domain, you must enter the application pool identity for each additional Web application.
Changing Web Application Associations
You can change Web application associations after the fact, as shown in Figure 8-8.
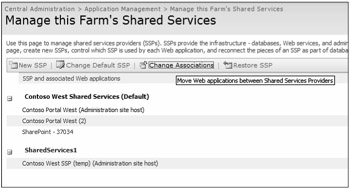
Figure 8-8: Select the Change Associations tab to modify default Web application associations.
Changing the Web application association changes many elements, including Search, Indexing, User Profiles, Audiences, Excel Calculation Services, BDC access, and My Site defaults. Therefore, changing associations should not be done without proper consideration and testing. Figure 8-9 shows the different options available. Verify that you are modifying the correct SSP, and never choose Select All unless you are very sure you want to change the SSP association of all Web applications.
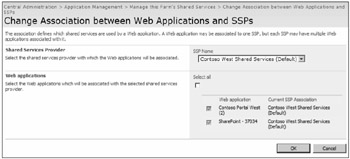
Figure 8-9: Verify you are modifying the correct SSP before re-associating Web applications.
EAN: 2147483647
Pages: 110