| This section walks through all the certificate generation and installation procedures needed for successful PEAP implementation. Configuring Automatic Client Enrollment on AD and Installing a Machine Certificate on a Windows Client The following steps describe how to enable automatic client certificate enrollment. Step 1. | On Domain Controller select Start>Programs>Administrative Tools>Active Directory Users and Computers.
| Step 2. | Right-click the domain's name and select Properties.
| | | Step 3. | Go to the Group Policy tab, select the Default Domain Policy, and click the Edit button as shown in Figure 11-9.
Figure 11-9. Domain Policy on the CA Server Environment 
| Step 4. | Go to Computer Configuration> Windows Settings> Security Settings> Public Key Policies> Automatic Certificate Request Settings as shown in Figure 11-10.
Figure 11-10. Group Policy on the CA Server 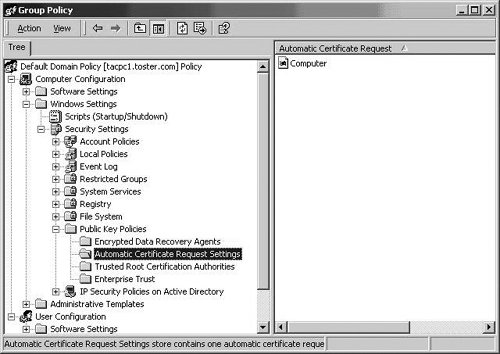
| | | Step 5. | Right-click and select a New>Automatic Certificate Request.
| Step 6. | Select a Computer certificate template as shown in Figure 11-11. Then select the desired CA and press Finish.
Figure 11-11. Certificate Template on the CA Server 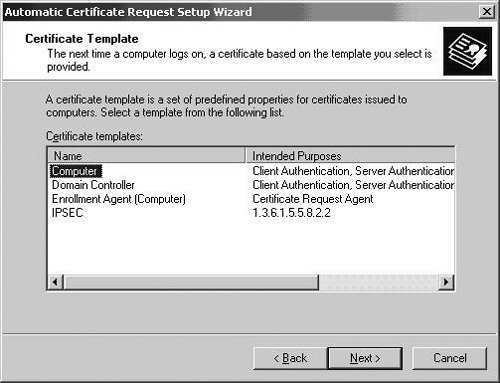
| Step 7. | From now on, any computer that will join the domain will automatically get a certificate.
|
Generating and Installing the CA Root Certificate on the ACS Server On the local ACS machine, point the browser at the Microsoft certification authority server as follows: Step 1. | If you are configured to log in, open the browser, browse to http://IP-address-of-Root-CA/certsrv, and provide all the credentials.
| Step 2. | Choose Retrieve the CA certificate or certification revocation list.
| Step 3. | Click on Download CA certificate and save it on the local machine. Make sure Base 64 encoded is selected.
| | | Step 4. | Open the certificate and click on Install Certificate as shown in Figure 11-12. Note that the icon at the top left corner of the screen shows that the certificate is not yet trusted (installed).
Figure 11-12. CA Root Certificate 
| Step 5. | Install the certificate in Local Computer/Trusted Root Certificate Authorities. Click Next and select Place all certificates in the following store and click Browse as shown in Figure 11-13.
Figure 11-13. Selecting Cert Storage for CA Cert 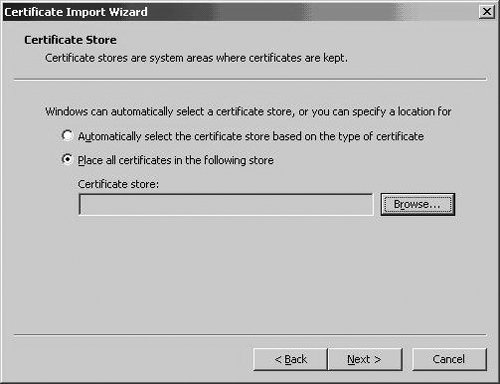
| | | Step 6. | Check Show physical stores and select under Trusted Root Certificate Authorities and Local Computer. Click OK as shown in Figure 11-14.
Figure 11-14. Choosing Local Computer for CA Cert 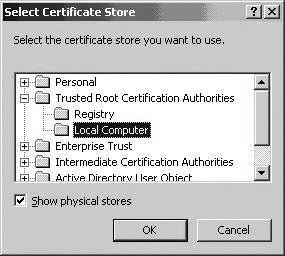
| Step 7. | Click Finish.
| Step 8. | Log in to ACS. Go to System Configuration > ACS Certificate Setup > Edit Certificate Trust List and check the trusted root certificate you've just installed as shown in Figure 11-15. Click Submit and restart ACS under System Configuration > Service Control > Restart.
Figure 11-15. Editing CA Cert Trust List 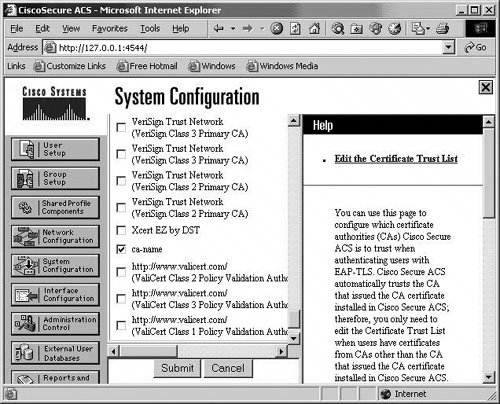
|
Generating and Installing an ACS Server Certificate on the ACS Server Follow the steps below to generate and install the ACS server certificate: Step 1. | Go to System Configuration  ACS Certificate Setup Generate Certificate Signing Request. This displays a Signing Request Form as shown in Figure 11-16. ACS Certificate Setup Generate Certificate Signing Request. This displays a Signing Request Form as shown in Figure 11-16.
Figure 11-16. Signing Request Form for Entering the Cipher Text Generated on ACS 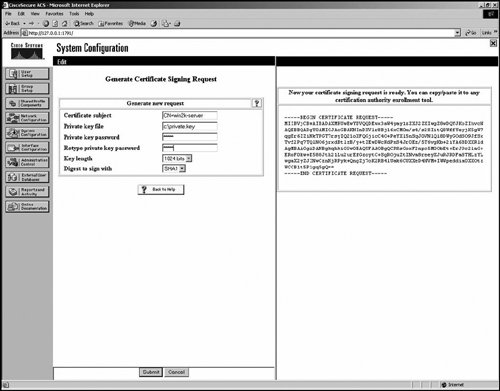
| Step 2. | In the Signing Request Form, fill in all the fields, and click Submit. This gives you the cipher text you need to copy and paste into the Signing Request to the CA sever, as discussed in step 3.
| Step 3. | Open a browser, and point to http://MS_Certificate_Server_IP/certsrv, which will bring up a signing Request Page. Choose Request a Certificate. In the next screen, choose Advanced request  Click on Next Choose Submit Certificate Request using a base 64 encoded PKCS#10. Then click Click on Next Choose Submit Certificate Request using a base 64 encoded PKCS#10. Then click Step 4. | Once you click Submit, you see a window similar to that shown in Figure 11-17. (If the auto-enrollment on the CA server is turned on, you will get this window. Otherwise, browse back to the CA Server as http://MS_CA_Server_IP/certsrv and change this option to Check on a Pending Certificate.)
Figure 11-17. ACS Server Certificate Approval Screen 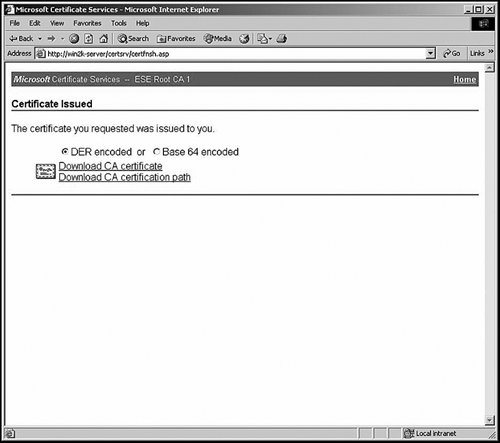
| Step 5. | Choose Base 64 encoded and download the CA certificate. The file type needs to have a .cer extension. The file can be stored anywhere.
| | | Step 6. | To install the server certificate that is downloaded in Step 5, go to ACS GUI, then browse to System Configuration > ACS Certificate Setup > Install ACS Certificate. Then you will see the screen shown in Figure 11-18.
Figure 11-18. ACS Server Cert Installation Screen 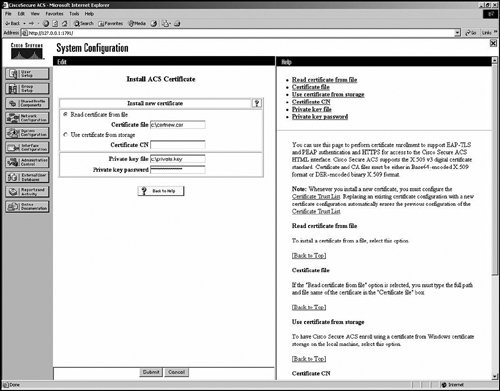
| | | Step 7. | In the form shown in Figure 11-19, choose Read Certificate from file and specify the name and location of the file downloaded earlier. Then click Submit, which displays another window, as shown in Figure 11-19.
Figure 11-19. ACS Server Cert Installation Screen 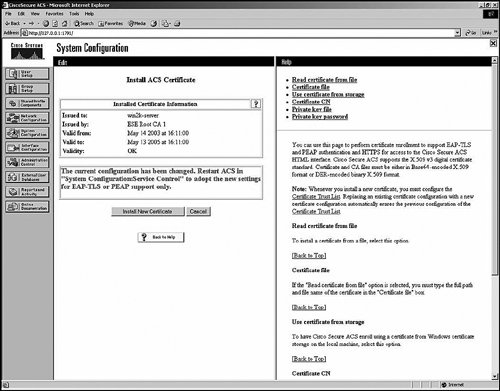
| | | Step 8. | Turn on Authentication parameters at System Configuration > Global Authentication Setup as shown in Figure 11-20.
Figure 11-20. Global Authentication Setup 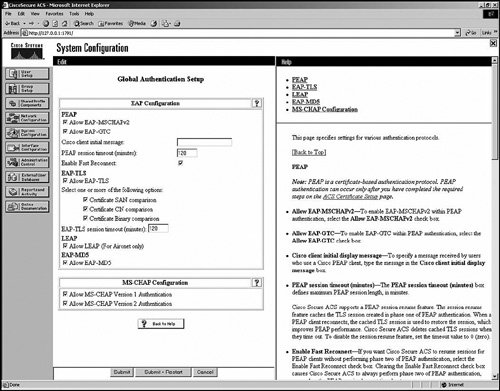
|
|