Staggered Isometric Grid
Staggered Isometric Grid
In this next example, you're going to create an isometric grid by laying out a basic floor tile. The particular arrangement that you're going to be using is called a staggered layout.
-
Start a new movie ( File > New; CTRL/CMD+N) and set your stage to 500300 pixels using the Document Properties dialog box. You can keep your frame rate at 12 fps since you're not going to be animating anything in this example. Save the file as grid_staggered.fla (also available in this chapter's source files).
-
Create a new movie clip using Insert > New Symbol... (CTRL/CMD+F8) and call it grid tile. You should then be presented with the empty timeline and stage for the new symbol.
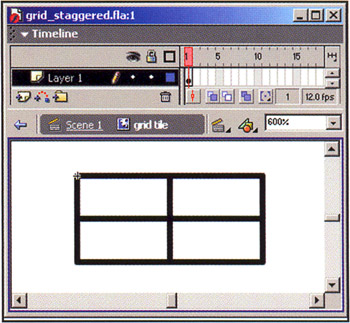
You'll start out by creating a basic floor tile that you'll duplicate and lay out using ActionScript to form a staggered isometric grid. Your tiles will be 32 pixels wide and 15 pixels tall. These dimensions allow you to achieve the unwieldy 25.56505 angle we were talking about earlier and create diagonals that look beautiful and tile perfectly . To help you draw the floor tile precisely, you're first going to draw a guide. The guide will be made up of a rectangle divided up into four smaller and equal- sized rectangles.
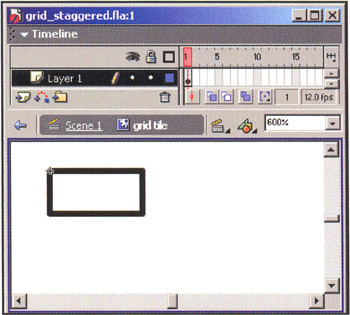
Using the Rectangle Tool (R) with a stroke color of black ( #000000 ) and no fill color, draw a small rectangle of arbitrary size . Since you're going to be working with small dimensions, it will help to zoom in on the rectangle so it takes up a little less than a quarter of the stage. This rectangle marks out the horizontal halfway point for your tile.
-
Double-click on one of the sides of the rectangle to select all sides and, using the Property Inspector, set its width to 16 , its height to 7.5 , x to , and y to .

-
With the rectangle still selected, use Edit > Duplicate (CTRL/CMD+D) to create a copy of the rectangle.
-
With the duplicate of the rectangle still selected, use the Property Inspector to set its x-coordinate to 16 and its y-coordinate to .
-
Without deselecting the second rectangle, use CTRL/CMD+D to make a third rectangle.
-
With the third rectangle still selected, use the Property Inspector to set its x-coordinate to and its y-coordinate to 7.5 .
-
To make the fourth and final rectangle, use CTRL/CMD+D with the third rectangle still selected and, using the Property Inspector, set its x-coordinate to 16 and its y-coordinate to 7.5 . That's it ”you're done with the guide. Now use it to draw the ground tile.
-
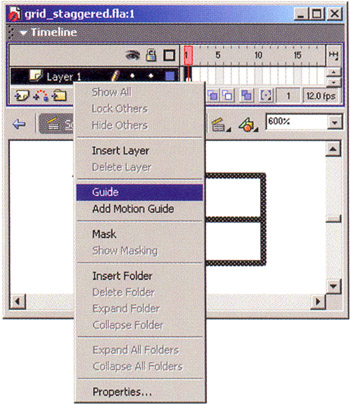
Without exiting the edit mode for the grid tile symbol, right-click (CMD-click on a Mac) on Layer 1 in the timeline and select Guide from the context-sensitive menu to convert Layer 1 into a Guide layer. A small hammer icon will appear to denote that the layer is indeed a guide. Turning a layer into a guide means that it will not show up when you export the movie. Finally, double-click on the layer name to edit it and rename it guide, and then lock this layer.
-
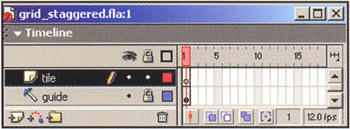
Next up, use Insert > Layer (or use the Insert Layer icon at the bottom of the timeline) to create a new layer. Doubleclick on it to rename it and call it tile . When you're done, your timeline should resemble the one opposite .
-
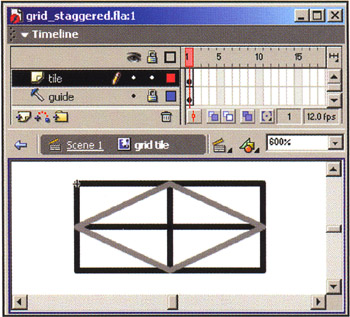
Making sure that Snap To Objects is active (checked) under the View menu (CTRL+SHIFT+/ on a PC, CMD+SHIFT+/ on a Mac), use the Line Tool (N) and a light gray Stroke Color (we used #999999 ) to connect the edges of the cross formed by the intersection of the four rectangles into a diamond shape as shown below. You should notice that the Line Tool automatically snaps to the points where the cross intersects the larger rectangle. Since the smaller rectangles are equal in size, these intersection points mark the horizontal and vertical midpoints of the larger rectangle. They also allow you to draw a symmetric isometric tile that adheres perfectly to the 25.56505 angle. Here's what the isometric tile looks like with the guide rectangles still visible:
-
You're done with our grid tile movie clip. Return to the main timeline by clicking on the Scene 1 link underneath the timeline.
-
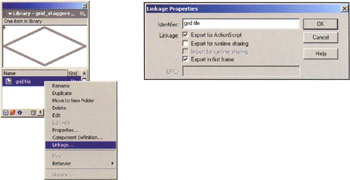
Since you're going to be using ActionScript to create our staggered isometric grid, you need to give the tile movie clip a Linkage ID (also known as a Symbol ID or Linkage Properties Identifier). Open the Library using Window > Library (F11), right-click (CMD-click on a Mac) on the grid tile movie clip, and select Linkage... from the context-sensitive menu.
-
In the Linkage Properties window, check the Export for ActionScript checkbox and make sure Export in first frame is also checked (it should become checked by default). Also make sure that the Identifier name is grid tile (again, it should default to it since it is the symbol's name).
-
Double-click on Layer 1 in the timeline to edit it and rename it actions . Click on frame 1 of this layer to select it and enter the following script in the Actions panel:
// the starting stage x-coordinate for the isometric 3D world WORLD_X = 90; // the starting stage y-coordinate for the isometric 3D world WORLD_Y = 30; // the width of a floor tile in our world TILE_W = 32; // the height of a floor tile in our world TILE_H = 15; // movie clip stacking depth var depth = 1000; // create the rows for (var gridY = 0; gridY<31; gridY++) { // handle odd and even rows differently if (gridY%2) { // even row // offset even rows, 16 pixels to the left xOffset = 16; // draw one additional tile for even rows numTiles = 11; } else { // odd row xOffset = 0; numTiles = 10; } // create the columns for (var gridX = 0; gridX<numTiles; gridX++) { // symbol ID of the tile var tileID = "grid tile"; // attach a copy of the tile movie clip to the stage _root.attachMovie(tileID, "gridTile"+depth+"_mc", depth++); // calculate the stage x- and y-coordinates to place the tile // based on its grid coordinates (gridX, gridY) var stageX = WORLD_X+(gridX*TILE_W-xOffset); var stageY = WORLD_Y+(gridY*TILE_H/2); // short-cut reference to the tile movie clip var theTile_mc = _root ["gridTile"+depth+"_mc"] ; // position the tile to by setting its _x and _y properties theTile_mc._x = stageX; theTile_mc._y = stageY; } }
The preceding simple script demonstrates the most important foundations of any tile-based world. We start off the code by setting up some initial constants to hold the top left coordinates of the world in stage coordinates, the dimensions of our tile movie clip and a counter to keep track of the depths of attached movie clips. We then come to the heart of the script: the nested loop that lays out the grid.
Here, we tell Flash that we want to create 31 rows. Depending on whether it is an odd- or even-numbered row, the rows have either 10 or 11 tiles in them. We do this so that if we were to mask the screen to a rectangular window (as is usually the case when the staggered layout is used), we wouldn't end up with gaps at the end of the even rows due to the horizontal offset toward the left.
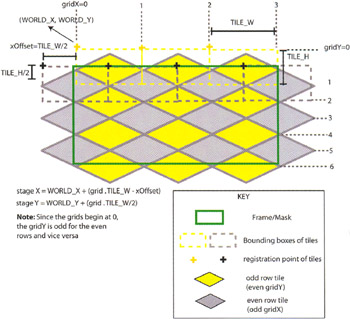
Since the loop used to create the columns (that is, lay out the tiles horizontally) is executed within the loop used to create the rows (that is, lay out the tiles vertically), it is said to be a nested loop. The diagram below shows the order in which the tiles are laid out and how we arrived at the equations used to position the tiles:
If our tiles had been regular, 2D rectangles, we could have laid them out very simply using the following code:
var stageX = WORLD_X + (gridX * TILE_W); var stageY = WORLD_Y + (gridY * TILE_H);
Basically, this means start with the origin we defined for our 3D world on the Flash stage ( WORLD_X, WORLD_Y ) and place each tile as far away from the origin horizontally as its horizontal position in the current row ( gridY ) multiplied by its width ( TILE_W ) and as far away from the origin vertically as its vertical position in the current column ( gridX ) multiplied by its height ( TILE_H ). Refer again to the preceding diagram to see this represented visually.
However, since our tiles are in fact not rectangular but are diamond-like in shape, we use the following code to lay the grid out:
var stageX = WORLD_X + (gridX * TILE_W - xOffset); var stageY = WORLD_Y + (gridY * TILE_H / 2);
These calculations create a staggered isometric layout.
To see what this looks like, test out the movie using C ontrol > Test Movie (CTRL+ENTER):
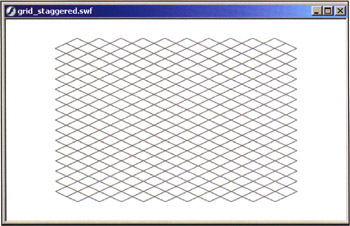
Creating a staggered isometric grid didn't do it for you? OK, so at this point you'd be forgiven for thinking that our design isn't exactly a prizewinner! But there's a reason for this: we need to cover the basics first. The isometric grid may not be much to look at, but it forms the basis on which isometric worlds are built. Carry right on to the next example, where you will create a new tile (a cube this time) and randomly attach it to your grid to create isometric cube structures. By the time you get to the end of this chapter, you'll know how to create a map-based isometric world and how to make a sprite to traverse the world using the keyboard.