Strengthening SSL Remote Access VPNs Security by Implementing Cisco Secure Desktop
One of the main advantages of SSL remote access VPNs is that they can provide access from almost any locationfrom a hotel, from an Internet café, or from a kiosk at an airport. Paradoxically, this ubiquity of access is also one of the main disadvantages of SSL remote access VPNsthese locations are often insecure, and a SSL remote access VPN implementation can, if you are not very careful, allow a hacker or cracker access to sensitive information including usernames, passwords, and data downloaded to the workstation from which a user is connecting.
This access to sensitive information can result from the installation of malware such as keystroke loggers as well as simply because web browser sessions leave traces such as caches, histories, temporary files, cookies, and password autocompletion. In addition, any data downloaded over an SSL remote access VPN and written to a hard disk is not effectively removed by its simple deletionsome or all of that data can be accessed fairly simply by someone with a minimal amount of technical expertise using readily available software tools.
So, having possibly horrified you with the possibilities of the compromise of SSL remote access VPNs, it is time to take a look at how the previously mentioned vulnerabilities can be addressed.
Cisco has software that helps to address these vulnerabilities called Cisco Secure Desktop. This software can be dynamically downloaded to client workstations upon initial connection via an ActiveX, Java, or .exe file.
The Cisco Secure Desktop suite can provide different levels of protection based on the location from which remote access users are connecting. In addition to the removal and overwrite of cache, histories, temporary files, and so on, the Secure Desktop suite can provide access based on the presence of antivirus software, firewall software, and operating systems and service packs.
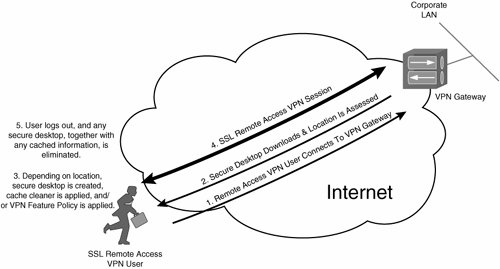
Secure Desktop operates as follows:
|
1. |
A remote access VPN user connects to the VPN 3000 concentrator. |
|
2. |
The Cisco Secure Desktop is dynamically downloaded from the concentrator to the user workstation, and the location of the workstation is assessed. |
|
3. |
Depending on the location, a secure, virtual desktop is created; a cache cleaner is applied; and/or a VPN feature policy is applied on the user workstation. The secure desktop includes an encrypted sandbox or hard drive partition. |
|
4. |
The user continues with his/her SSL remote access VPN session. |
|
5. |
When the user logs out from the VPN 3000 concentrator, the secure desktop is eliminated, with all cache, history, temporary files, and user data (including e-mail attachments) being overwritten using the U.S. Department of Defense (DoD) method for secure data elimination. |
Figure 10-41 illustrates the operation of Cisco Secure Desktop.
Figure 10-41. Operation of Cisco Secure Desktop
Installing the Cisco Secure Desktop
The first step in implementing the Cisco Secure Desktop is to install the software on the VPN 3000 concentrator. You can accomplish this by going to Configuration > Tunneling and Security > WebVPN > Secure Desktop > Setup (see Figure 10-42).
Figure 10-42. Installing the Cisco Secure Desktop
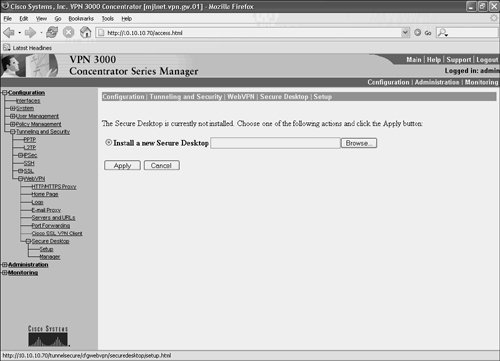
Choose Install a new Secure Desktop, browse to the location where the software is stored, and click Apply. If all is well and good, a page with a message stating that the software has been correctly uploaded will now display.
Configuring the Cisco Secure Desktop for Windows Clients
After the software has been installed, you can go to Configuration > Tunneling and Security > WebVPN > Secure Desktop > Manager to begin configuration.
As previously described, the Cisco Secure Desktop is location based. That is, the Cisco Secure Desktop applied depends on the location from which users connect.
Click the Windows Location Settings heading in the subtree on the left side of the Cisco Secure Desktop window. You will then see the Windows Location Settings page shown in Figure 10-43.
Figure 10-43. Specifying Locations Within Cisco Secure Desktop
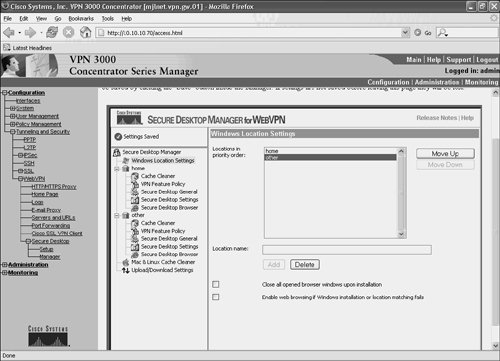
In the Location name box, you can specify the names of locations from which user can connect to the VPN 3000 concentrator and add them in turn by clicking the Add button. In Figure 10-43, two locations have been added, home and other.
When users connect to the VPN 3000 concentrator, they are matched against the configured locations in the order that they are listed in the Windows Location Settings window. So, it is important to list to locations in the correct order.
Configuration of the security setting associated with each location is achieved by clicking the location names in the left pane of the window.
You might be wondering how the VPN 3000 concentrator knows that, for example, a user is connecting from his home office and not some other location such as an Internet café or kiosk. Locations are identified by the Secure Desktop when it downloads to a user workstation depending on whether a certificate is installed on the machine, whether the machine NIC is assigned a certain IP address, or whether a machine has a certain registry setting or file.
Figure 10-44 shows the configuration of the identification criteria for a location (in this example, home).
Figure 10-44. Configuration of the Identification Criteria for a Location
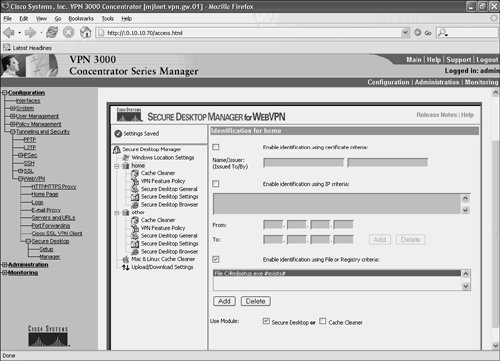
If you take a look at the Identification pane in Figure 10-44 (Identification for home), you will see that there are three options (check boxes):
- Enable identification using certificate criteria By checking this box, it is possible to use the fields of a certificate installed on the user workstation to identify its location.
- Enable identification using IP criteria Checking this box enables an administrator to specify a range of IP addresses. If a user workstation is assigned an IP address within this range, the workstation's location is identified on this basis.
- Enable identification using File or Registry criteria This box, if checked, allows identification of a location based on a file or registry entry on a user workstation.
In Figure 10-44, the identification of the location home is based on the existence of a file called mjlsetup.exe on the user workstation.
In summary, when a user connects to the VPN 3000 concentrator, the Cisco Secure Desktop dynamically downloads, and the location of the workstation from which the user is connecting is assessed based on the configured criteria.
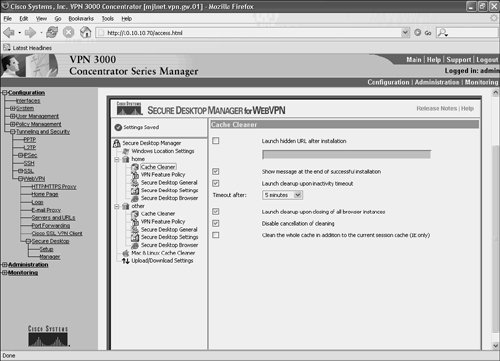
Having configured the location criteria, it is important to specify which Cisco Secure Desktop suite module or function will be applied on a user workstation according to its location. The modules and functions are as follows:
- Cache Cleaner As the name suggests, this module deletes and disables information including browser caches, temporary files, and autocompletion information, including passwords.
- VPN Feature Policy This module provides selective WebVPN access depending on the presence of components such as antivirus software, operating system type and service pack level, firewall software, and other Secure Desktop components.
- Secure Desktop This module provides a secure, encrypted space (desktop) on Windows XP and Windows 2000. The user session is then created within this secure desktop.
The particular module that is used on a workstation at a particular location depends on the selection specified at the bottom of the Identification pane (see Figure 10-44).
It is possible to choose either Secure Desktop or Cache Cleaner for a particular location by checking the appropriate box next to Use Module. If you do not choose Secure Desktop or Cache Cleaner, the VPN Feature Policy is used for a location.
Configuring the Windows Cache Cleaner
The Cache Cleaner settings for a particular location can be configured by clicking Cache Cleaner in the subtree of that location on the left side of the Cisco Secure Desktop Manager.
Figure 10-45 shows the configuration settings for the Cache Cleaner.
Figure 10-45. Configuration Settings for the Cache Cleaner
Specific settings for Cache Cleaner include the following:
- Launch hidden URL after installation If this setting is checked, a URL can be entered which is launched after the installation of the Cache Cleaner.
- Show message at the end of successful installation If this setting is checked, a message displays on the user workstation confirming the successful installation of the Cache Cleaner.
- Launch cleanup upon inactivity timeout When this option is checked, the Cache Cleaner begins operation after a period of inactivity on the user workstation.
- Launch cleanup upon closing of all browser instances This setting, if checked, causes the Cache Cleaner to begin operation when all browser windows are closed.
- Disable cancellation of cleaning This prevents user cancellation of cache cleaning.
- Clean the whole cache in addition to the current session cache (IE only) Checking this setting ensures that the Internet Explorer cache is cleaned when the Cache Cleaner starts.
Configuring VPN Feature Policy Settings
To configure VPN Feature Policy settings for a location, click the VPN Feature Policy on the subtree of the location; the screen shown in Figure 10-46 will appear.
Figure 10-46. Configuring VPN Feature Policy Settings
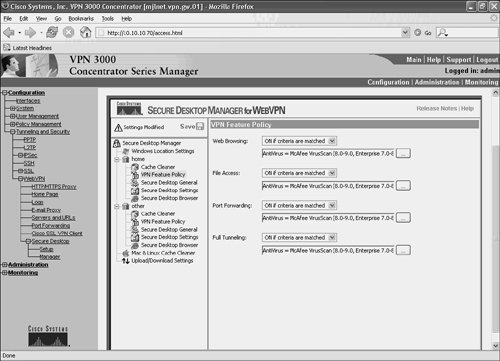
Settings for the VPN Feature Policy include Web Browsing, File Access, Port Forwarding, and Full Tunneling.
These settings (levels of access) can be enabled, enabled if certain conditions are fulfilled, or be disabled from a user workstation by choosing ON, ON if criteria are matched, or OFF, respectively, in the corresponding drop-down boxes.
If you choose the ON if criteria are matched option, the criteria that must be fulfilled for a particular level of access to be enabled can be specified by clicking on the ellipsis (. . .) button.
The criteria that can be matched include the presence of antivirus software, firewall software, operating system and service pack, and other Secure Desktop features on the user workstation.
Configuring Secure Desktop Options
When the Secure Desktop is specified for a particular location, you can configure the associated options by clicking Secure Desktop General, Secure Desktop Settings, and Secure Desktop Browser in location subtree.
Figure 10-47 shows the options associated with Secure Desktop General.
Figure 10-47. Configuring Options Associated with Secure Desktop General
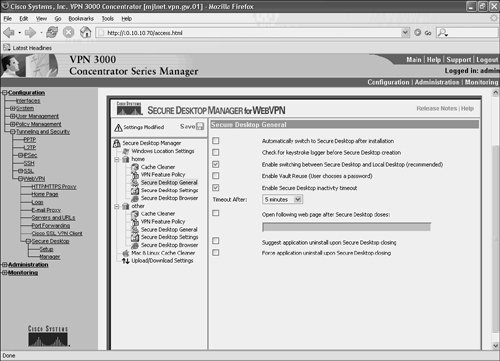
Secure Desktop General settings include the following:
- Automatically switch to Secure Desktop after installation When checked, this setting causes the Secure Desktop to load immediately after installation.
- Check for keystroke logger before Secure Desktop creation This setting, if checked, causes a check for a keystroke logger to run before the creation of the Secure Desktop on the user workstation.
This setting only works if the user has administrator privileges on the workstation.
- Enable switching between Secure Desktop and Local Desktop (recommended) If this option is checked, the user can switch between the secure desktop and the regular desktop on the workstation.
It is a very good idea to check this option so that users can respond to any application prompts.
- Enable Vault Reuse (User chooses a password) If checked, a Secure Desktop vault can be reused (and not overwritten between sessions).
The user selects a password to allow access to this Secure Desktop.
- Enable Secure Desktop inactivity timeout When checked, this option causes the Secure Desktop to automatically close after a period of inactivity.
- Open following web page after Secure Desktop closes This setting, if checked, causes a URL to be opened after the Secure Desktop closes.
- Suggest application uninstall upon Secure Desktop closes When this setting is checked, the user is asked whether he/she wants the Secure Desktop uninstalled after it closes.
- Force application uninstall upon Secure Desktop closing The Secure Desktop is forcibly uninstalled after the Secure Desktop closes when checked.
Clicking Secure Desktop Settings in the subtree allows further Secure Desktop options to be configured (see Figure 10-48).
Figure 10-48. Configuring Secure Desktop Settings
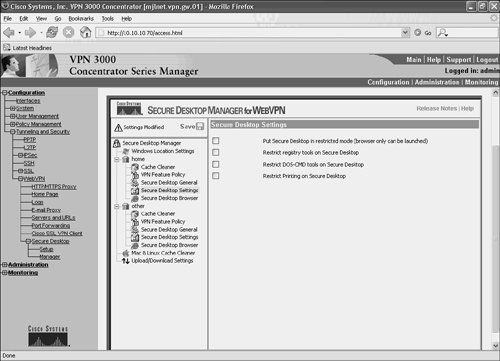
The further four options contained under Secure Desktop Settings are as follows:
- Put Secure Desktop in restricted mode When this setting is checked, only the browser that was originally used to start the Secure Desktop can be used in the Secure Desktop itself.
- Restrict Registry tools on Secure Desktop If checked, this option ensures that a user cannot modify the registry within the Secure Desktop.
- Restrict DOS-CMD tools on Secure Desktop This setting, if checked, prevents the use of the DOS prompt within the Secure Desktop.
- Restrict Printing on Secure Desktop When this option is checked, users cannot print from within the Secure Desktop.
The options under Secure Desktop Settings can be chosen to ensure the highest level of security for the Secure Desktop.
Configuring Cache Cleaner Options for Mac and Linux Users
The Mac and Linux Cache Cleaner heading under the subtree in the Secure Desktop Manager allows the configuration of options associated with the Cache Cleaner for Mac and Linux users.
Figure 10-49 shows the configuration options for the Mac and Linux Cache Cleaner.
Figure 10-49. Configuration Options for the Mac and Linux Cache Cleaner
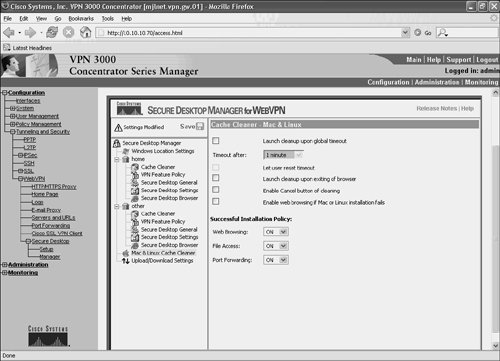
Mac and Linux Cache Cleaner options are as follows:
- Launch cleanup upon global timeout When checked, this option causes the Cache Cleaner to run after a period of inactivity on the user workstation.
- Let user reset timeout If this setting is checked, a user can reset the timeout time period.
- Launch cleanup upon exiting of browser This option, if checked, causes the Cache Cleaner to start when all browser instances are closed.
- Enable Cancel button of cleaning When this box is checked, users are able to cancel cache cleaning.
- Enable web browsing if Mac or Linux installation fails This option ensures that web browsing is allowed if the installation of the Cache Cleaner fails.
The Successful Installation Policy options allow the configuration of VPN Feature Policy settings for Mac and Linux users:
- Web browsing If ON is chosen, web browsing is allowed from Mac and Linux workstations.
- File Access Allow (ON) or disallow (OFF) file access.
- Port Forwarding Allow or disallow port forwarding.
Note that VPN Feature Policy settings on Mac and Linux workstations do not depend on criteria such as the presence of antivirus software or access from a particular location (unlike Windows VPN Feature Policy settings).
Note
Having configured Cisco Secure Desktop, make sure that you save the configuration within the Cisco Secure Desktopthe configuration is independent of that for the VPN 3000 concentrator as a whole.
Enabling the Cisco Secure Desktop
After all the relevant settings have been configured within the Cisco Secure Desktop Manager, it is time to enable the Cisco Secure Desktop. You can accomplish this under Configuration > Tunneling and Security > WebVPN > Secure Desktop > Setup (Figure 10-50).
Figure 10-50. Enabling the Secure Desktop

Choose Enable Secure Desktop and click Apply. The Secure Desktop is now enabled.
Part I: Understanding VPN Technology
What Is a Virtual Private Network?
- What Is a Virtual Private Network?
- VPN Devices
- Deploying Site-to-Site and Remote Access VPNs: A Comparison
- Summary
- Review Questions
Part II: Site-to-Site VPNs
Designing and Deploying L2TPv3-Based Layer 2 VPNs
- Designing and Deploying L2TPv3-Based Layer 2 VPNs
- Benefits and Drawbacks of L2TPv3-Based L2VPNs
- L2TPv3 Pseudowire Operation
- Configuring and Verifying L2TPv3 Pseudowires
- Summary
- Review Questions
Designing and Implementing AToM-Based Layer 2 VPNs
- Designing and Implementing AToM-Based Layer 2 VPNs
- Benefits and Drawbacks of AToM-Based L2VPNs
- AToM Pseudowire Operation
- Deploying AToM Pseudowires
- Implementing Advanced AToM Features
- Summary
- Review Questions
Designing MPLS Layer 3 Site-to-Site VPNs
- Designing MPLS Layer 3 Site-to-Site VPNs
- Advantages and Disadvantages of MPLS Layer 3 VPNs
- MPLS Layer 3 VPNs Overview
- A Detailed Examination of MPLS Layer 3 VPNs
- Deploying MPLS Layer 3 VPNs
- Summary
- Review Questions
Advanced MPLS Layer 3 VPN Deployment Considerations
- Advanced MPLS Layer 3 VPN Deployment Considerations
- The Carriers Carrier Architecture
- The Inter-Autonomous System/Interprovider MPLS VPN Architecture
- Supporting Multicast Transport in MPLS Layer 3 VPNs
- Implementing QoS for MPLS Layer 3 VPNs
- Supporting IPv6 Traffic Transport in MPLS Layer 3 VPNs Using 6VPE
- Summary
- Review Questions
Deploying Site-to-Site IPsec VPNs
- Deploying Site-to-Site IPsec VPNs
- Advantages and Disadvantages of IPsec Site-to-Site VPNs
- IPsec: A Security Architecture for IP
- Deploying IPsec VPNs: Fundamental Considerations
- Summary
- Review Questions
Scaling and Optimizing IPsec VPNs
- Scaling and Optimizing IPsec VPNs
- Scaling IPsec Virtual Private Networks
- Ensuring High Availability in an IPsec VPN
- Designing QoS for IPsec VPNs
- MTU and Fragmentation Considerations in an IPsec VPN
- Summary
- Review Questions
Part III: Remote Access VPNs
Designing and Implementing L2TPv2 and L2TPv3 Remote Access VPNs
- Designing and Implementing L2TPv2 and L2TPv3 Remote Access VPNs
- Benefits and Drawbacks of L2TP Remote Access VPNs
- Operation of L2TP Voluntary/Client-Initiated Tunnel Mode
- Implementing L2TP Voluntary/Client-Initiated Tunnel Mode Remote Access VPNs
- Designing and Implementing L2TP Compulsory/NAS-Initiated Tunnel Mode Remote Access VPNs
- Integrating L2TP Remote Access VPNs with MPLS VPNs
- Summary
- Review Questions
Designing and Deploying IPsec Remote Access and Teleworker VPNs
- Designing and Deploying IPsec Remote Access and Teleworker VPNs
- Comparing IPsec Remote Access VPNs with Other Types of Remote Access VPNs
- Understanding IKE in an IPsec Remote Access VPN Environment
- Deploying IPsec Remote Access VPNs Using Preshared Key and Digital Signature Authentication
- Summary
- Review Questions
Designing and Building SSL Remote Access VPNs (WebVPN)
- Designing and Building SSL Remote Access VPNs (WebVPN)
- Comparing SSL VPNs to Other Types of Remote Access VPNs
- Understanding the Operation of SSL Remote Access VPNs
- Using Clientless SSL Remote Access VPNs (WebVPN) on the Cisco VPN 3000 Concentrator
- Implementing Full Network Access Using the Cisco SSL VPN Client
- Strengthening SSL Remote Access VPNs Security by Implementing Cisco Secure Desktop
- Enabling SSL VPNs (WebVPN) on Cisco IOS Devices
- Deploying SSL VPNs (WebVPN) on the ASA 5500
- Summary
- Review Questions
Part IV: Appendixes
Designing and Building SSL Remote Access VPNs (WebVPN)
- Designing and Building SSL Remote Access VPNs (WebVPN)
- Appendix A. VPLS and IPLS Layer 2 VPNs
- Understanding VPLS
- Understanding IPLS
- Summary: Comparing VPLS and IPLS
Appendix B. Answers to Review Questions
EAN: 2147483647
Pages: 124
