| The final segment of this Web application will manage files of any type. These scripts will allow users to upload files from their computers, which will then be stored on the server. The concept behind managing file uploadsas well as the very, very important preparation stepswas discussed in Chapter 11, "Extended Topics." This application will expand upon that basic demonstration by Storing the file's information in the database Renaming the file Providing a method of downloading the files Placing the files outside of the Web root directory, for improved security
In order to use these scripts, you'll need to do two things. First, create the uploads table (if you haven't already), using this SQL command (Figure 12.21). CREATE TABLE uploads ( upload_id int(10) UNSIGNED NOT NULL  AUTO_INCREMENT, file_name VARCHAR(30) NOT NULL, file_size INT(6) UNSIGNED NOT NULL, file_type VARCHAR(30) NOT NULL, description VARCHAR(100) DEFAULT NULL, date_entered TIMESTAMP, PRIMARY KEY (upload_id), KEY (file_name), KEY (date_entered) ) AUTO_INCREMENT, file_name VARCHAR(30) NOT NULL, file_size INT(6) UNSIGNED NOT NULL, file_type VARCHAR(30) NOT NULL, description VARCHAR(100) DEFAULT NULL, date_entered TIMESTAMP, PRIMARY KEY (upload_id), KEY (file_name), KEY (date_entered) )
Figure 12.21. Create a new table to manage the list of uploaded files. 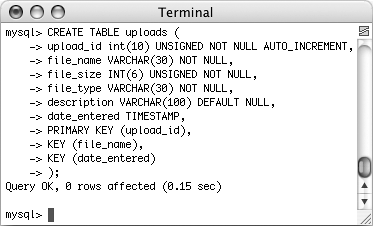
Second, create an uploads directory, located outside of the Web directory (see Figure 12.3). Make sure that this directory has open permissions so that PHP (through the Web server) can write to it. Again, see Chapter 11 for specific instructions. Uploading files The page used to upload files will be rather simple, taking only a file and an optional description. To expand upon this functionality, the page will present the option of accepting up to three files. This variation will demonstrate how easy it is to manage multiple file submissions in one script. As I mentioned, the file's informationname, type, size, and descriptionwill be stored in the database. The file itself will be stored in the uploads directory and renamed using the associated upload_id from the uploads table. To write add_file.php 1. | Create a new PHP document in your text editor (Script 12.8).
<?php # Script 12.8 - add_file.php HTML header. $page_title = 'Upload a File'; include ('./includes/header.html'); $counter = 3;
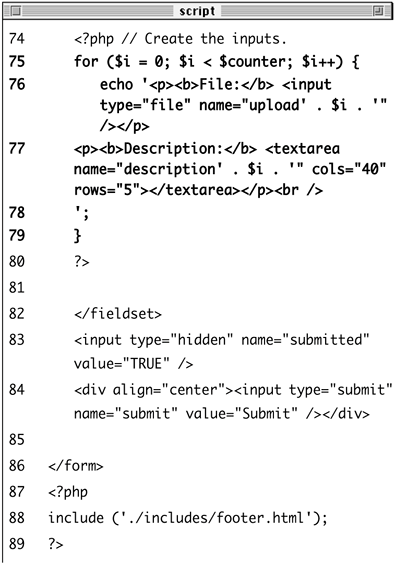
Script 12.8. This script allows the user to upload one to three files that will then be stored on the server. 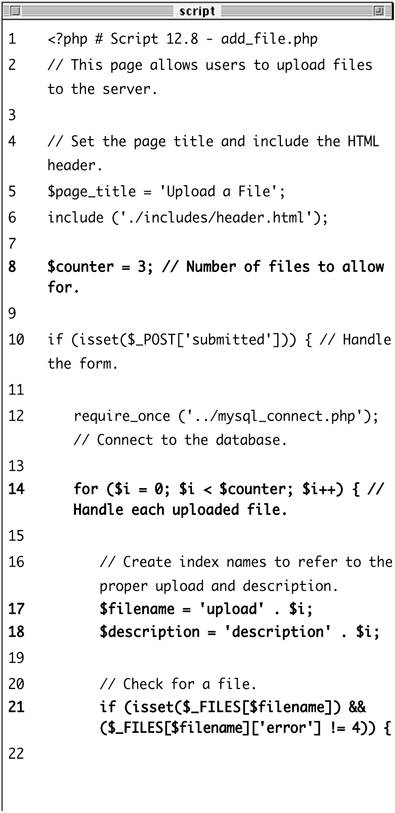
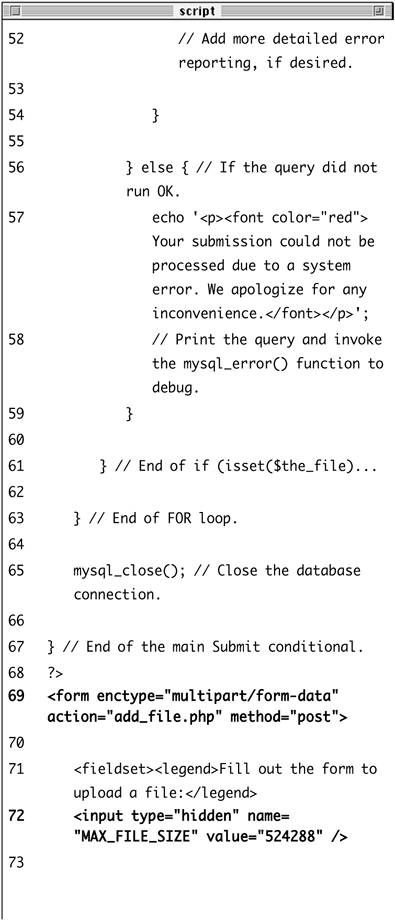
The $counter variable will be used to determine how many files can be uploaded in this one script.
| 2. | Check if the form has been submitted, include the database connection, and define a for loop.
if (isset($_POST['submitted'])) { require_once ('../mysql_connect.  php); for ($i = 0; $i < $counter; $i++) { php); for ($i = 0; $i < $counter; $i++) {
The for loop will run the same sequence of steps for each of the potentially uploaded files. By changing the value of $counter (see Step 1), you can increase or decrease the number of allowed file uploads.
| 3. | Check if a file has been uploaded.
$filename = 'upload' . $i; $description = 'description' . $i; if (isset($_FILES[$filename]) &&  ($_FILES[$filename]['error] ($_FILES[$filename]['error]  != 4)) { != 4)) {
The form's file inputs will have names like upload0, upload1, upload2 (Figure 12.22). To determine if a particular file upload has been used, I first create a shorthand for the element name by combining the word upload with the value of $i. Then I see if $_FILES[$filename] has a value, and that it doesn't have an error value of 4, which would mean that no file was uploaded.
Figure 12.22. The HTML source of the page shows the different names for the dynamically generated form elements. 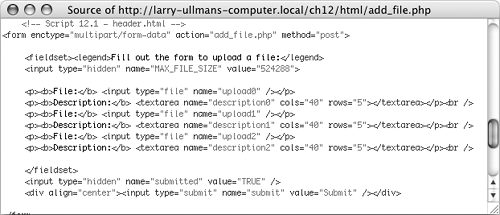
The form will also have textareas called description0, description1, etc., so I create a shorthand reference for those here as well.
| 4. | Validate the description.
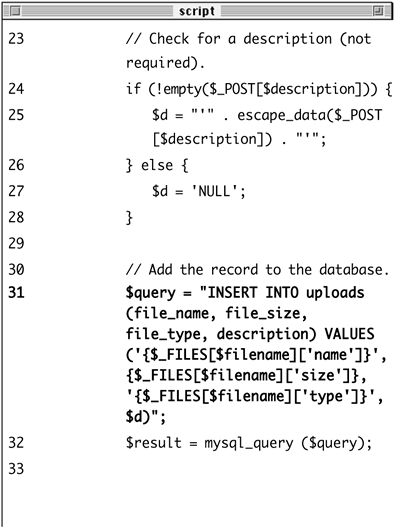
if (!empty($_POST[$description])) { $d = "'" . escape_data($_POST  [$description]) . "'"; } else { $d = 'NULL'; } [$description]) . "'"; } else { $d = 'NULL'; }
As in my add_url.php example, I'll use a bare minimum of validation on the description input. Since this form will have no other fields to be validated, this is the only conditional required. You could also validate the size of the uploaded file to determine if it fits within the acceptable range, if you want.
One new idea here is that I want the resulting variable$dto be INSERT-able into my database as is. If there is no file description, $d will have a value of NULL, so that the column's value is NULL. If there is a description, $d will be of the format 'This is the description', including the single quotation marks. This should make more sense when you look at the query in the next step.
| 5. | Insert the record into the database for this upload.
$query = "INSERT INTO uploads  (file_name, file_size, file_type, (file_name, file_size, file_type,  description) VALUES ('{$_FILES description) VALUES ('{$_FILES  [$filename]['name]}', {$_FILES [$filename]['name]}', {$_FILES  [$filename]['size]}, '{$_FILES [$filename]['size]}, '{$_FILES  [$filename]['type]}', $d)"; $result = mysql_query ($query); [$filename]['type]}', $d)"; $result = mysql_query ($query);
Each uploaded file will be recorded in the database using this query. It makes use of the $_FILES multidimensional array, inserting the original filename, its size, and its MIME type, all of which come from the Web browser. The description is also stored.
As an added measure of security, you could run all of the $_FILES information through the escape_data() function.
| 6. | Create the new filename.
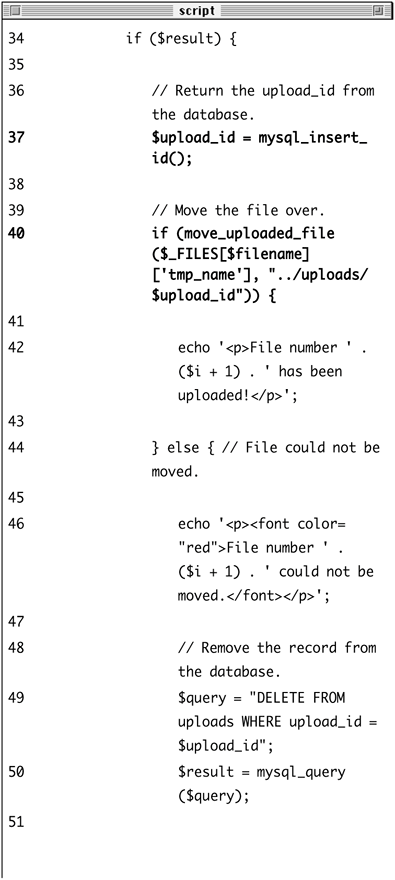
if ($result) { $upload_id = mysql_insert_id();
The file will be stored on the server using a new name, which is much more secure than using the original user-defined name. The name of the file will be its upload_id from the database (retrieved by the mysql_insert_id() function).
| 7. | Copy the file to its new location on the server.
if (move_uploaded_file($_FILES  [$filename]['tmp_name], "../ [$filename]['tmp_name], "../  uploads/$upload_id)) { echo '<p>File number ' . ($i + 1) uploads/$upload_id)) { echo '<p>File number ' . ($i + 1)  . ' has been uploaded!</p>'; } else { echo '<p><font color="red"> . ' has been uploaded!</p>'; } else { echo '<p><font color="red">  File number ' . ($i + 1) . ' File number ' . ($i + 1) . '  could not be moved.</font></p>'; $query = "DELETE FROM uploads could not be moved.</font></p>'; $query = "DELETE FROM uploads  WHERE upload_id = $upload_id; $result = mysql_query ($query); } WHERE upload_id = $upload_id; $result = mysql_query ($query); }
I'll use the move_uploaded_file() function to move the temporary file to its permanent location (in the uploads folder with its new name). If the move worked, a message is printed indicating such. If the file could not be moved (see Figure 12.23), I'll delete the record from the database and print an error message.
Figure 12.23. If you see a permissions error like this, make sure your pathname is valid and that the permissions on the destination directory are appropriate. 
| 8. | Complete the conditionals, the for loop, and the PHP section.
} else { echo '<p><font color=  "red>Your submission "red>Your submission  could not be processed could not be processed  due to a system error. due to a system error.  We apologize for any We apologize for any  inconvenience.</font> inconvenience.</font>  </p>'; } } } mysql_close(); } ?> </p>'; } } } mysql_close(); } ?>
| 9. | Begin the HTML form.
<form enctype="multipart/form-data"  action="add_file.php action="add_file.php  method="post> <fieldset><legend>Fill out the method="post> <fieldset><legend>Fill out the  form to upload a file:</legend> <input type="hidden" name= form to upload a file:</legend> <input type="hidden" name=  "MAX_FILE_SIZE value="524288" /> "MAX_FILE_SIZE value="524288" />
This form will be very simple, but it contains the three necessary parts for file uploads: the form's enctype attribute, the MAX_FILE_SIZE hidden input (524,288 bytes or 512 KB), and the file input (three of them, actually).
| 10. | Create the file and description inputs.
<?php for ($i = 0; $i < $counter; $i++) { echo '<p><b>File:</b> <input  type="file name="upload' . type="file name="upload' .  $i . '" /></p> <p><b>Description:</b> <textarea $i . '" /></p> <p><b>Description:</b> <textarea  name="description . $i . '" name="description . $i . '"  cols="40 rows="5"></textarea> cols="40 rows="5"></textarea>  </p><br /> '; } ?> </p><br /> '; } ?>
To create the inputs, I use another loop based upon the $counter variable. Within the loop, the two inputs are printed, using a unique name for each (see Figure 12.22).
Remember that you only need the one MAX_FILE_SIZE input (see Step 9), regardless of how many actual file inputs you have.
| 11. | Complete the form and the PHP page.
</fieldset> <input type="hidden" name=  "submitted value="TRUE" /> <div align="center"><input "submitted value="TRUE" /> <div align="center"><input  type="submit name="submit" type="submit name="submit"  value="Submit /></div> </form> <?php include ('./includes/footer.html'); ?> value="Submit /></div> </form> <?php include ('./includes/footer.html'); ?>
| 12. | Save the file as add_file.php, upload to your Web server, and test in your Web browser (Figures 12.24 and 12.25).
Figure 12.24. The file upload form. 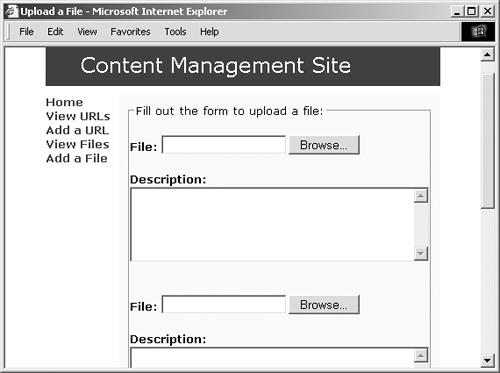
Figure 12.25. The result if the file upload worked. 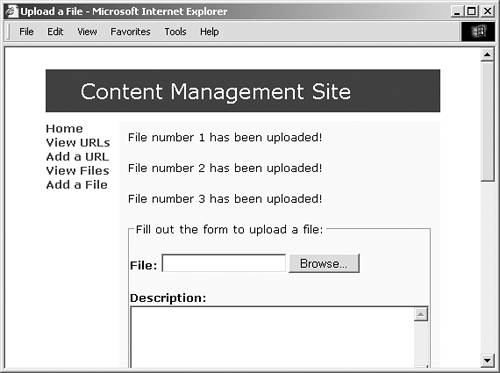
|
 Tips Tips
Once this script is ready to go live, you can suppress any future error messages by prepending the move_uploaded_file() function with @. Because this script uploads multiple files, you may need to adjust the post_max_size and max_execution_time settings in the php.ini file. The files are stored on the server without file extensions. This isn't a problem, though, as the files will be given their original names when the user attempts to download them.
Viewing and downloading files The final two scripts in the application will allow users to view the uploaded files and then download them (one at a time). The viewing part is fairly obvious, but the downloading script requires extensive use of PHP's header() function. To write view_files.php 1. | Create a new PHP document in your text editor (Script 12.9).
<?php # Script 12.9 - view_files.php $page_title = 'View Files'; include ('./includes/header.html'); require_once ('../mysql_connect.  php); $first = TRUE; php); $first = TRUE;
Script 12.9. The view_files.php script shows the uploaded files, along with their description, size, and uploaded date. 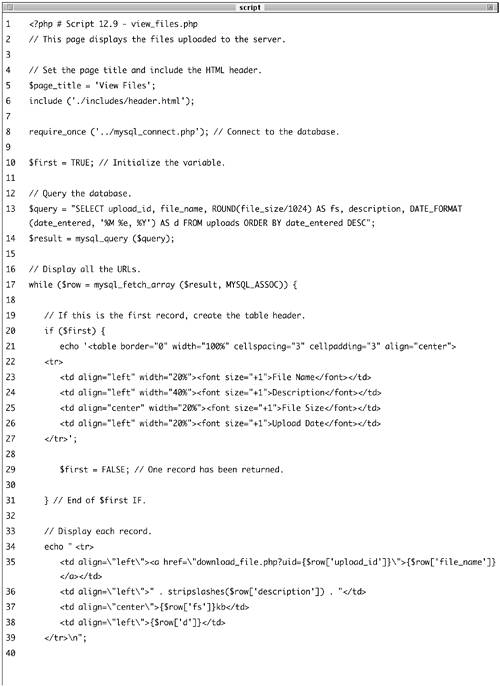 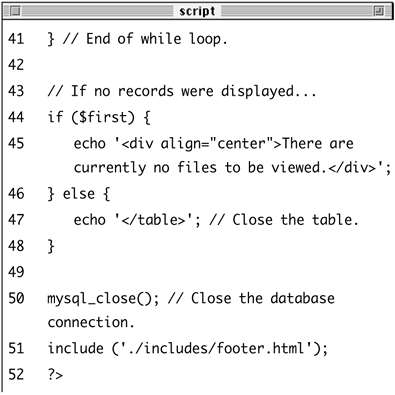
The $first variable will be used as it was in the view_urls.php script: to create the header and indicate whether or not some files are viewable.
| 2. | Retrieve all of the files from the database.
$query = "SELECT upload_id,  file_name, ROUND(file_size/1024) file_name, ROUND(file_size/1024)  AS fs, description, DATE_FORMAT AS fs, description, DATE_FORMAT  (date_entered, '%M %e, %Y) AS d (date_entered, '%M %e, %Y) AS d  FROM uploads ORDER BY date_entered FROM uploads ORDER BY date_entered  DESC; $result = mysql_query ($query); DESC; $result = mysql_query ($query);
This query will return the upload_id, file_name, description, and a formatted date for every uploaded file, the most recently uploaded file listed first. At the same time, the query will return the file's size in kilobytes, by dividing the stored file size by 1,024 and then rounding this number off.
| 3. | Display every record.
while ($row = mysql_fetch_array  ($result, MYSQL_ASSOC)) { if ($first) { echo '<table border="0" ($result, MYSQL_ASSOC)) { if ($first) { echo '<table border="0"  width="100%" cellspacing="3 width="100%" cellspacing="3  cellpadding="3 cellpadding="3  align="center> <tr> <td align="left" width="20%"> align="center> <tr> <td align="left" width="20%">  <font size="+1>File Name <font size="+1>File Name  </font></td> <td align="left" width="40%"> </font></td> <td align="left" width="40%">  <font size="+1>Description <font size="+1>Description  </font></td> <td align="center" width="20%"> </font></td> <td align="center" width="20%">  <font size="+1>File Size <font size="+1>File Size  </font></td> <td align="left" width="20%"> </font></td> <td align="left" width="20%">  <font size="+1>Upload Date <font size="+1>Upload Date  </font></td> </tr>'; $first = FALSE; } echo " <tr> <td align=\"left\"><a href= </font></td> </tr>'; $first = FALSE; } echo " <tr> <td align=\"left\"><a href=  \"download_file.php?uid= \"download_file.php?uid=  {$row['upload_id]}\">{$row {$row['upload_id]}\">{$row  ['file_name]}</a></td> <td align=\"left\">" . ['file_name]}</a></td> <td align=\"left\">" .  stripslashes($row stripslashes($row  ['description]) . "</td> <td align=\"center\">{$row ['description]) . "</td> <td align=\"center\">{$row  ['fs]}kb</td> <td align=\"left\">{$row ['fs]}kb</td> <td align=\"left\">{$row  ['d]}</td> </tr>\n"; } ['d]}</td> </tr>\n"; }
Again, this section works much like its predecessor in view_urls.php. The $first variable is used to create a header once and then every record is printed (Figure 12.26). I'm using the MYSQL_ASSOC constant with mysql_fetch_array() and therefore refer to, for example, $row['fs'], to print out the values.
Figure 12.26. The view_files.php page. 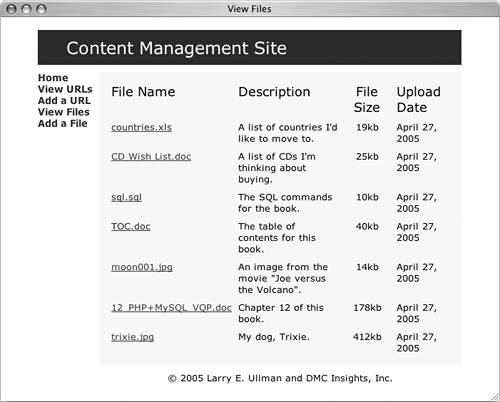
Each filename is a link to the download_file.php script, with the upload_id appended to the URL as uid. This value will be used by the download script to know which file to send to the Web browser.
| 4. | Display a message if there were no files or close the table if there were.
if ($first) { echo '<div align="center">There  are currently no files to be are currently no files to be  viewed.</div>'; } else { echo '</table>'; } viewed.</div>'; } else { echo '</table>'; }
| 5. | Complete the PHP page.
mysql_close(); include ('./includes/footer.html'); ?>
| 6. | Save the file as view_files.php, upload to your Web server, and test in your Web browser.
|
To write download_file.php 1. | Create a new PHP document in your text editor (Script 12.10).
<?php # Script 12.10 - download_file.php
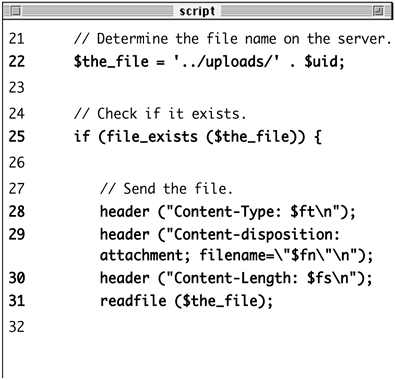
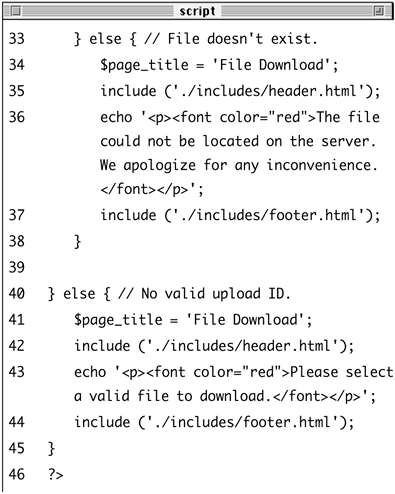
Script 12.10. This script forces a file download by sending the proper headers to the Web browser. 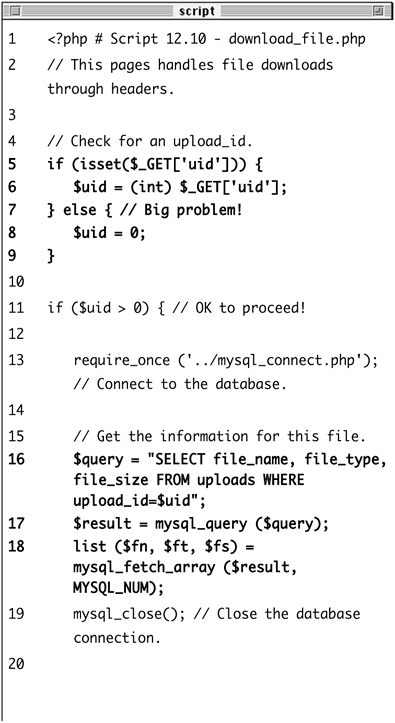
| 2. | Check for an upload_id.
if (isset($_GET['uid'])) { $uid = (int) $_GET['uid']; } else {// Big problem! $uid = 0; } if ($uid > 0) {
Before continuing, I want to ensure that the script received a valid upload_id, which should be a positive number. Type casting is used on the variable, as an extra precaution.
| 3. | Retrieve the information for this file.
require_once ('../mysql_connect.  php); $query = "SELECT file_name, php); $query = "SELECT file_name,  file_type, file_size FROM uploads file_type, file_size FROM uploads  WHERE upload_id=$uid; $result = mysql_query ($query); list ($fn, $ft, $fs) = WHERE upload_id=$uid; $result = mysql_query ($query); list ($fn, $ft, $fs) =  mysql_fetch_array ($result, mysql_fetch_array ($result,  MYSQL_NUM); mysql_close(); MYSQL_NUM); mysql_close();
To download the file, I'll need to know the file's name, type, and size. I retrieve all of this information from the database using $uid in my query and then the list() function.
| 4. | Determine the file's name and location on the server.
$the_file = '../uploads/' . $uid;
For the file's name, I'm defining the entire relative path to the file. The path is ../uploads/, plus the upload ID. Setting this as a variable here will make it easier to refer to the file later in the script.
| 5. | Check for the existence of the file on the server.
if (file_exists ($the_file)) {
Before attempting to send the file to the Web browser, I'll confirm its existence. The file_exists() function returns trUE if the file can be found on the server.
| 6. | Send the file.
header ("Content-Type: $ft\n"); header ("Content-disposition:  attachment; filename=\"$fn\"\n); header ("Content-Length: $fs\n"); readfile ($the_file); attachment; filename=\"$fn\"\n); header ("Content-Length: $fs\n"); readfile ($the_file);
These header() calls will send the file data to the Web browser, creating a download prompt (Figure 12.27). The first line prepares the browser to receive the file, based upon the MIME type (stored in the database when the file was uploaded). The second line sets the name of the file being downloaded, also using the original filename as it was on the user's computer. The double quotation marks around the file's name are in case there are spaces in the name.
Figure 12.27. Clicking a link in the view_files.php page should result in this prompt (using Internet Explorer on Windows, other browsers and operating systems will behave differently). 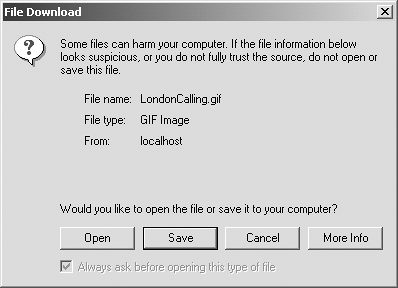
The last header() function reports upon the length of the data to be sent, which was again determined when the file was uploaded. The file data itself is sent using the readfile() function, which reads in a file and immediately sends the content to the Web browser.
| 7. | Complete the conditionals.
} else { $page_title = 'File Download'; include ('./includes/header.  html); echo '<p><font color="red"> html); echo '<p><font color="red">  The file could not be located The file could not be located  on the server. We apologize on the server. We apologize  for any inconvenience. for any inconvenience.  </font></p>'; include ('./includes/footer. </font></p>'; include ('./includes/footer.  html); } } else { $page_title = 'File Download'; include ('./includes/header. html); } } else { $page_title = 'File Download'; include ('./includes/header.  html); echo '<p><font color="red"> html); echo '<p><font color="red">  Please select a valid file to Please select a valid file to  download.</font></p>'; include ('./includes/footer. html'); } download.</font></p>'; include ('./includes/footer. html'); }
The first else concludes the file_exists() conditional. The second concludes the invalid $uid conditional.
| 8. | Complete the page.
?>
Notice that this page only prints something to the Web browser if a problem occurs. If all goes well, clicking the link in view_files.php creates the download prompt (or immediately downloads the file, depending upon the browser), but the Web browser remains on the view_files.php page.
| 9. | Save the file as download_file.php, upload to your Web server, and test in your Web browser (by clicking a link in view_files.php).
|
 Tips Tips
Various Web browsers handle file downloads differently. You should test scripts like this one on as many browsers and platforms as possible to ensure reliable results. To improve the reliability of this script, you could call the ob_end_clean() function prior to the header() lines. By doing so, you would keep other, irrelevant data, from being mixed-in with the downloaded file. You could also call the exit() function after readfile() to specifically terminate the execution of the script.
Editing File Records I have not included a page for editing a file record, but to do so would not be hard, particularly if you use edit_url.php as a model. For starters, you'll need to provide the edit_file.php page with the upload_id, presumably linked from view_files.php (as view_urls.php linked to edit_url.php). On edit_file.php, you would then validate the upload_id in exactly the same way (confirming that it is a positive integer). For the form itself, start with the edit and delete radio buttons. Then retrieve all of the current file information and print most of it in the browser, showing the current file's name, size, and upload date. Create a new file input (just one) and a description textarea, preset with the current description (from the database). When handling the form, first see if the file should be deleted. If so, run a DELETE query on the table (using the upload_id in a WHERE clause) and then remove the actual file using unlink(). If the file's record is being edited, check if a new file has been submitted. If so, update all of the file's information in the table and then move the upload to its final destination, using the exact same filenamespecifically, the upload ID. This will have the effect of replacing the old file. If a new file was not uploaded, meaning that just the description was edited, then you only need to update that particular column in the database. |
|
 AUTO_INCREMENT, file_name VARCHAR(30) NOT NULL, file_size INT(6) UNSIGNED NOT NULL, file_type VARCHAR(30) NOT NULL, description VARCHAR(100) DEFAULT NULL, date_entered TIMESTAMP, PRIMARY KEY (upload_id), KEY (file_name), KEY (date_entered) )


 php); for ($i = 0; $i < $counter; $i++) {


 Tips
Tips


