21.4 Using Floating Viewports
|
| < Day Day Up > |
|
Floating, or untiled, viewports, although more complex than tiled viewports, offer considerably more flexibility. But how are floating viewports different from tiled viewports? Let's take a look.
As we saw in Section 21.2, AutoCAD designed tiled viewports as drawing tools for a Model Space environment. Tiled viewports act like holes in an imaginary box through which you view different parts of your drawing. The location and size of the hole determine what you see, how much you see, and at what angle you see the drawing objects. Tiled viewports don't affect how the drawing will be plotted.
Floating viewports were designed as plotting tools in a Paper Space environment. Floating viewports also act like holes, but this time they're holes in a sheet of paper covering the drawing objects. The location and size of floating viewports holes determine what will be plotted, how much will be plotted, and at what angle the drawing objects will be plotted.
Some things to remember about floating viewports include:
-
Floating viewports are objects and can be moved, stretched, and erased like any other object on a drawing. Consequently, you can place them on a separate layer that can be frozen at plot time.
-
Unlike tiled viewports, floating viewports don't have to be rectangular.
-
Floating viewports can overlap.
-
You can control layers within each viewport independently of the rest of the drawing. This is a key benefit since you often won't want details shown in one viewport reflected in another.
-
Use floating viewports to show different views of one or more objects on a single plot.
-
Unlike tiled viewports, only one floating viewport is active at a time.
-
Floating viewports live in Paper Space (on a Layout tab). Although they're not available in Model Space, you can work in Model Space through a floating viewport (much as a doctor works on a kidney or gall bladder through a hole in the skin).
-
Sizing text on Paper Space is really quite easy. Since you're working on the actual plotted page, simply enter the text at the desired plotted size. No need for scale factors!
21.4.1 Creating Floating Viewports Using MView
Creating floating viewports using the MView command appears more daunting than it actually is. The command sequence looks like this:
Command: mview (or mv)
Specify corner of viewport or
[ON/OFF/Fit/Shadeplot/Lock/Object/Polygon al/Restore/2/3/4] <Fit>: [begin a window]
Specify opposite corner: [complete the window]
Let's look at each option.
-
The ON/OFF options allow you to "open" or "close" the viewport through which you see the drawing. If the viewport is OFF, it's closed and you can't see through it. Thus, that part of the drawing is hidden.
When you select one of these options, AutoCAD will prompt you to select the viewport to turn ON or OFF.
-
The Fit option will create a single, maximumsize floating viewport within the display area.
-
Shadeplot is new to R2004. It controls exactly what plots within a viewport. It prompts
Shade plot? [As displayed/Wireframe/ Hidden/Rendered] <As displayed>:
-
As displayed, of course, plots the viewport as is.
-
Wireframe refers to a type of three- dimensional drawing. You'll learn more about that in the 3D AutoCAD 2004: One Step at a Time text.
-
Hidden allows you to remove hidden lines from the selected viewport during plotting. These are not lines drawn using a hidden linetype, but lines "hidden" or behind other lines or objects in three-dimensional space.
-
Rendered refers to a shading technique used on three-dimensional objects. Again, you'll learn more about that in the 3D text.
-
-
The Lock option allows you to lock a viewport. It prompts
Viewport View Locking [ON/OFF]: [enter ON or OFF]
Select objects: [select the viewport to lock or unlock]
When a viewport is locked, you can't (intentionally or accidentally) change the scale factor within it. This is a handy tool if you intend to work on the Model Space within a viewport.
-
The Object option allows you to select any existing closed polyline, ellipse, spline, region, or circle (existing in Paper Space) and turn it into a floating viewport.
-
The Polygonal option allows you to create a floating viewport with any number of sizes and in any shape. It prompts
Specify start point: [pick a start point]
Specify next point or [Arc/Length/ Undo]: [create the shape just as you would a polyline]
-
The 2/3/4 options tell AutoCAD to create two, three, or four viewports. AutoCAD will prompt you to locate the viewports.
-
Restore is a very useful tool. It allows you to translate tiled viewports into floating viewport objects. When selected, AutoCAD allows you to enter the name of a saved tiled configuration or to translate the current tiled configuration into floating viewports.
-
Of course the default option – Specify corner of viewport – allows you to manually create viewports one at a time.
Let's insert a title block into our drawing and then set up some floating viewports.
Do This: 21.4.1.1 Creating Floating Viewports
-
Be sure you're still in the flr-pln21a.dwg file in the C:\Steps\Lesson21 folder. If not, please open it now.
-
Follow these steps.
TOOLS
COMMAND SEQUENCE
STEPS
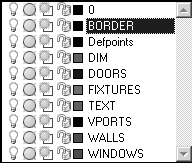
1. Set the BORDER layer current.
Command: i
2. Insert the ANSI-A title block drawing that came with AutoCAD. (Find it in the Documents and Settings\[Timothy S. Sykes]\Local Settings\Application Data\Autodesk\AutoCAD 2004\R16.0\enu\Template folder. [This is on a Windows XP computer; on earlier releases of Windows, look for the file in the \AutoCAD 2004\Templates folder.) Put it at the 0,0 coordinates.
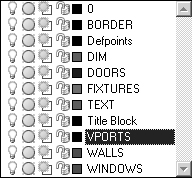
3. Set the VPORTS layer current.
Command: mv
4. Enter the MView command by typing mview or mv at the command line. (AutoCAD has no button for the MView command.)
Specify corner of viewport or
[ON/OFF/Fit/Shadeplot/Lock/ Object/Polygonal/Restore/2/3/4] <Fit>: .5,7.5
Specify opposite corner: 4.75,4.25
5. Place the first floating viewport as indicated.
Command: [enter]
Specify corner of viewport or
[ON/OFF/Fit/Shadeplot/Lock/ Object/Polygonal/Restore/2/3/4] <Fit>: 5,6.5
Specify opposite corner: 10,2.5
6. Place a second floating viewport as indicated. Your drawing now looks like Figure 21.4.1.1.6a.
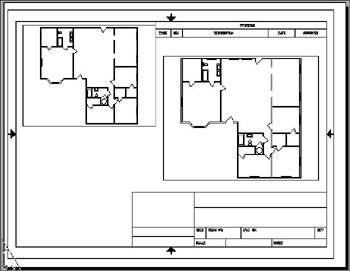
Figure 21.4.1.1.6a
Command: c
Specify center point for circle or [3P/2P/Ttr (tan tan radius)]: 2.25,2.25
Specify radius of circle or [Diameter]: 1.75
7. Now let's make a nonrectangular viewport – the easy way. Draw a circle as indicated.
Command: mv
8. Now we'll use the MView command to convert the circle to a floating viewport. Enter the MView command.

Specify corner of viewport or
[ON/OFF/Fit/Shadeplot/Lock/ Object/Polygonal/Restore/2/3/4] <Fit>: o
9. Use the Object option.
Select object to clip viewport:
10. Select the circle. Your drawing now looks like Figure 21.4.1.1.10a. Notice that the round viewport shows only part of the drawing. It began with the full drawing and then clipped away the part that didn't fit into the circle.
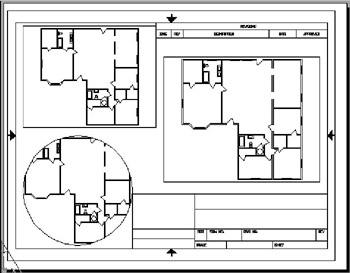
Figure 21.4.1.1.10a
Command: qsave
11. Save the drawing but don't exit.
21.4.2 The Viewports Toolbar
The one common thread that permeates the thrills of life – your first kiss, your first child, your first paycheck … - is that each results from the discovery of something new and wonderful.
Never miss an opportunity to explore or you may miss an opportunity to discover.
Anonymous
We've made a good start with Paper Space and floating viewports. But have you discovered the viewports toolbar yet (Figure 21.4.2a)?

Figure 21.4.2a
This handy item provides single-button selection of some of the MView options as well as some other tools.
Let's take a look.
-
The first button – Display Viewports Dialog – does just that. It displays the Viewports dialog box that we used to create tiled viewports in Section 21.2 of this lesson. You can also use this dialog box to create floating viewports in
Paper Space! Simply follow the same procedures you learned for tiled viewports.
(Notice that the viewports dialog box presented when in Paper Space doesn't have the New name text box. Floating viewport configurations are saved as layouts.)
-
The second button – Single Viewport – executes the Fit option of the MView command.
-
The third button – Polygonal Viewport – allows you to create a viewport with any number of sizes and in any shape by executing the Polygon option of the MView command.
-
The fourth button – Convert Object to Viewport – is a modifying tool used to redefine viewport boundaries. We'll learn more about it in Lesson 22.
-
On the right end of the toolbar, you'll find the Viewport Scale Control box. You'll use this to set the scale of the image seen through the floating viewport. We'll look at this procedure next.
21.4.3 Adjusting the Views in Floating Viewports
Once you've created floating viewports, you'll need to adjust what you see through them. This means adjusting the scale and then panning to achieve the appropriate view for your plot. Before we do either, we must tell AutoCAD to allow us to work in the Model Space we see through the floating viewport. Do this by simply entering MSpace or MS at the command prompt and then selecting the viewport you wish to use (see the insert below).
| Note | To toggle between Paper Space and Model Space, simply type PSpace (or ps) or MSpace (or ms) at the command prompt. Alternately, you can pick on PAPER or MODEL on the status bar. You can also double-click in a Paper Space area to activate Paper Space, or in a viewport to activate Model Space (simultaneously making that viewport current). |
We'll begin by setting the scale for the viewport. AutoCAD provides two methods of doing this – the XP option of the Zoom command, or the Viewport Scale Control box on the Viewports toolbar.
-
The Zoom Approach: While at the Zoom prompt, simply type 1/[SF]xp (where SF is the scale factor for the scale you wish to use in this particular viewport – refer to Appendix A).
-
The Control Box Approach: Pick the down arrow and select the appropriate scale. Alternately, you can type a scale into the box. (Note: A 1:1 scale often returns a value in the control box as 1"=1'. This programming glitch doesn't affect the actual 1:1 scale of the viewport, although it can be confusing.)
Let's try it.
Do This: 21.4.3.1 Scaling Floating Viewports
-
Be sure you're still in the flr-pln21a.dwg file in the C:\Steps\Lesson21 folder. If not, please open it now.
-
Follow these steps.
TOOLS
COMMAND SEQUENCE
STEPS

Command: ms
1. Open Model Space by typing mspace or ms at the command prompt. Alternately, you can pick PAPER on the status bar.
2. Select anywhere in the upper left viewport to activate it. Notice that the boundary darkens to indicate that it's active.

Command: p
3. Use the Pan command to center the master bath in the viewport.
Command: z
4. Now we'll set the scale for this viewport. Enter the Zoom command.
Specify corner of window, enter a scale factor (nX or nXP), or
[All/Center/Dynamic/Extents/Previous/ Scale/Window] <real time>: 1/48xp
5. We wish to set the scale of this viewport to ¼"=1'-0". The scale factor for this scale is 48 (see Appendix A). So enter the scale factor, as shown, using the xp suffix to indicate that you are scaling Paper Space.
AutoCAD scales the viewport. (You may have to pan slightly to center the view again.) This viewport now looks like Figure 21.4.3.1.5a.
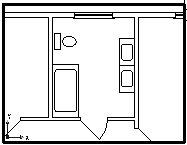
Figure 21.4.3.1.5a6. Now let's use the control box method. Pick anywhere in the right viewport to activate it.
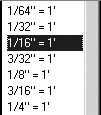
7. Pick the down arrow in the Viewport Scale Control box, and then scroll down until you can see the 1/16"=1' selection. Pick that one.
Easy? This viewport now looks like Figure 21.4.3.1.7a.
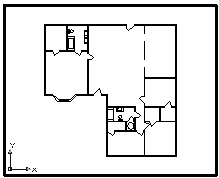
Figure 21.4.3.1.7a
Command: p
8. Activate the round viewport and center the bay window in the view.
9. Use either of the methods we've discussed to set the scale in this viewport to ¼"=1'-0".

Command: ps
10. Return to Paper Space.
11. On the TEXT layer, add the geometry shown in Figure 21.4.3.1.11a.
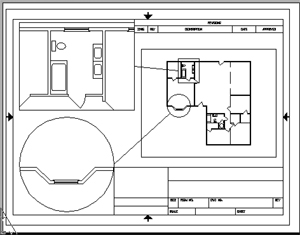
Figure 21.4.3.1.11aCommand: saveas
12. Save the drawing as MyFlr-pln22a in the C:\Steps\Lesson22 folder. Close the drawing.
The drawing now shows the full plan at a 1/16"-1'-0" scale and the common bathroom and bay window at a ¼"=1'-0" scale.
We've completed the Paper Space setup of our drawing. Let's review what we've accomplished.
-
We began with a floor plan drawn in Model Space. The limits of Model Space had been set to produce a ¼"=1'-0" drawing on a C-size sheet of paper.
-
We opened the layout tab of our drawing and set it up to print our Model Space drawing on an A-size sheet (11" x 8½"). We used an AutoCAD title block designed for this page size and added three floating viewports – two rectangular and one converted object (circle).
-
We set different views of the same model in each of the floating viewports – each viewport having its own scale.
|
| < Day Day Up > |
|
EAN: 2147483647
Pages: 96