Making Your Site Easier to Navigate
Several Web components help visitors to a Web site navigate ”an important attribute for any business Web site that serves as a company s public face. By adding a link bar or table of contents to your page, you provide a way for visitors to get an overview of your site s most important areas of interest, and to move from one area to another any time they wish.
Linking Your Site with Link Bars
One of the easiest and most convenient tools you can give visitors for navigating the main areas of your Web site is a link bar. Normally, creating a link bar is a time-consuming process ” especially if you re graphically challenged. FrontPage s Link Bar Web component, however, saves you the trouble of having to draw the link bar buttons and making the links.
| Lingo | A link bar is a row of buttons, arranged either vertically or horizontally, that are linked to important pages on your site. |
To create a link bar, just follow these steps:
-
Open the page that you want to include a link bar.
-
Position the cursor at the location where you want the link bar to appear.
-
Click the Web Component button, and click Link Bars.
-
Click Bar With Custom Links, and click Finish.
-
When the Create New Link Bar dialog box appears, enter a name for your link bar and click OK.
-
Click Add Link. In the Add to Link Bar dialog box, type the text to display for the link. The text you enter (such as Discussions, Documents, Lists, Images) should correspond to the type of content your site contains. Select the document in your site that you want to link to, then click OK. The link appears in Link Bar Properties (see Figure 13-11).
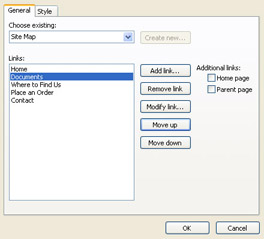
Figure 13-11: This dialog box leads you through the process of creating a link bar.Caution Make sure you link to files or pages that actually exist on your computer or network, and make sure the file names are accurate. FrontPage verifies the linked files locations before it creates the link bar. If there s a mistake, the link bar won t be created, and you ll have to start over again.
-
Repeat step 6 for each link you want to add to the link bar.
-
Click Style.
-
Click Use Page s Theme if the current page has a theme applied to it, and you want the link bar to have the same theme.
-
Click a button style.
-
Specify whether you want the buttons in the link bar to be vertical or horizontal in orientation.
-
Click OK to add the link bar to your page (see Figure 13-12).
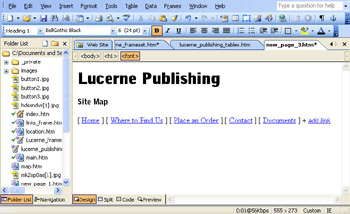
Figure 13-12: A link bar leads visitors to the main areas of your Web site.
| Aha! | You Can Add Other Link Bars to Your Site |
Adding a Table of Contents
In a FrontPage-based Web that contains many pages and categories (such as a Customer Support or Products and Services area), creating a Table of Contents makes it easier for visitors to find what they re looking for. The Table of Contents Web component creates a hierarchical set of hyperlinks to all of the pages in your site. Visitors can scan the links to get an overview of all of your site s contents, then click on the file they are looking for. Follow these steps to create a Table of Contents:
-
Position the cursor at the location where you want the Table of Contents to appear.
-
Click the Web Component button, and click Table Of Contents.
-
Click For This Web Site, and click Finish.
-
In the Page URL for the starting point of the table box, enter the URL of the Web page that will be presented on the left margin of the table of contents. Pages linked to this page will be indented.
-
Specify a font size for the heading that names the starting point page.
-
Select Recompute Table Of Contents When Any Other Page Is Edited if you want FrontPage to automatically recalculate the table of contents as you create or edit pages. Click OK.
| Aha! | Make Your TOC Your Startup Page |
EAN: 2147483647
Pages: 179