Working with Disks and Other Volumes
A volume is a fixed amount of storage. Typically volumes exist on disks, but they can also exist on tapes or even on memory sticks or USB keys. A volume is a location in which data can be placed. The terms disk and volume are often used interchangeably, but volumes are areas within a disk, and there can be more than one volume per disk. For our purposes in this book though, the terms can be transposed with some freedom.
Looking at drives, partitions, and volumes
When you click the Computer button in the sidebar, the window will reveal all the volumes currently available on your computer. The simplest example of a volume is a disk, such as your internal hard drive, a Zip disk, or a CD-ROM. However, as we mentioned, a disk can be partitioned so that it contains two or more volumes. A partitioned disk is like a duplex or apartment building; one building holds two or more separate residences, and one disk can have two or more independent volumes. If you want to partition your hard drive into multiple volumes, you’ll need to use the Disk Utility application as described in Chapter 22.
A mounted disk image is also a volume. A disk image is actually a file that when opened creates a virtual disk available to your system. The content stored on these virtual disks is typically application installers or upgrades. Many software developers distribute software updates in a disk image file. You are able to make your own disk image files with the Disk Utility application, which is also described in Chapter 21.
File server drives and iDisks are also volumes. We explain how to access these volumes in Chapter 10.
Mac OS X represents each type of volume with a distinctive icon. For example, hard drives and partitions have an icon that looks like an internal hard drive, while network drives look like something from a science fiction movie, to represent the ethereal and high-tech network connection between the server and your machine. Figure 3-29 shows several different volume icons.

Figure 3-29: Various types of volumes have different icons.
You decide whether volume icons show on your desktop. This is set in Finder preferences (covered in Chapter 4). The default setting is to show all disks on your desktop.
Ejecting disks
Server volumes, disk images, CD-ROM’s, Zip/Jaz Disks, and Floppy disks have one very important thing in common, they are all removable. Remove disk icons by unmounting (also known as ejecting) the disk. Although ejecting really only applies to removable disks, such as Zip disks or CDs, the same term is used throughout the Mac OS for consistency. Eject a volume by using one of the following methods:
-
Drag the disks to the Trash (the last item in the Dock). The Trash icon becomes an Eject symbol, when dragging a disk, to reassure users that you are not “Trashing” a disk, just removing it.
-
Control-click the volume’s icon, either in the Computer window or on the desktop, and choose Eject from the contextual menu.
-
Select the volume’s icon and choose File Eject <name>. (<name> is the name of the disk selected.) The keyboard equivalent for this command is z-E.
-
Click the Eject symbol that appears in the sidebar next to the desired disk.
-
Select the volume’s icon and press the Eject key on your keyboard. (If your keyboard doesn’t have an eject key, the F12 key works.) This method doesn’t work for server volumes.
If the volume isn’t in use (in use refers to the volume containing open files), the Finder removes it from the desktop and the Computer window. Because the System volume (the one containing the active copy of Mac OS X) is in use, you cannot eject it.
Removable disks, such as Zips and CDs, are remounted by inserting them back in their drives. Disk images are remounted by double-clicking the images and allowing the Disk Utility application to mount them. Hard drives and partitions can be remounted by logging out and logging back in to Mac OS X or by using the Disk Utility application.
Erasing volumes
Sometimes, particularly with removable volumes like Zip disks or USB keys, you may want to return a disk to its original condition, before it contained any data. This process is called initializing or erasing a disk. You accomplish this with the Disk Utility application. The procedure is described in Chapter 21.
Burning discs
Most modern computers have the capability to write data to optical media. This is most commonly known as burning a disc (spelled d-i-s-c when referring to optical media, and d-i-s-k when referring to hard drives, network drives, or other removable media types). Burnable optical media includes CD-R, CD-RW, DVD-R, DVD-R+, DVD-RAM, DVD-RW. The mad scientists at Apple realized that as more people got access to this technology, it would be nice if it was easy to use! To this end, Mac OS X supports the ultra-easy and intuitive Finder-based burning.
To get the process started, insert one piece of blank optical media of your choice. (Do make sure the media is compatible with your drive. Check the documentation that came with your system and/or Apple System Profiler as described in Chapter 22.) After inserting the disc, an alert will appear, as shown in Figure 3-30.
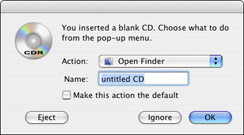
Figure 3-30: The alert when a blank or burnable disc is inserted.
The alert window gives you choices about how to use the disc. Enter a name for the disc in the Name field, and select your desired application to prepare the disc. The default setting is Open Finder. You’ll notice the Make this action the default checkbox. If you first check this box, your computer will always prepare a blank disc the way you select. It’s not advisable to check this box, simply because you may want to prepare discs differently later on. If you accidentally set the wrong default action, or want to edit the settings, open the CDs & DVDs preference pane and choose the appropriate actions from the pull-down menus. The preference pane is shown in Figure 3-31.
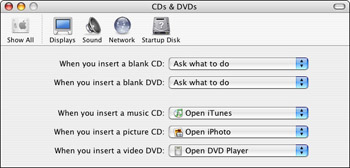
Figure 3-31: The CDs & DVDs preference pane gives you control of the Finder’s behavior when discs are inserted. The window contains controls for blank media as well as formatted media.
Selecting Open Finder tells the Finder to take responsibility for making your new disc. The Finder first prepares a virtual version of the disc on your desktop. Though the virtual disc looks like a real disc, it’s just a pseudo-CD, and it functions just like a hard drive. (It actually is a small piece of your hard drive that gets dynamically set aside for this process.) Double-click the virtual disc to reveal its contents. Because the Finder sees this virtual disc as a different disc than your hard drive, all you have to do is drag items over to copy items to it. Copy any items that you wish to burn onto the disc (limited, of course, by the storage capacity of the chosen blank media) and then organize them as you like. When you are satisfied with the setup of the disc, select Burn Disc from the Finder menu (or from the contextual menu for the disc itself), or drag the disc to the Trash. You’ll notice the Trash icon, which would become the Eject symbol when removing a disc, becomes a type of fallout shelter/nuclear waste warning symbol, which is Apple’s clever Burn icon.
Regardless of how you initiate the burn, the result is another alert window, requesting confirmation of your intent to burn the disc as shown in Figure 3-32.
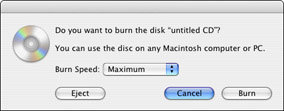
Figure 3-32: After selecting Burn Disc in the File menu, this dialog box appears to confirm your intention.
If you prematurely selected Burn Disc, and want to continue editing the disc’s contents, select Ignore. That will ignore the Burn command, and allow you to continue. If you want to cancel the whole disc-burning project, select Eject. This will remove the virtual disc from the desktop, and eject your unmodified blank disc from the drive.
A Burn Speed pull-down menu is also present in the burn confirmation dialog. Though the default speed is Maximum, you can choose a slower speed from the pull-down menu. These slower speed options are useful if your media is of lesser quality or if your drive is misbehaving.
After selecting Burn from the confirmation dialog, the burn process begins. A progress meter appears, displaying information on what’s happening behind the scenes: The Finder prepares the data, initiates the writing process, and then verifies the condition of the newly created CD, as seen in Figure 3-33.

Figure 3-33: During the burn process, this progress meter appears to assure you that all is well. First the disc gets burned (left), then the Mac OS verifies the data (right).
When complete, the drive will eject your fresh-off-the-presses disc. You can put this disc away for storage or reinsert it into the computer to go through it personally.
At nearly any time during the process, you can click the Stop button in the progress meter. This may result in a partially burned disc, which is useless. Your computer can’t deal with a disc that’s only half done.
The aforementioned process is used to create data discs. If you want to create a music CD, the process is different. You would select iTunes from the initial disc-preparation window’s pop-up menu. Similarly, select iMovie or iDVD to create a movie disc, or select iPhoto to create a disc full of images. After selecting the appropriate application for your project, the chosen application launches and initiates its own burn controls and dialogs. These processes are discussed further for each application in Chapters 19 and 20.
EAN: 2147483647
Pages: 290