Using Exmerge
So far, you have moved the mailboxes from the Corp site to the Exchange Server 2003 and migrated all the user accounts. Now you must contend with the mailboxes that exist in the other two Exchange 5.5 sites. Our plan is to consolidate mailboxes from three sites into one Exchange server, but it is impossible to install two more Exchange 2003 servers into those sites and then use Move Mailbox to move those mailboxes to Exchange 2003 since our design calls for only one Exchange Server 2003.
This is when Exmerge (Microsoft Exchange Mailbox Merge Wizard) comes in handy. It is a sophisticated tool that offers multiple applications and configuration choices, but in our migration scenario, we will use it to export the contents of a mailbox in Exchange 5.5 to a .PST file. The contents can then be imported into a new mailbox for that user in Exchange 2003. Note that we’ll need to do this for each site in a separate administrative action.
| Note | When migrating mailbox content between organizations or from an Exchange 5.5 site to an Exchange Server 2003 site that has no 2003 server installed in that site, Exmerge is really your only choice. |
For Exmerge to run properly, the following must be handled:
-
The account under which this tool is run must have invasive permissions on the source mailboxes.
-
The target mailboxes must be previously created in Exchange 2003 and initialized. This means that creating the mailbox is not enough. You must also do one of two things: send e-mail to that mailbox to initialize it, and/or have the user connect to the mailbox using her Microsoft Outlook client.
-
The account under which this tool is run must have Send As and Receive As permissions on the Exchange 2003 mailbox store. These permissions are denied by default, so you’ll need to block permissions inheritance at the store level, copy the permissions so that the store retains its permissions, then change the default to allow this account these permissions. You’ll also need to do this for any group of which the account is a member that has also been denied these permissions. For example, if you run this tool as the Administrator, you’ll need to allow these permissions for the Administrator account and also for the Domain Admins and Enterprise Admins security groups.
-
Do not run the ADC to upload Exchange 5.5 directory information for any of the accounts for which you will run Exmerge. In our scenario, when ADC was run, the Exchange 5.5 directory information pointed the Active Directory account back to the Exchange 5.5 server for mailbox information. Hence, we were unable to create a new mailbox in the 2003 databases because the account was already configured with a mailbox in the Exchange 5.5 databases. In this scenario, even though the mailbox can be exported to a .PST file, there is no method of importation. The only workaround is to not upload the Exchange 5.5 directory information and, after creating a new mailbox for that Active Directory account in the Exchange 2003 databases, use Exmerge to migrate the mailbox data.
Tip Common error messages are well documented in both TechNet (http://www.microsoft.com/technet/) and the document that accompanies Exmerge. Be sure to use these tools to help you troubleshoot your use of Exmerge.
Also note that in our scenario, we did not use the ADC to upload Exchange 5.5 directory information about those accounts outside the Corp site. Instead, we created mailboxes for them in our Exchange 2003 databases and then initialized each mailbox by sending an e-mail to it. We’ll illustrate using Exmerge with three accounts instead of the 15 or more accounts that we have been using in our example.
To run Exmerge, start the program and move past the Welcome page. On the next page, choose to perform the extraction and importation in one step. Note that we are also selecting to delete the .PST file after it has been imported (Figure 15-29).
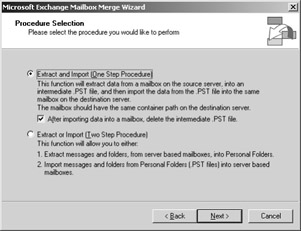
Figure 15-29: The Procedure Selection page in the Exmerge Wizard.
The next two pages you encounter ask for the source and target server information. After these pages are populated, we confirm the options we want by clicking the Options button:
-
Select User Messages and Folders on the Data tab.
-
Select Merge Data Into The Target Store on the Import Procedure tab.
-
Leave the default on the Folders tab (no folders are ignored).
-
Accept the default of All Dates on the Dates tab.
-
Leave all input boxes empty on the Message Details tab.
After entering the server information, click Next to display the Mailbox Selection page (Figure 15-30). If your permissions are configured correctly on the source server, a list of mailboxes is shown. Highlight the mailboxes you want to migrate. In our example, we selected three mailboxes to migrate. Click Next.
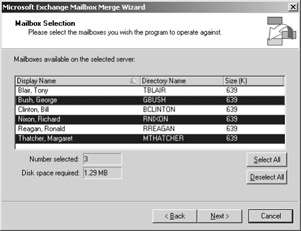
Figure 15-30: Selecting the mailboxes to be merged using the Exmerge Wizard.
The next page prompts you for the locale you want to use. Accept the default and move on to the Target Directory page, which asks you to enter the location where the .PST files are to be written. We created a unique path to ensure that the .PST files can be easily found. To do this, click the Change Folder button and select a folder. In our example (Figure 15-31), we selected the folder named pstfiles. Note that we selected a partition that could easily hold the amount of information we are migrating.
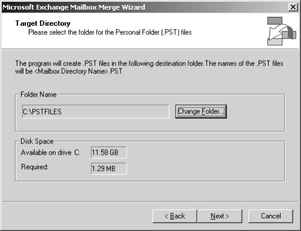
Figure 15-31: Selecting the folder where .PST files will be written.
On the next page, accept the File Name defaults and click the Save Settings button. (From this page, you can perform some interesting tasks that don’t directly relate to our migration scenario. You can read more about what the page has to offer in the Exmerge documentation.) Click Next to start the migration of the user’s mailbox data to the .PST file and then to the mailbox in Exchange 2003. A status box (Figure 15-32) provides details about the migration.
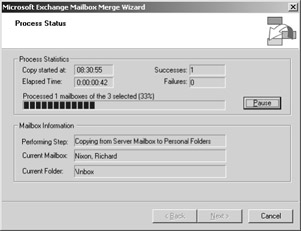
Figure 15-32: Migration status box in the Exmerge Wizard.
Finally, you can verify that the data has been transferred by looking at the user’s mailbox information in the ESM and seeing that mailboxes both exist and have items inside them (Figure 15-33).
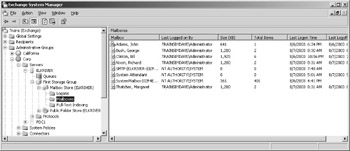
Figure 15-33: Mailbox item information in the ESM.
You might have a few problems the first time you use Exmerge, but eventually you’ll find this tool easy to use and very reliable. Using this tool will require some extra administrative effort on your part if you are migrating hundreds or thousands of mailboxes, but the effort will pay off when the contents are migrated to the new mailboxes and your users find their mailbox information to be in order.
EAN: 2147483647
Pages: 254