Finding and Categorizing Messages
If you are having trouble locating a particular message in your Inbox or another message folder, you can search for it using Outlook s Find or Advanced Find features. You can look for messages in a single folder, a group of folders you select, or all your folders. You can instruct Outlook to search through the text of every message or only the Subject field.
To make finding messages easier, you can create categories and assign messages to them. With categories, you group messages by a common characteristic. Outlook includes a set of predefined categories, and you can create your own. For example, you might assign all messages about invoices and payments to the Finance category, or you might create a Payroll category for all messages related to timesheets and paychecks .
In this exercise, you will find a message using the Find feature, create a category, assign messages to it, and then find messages using the Advanced Find feature.
USE the SBSOrganizing data file in the practice file folder for this topic. This practice file is located in the ![]() My Documents\Microsoft Press\Office 2003 SBS\Organizing folder and can also be accessed by clicking Start/All Programs/Microsoft Press/Microsoft Office System 2003 Step by Step .
My Documents\Microsoft Press\Office 2003 SBS\Organizing folder and can also be accessed by clicking Start/All Programs/Microsoft Press/Microsoft Office System 2003 Step by Step .
BE SURE TO start Outlook before beginning this exercise.
OPEN the SBSOrganizing data file from within Outlook, and then open the practice Inbox.
-
On the toolbar, click the Find button.
The Find pane appears above the practice Inbox.
-
In the Look for box in the Find pane, type show , a word that you know is contained within a message in your Inbox. Then click the Find Now button.
Outlook searches your messages and displays only those that contain the word you typed.

-
Press [CONTROL]+ [A] to select both the found messages.
-
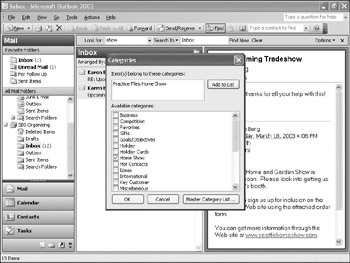
Right-click the selected messages, and click Categories on the shortcut menu.
The Categories dialog box appears.
Tip The messages in the practice file Inbox are categorized so they can easily be removed from your computer when you are finished with this course.
-
In the Item(s) belong to these categories box, after Practice Files , type ;Home Show to add a new category, and then click the Add to List button.
The category is added to the list and automatically selected for the messages.
-
In the Categories dialog box, click OK .
-
To redisplay all the messages, click the Clear button.
All your messages are displayed.
-
In the Inbox, click the Today s schedule message from Ben Smith once to select it.
-
On the Edit menu, click Categories .
-
In the Available categories list, select the Home Show check box, and then click OK .
The message is assigned to the category.
-
In the Find pane, click the Options button, and then click Advanced Find in the Options drop-down list.
The Advanced Find window appears.
-
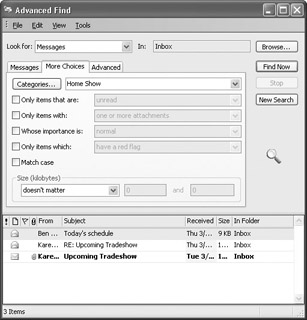
In the Advanced Find window, click the More Choices tab, and then click the Categories button.
The Categories dialog box appears.
-
In the Available categories list, select the Home Show check box, and then click OK .
The Categories dialog box closes , and you return to the Advanced Find window. Your category appears in the Categories box.
-
Click the Find Now button.
Outlook searches your messages and displays the matching items in a list at the bottom of the Advanced Find window.
CLOSE the Advanced Find window and the Find pane.
EAN: 2147483647
Pages: 350
- Chapter III Two Models of Online Patronage: Why Do Consumers Shop on the Internet?
- Chapter IV How Consumers Think About Interactive Aspects of Web Advertising
- Chapter VI Web Site Quality and Usability in E-Commerce
- Chapter VII Objective and Perceived Complexity and Their Impacts on Internet Communication
- Chapter XII Web Design and E-Commerce