| In this next example we'll see how painting in shades of gray allows you to introduce transparency effects: Darker grays conceal more, lighter grays reveal more of the layer. Or put another way, the closer you move towards black, the greater the masking effect; the closer you move towards white, the more the revealing effect. Figure 4.9. The source images (examples A and B) and the finished composition (example C).


1. | Open the source images, Texture 1 and Texture 2.
| 2. | Using the Move tool (v) drag one image on top of the other. Hold down the Shift key to register the layers. Double-click the layer thumbnails to rename the layers.
| 3. | Select the top layer and click the Add Layer Mask icon at the bottom of the Layers palette to add a layer mask to this layer.
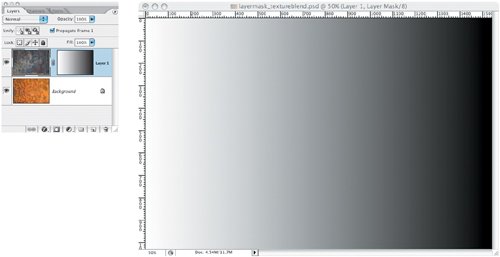
| 4. | Choose the Gradient tool (g), and from the Gradient Picker choose Foreground to Transparent (the second in the list), and for gradient type choose Linear. Make sure that the Transparency option is checked. Make Black the foreground color. Target the layer mask and swipe across the image with the Gradient tool. The farther you drag, the more gradual the transition; if you don't like the result, press Command/Ctrl-Z to undo and try again, or just swipe again with the Gradient tool for a cumulative effect. Where the gradient is black on the layer mask, that portion of the layer is concealed, revealing portions of the layer beneath.
| | | 5. | As an optional step, once you've got the gradient more or less the way you like it, you can further tweak the way the gradient transitions from black to transparentand consequently how the image layers blend togetherusing Levels or Curves on the layer mask itself. That's right: as well as painting on masks you can also make tonal adjustments on a mask. With the layer mask selected choose Image > Adjustments > Levels to see how moving the Input sliders affects the ratio of black to white in the mask and how that in turn impacts the image.
|
Figure 4.10. The Gradient tool options showing a Foreground to Transparent gradient and Linear Gradient. Transparency is checked. 
Figure 4.11. The Layers palette of the image showing the layer mask with gradient and the mask itself. Option/Alt-click the layer mask to toggle between viewing the mask and the image. 
Layer masks can be a bit puzzlingespecially late at night and on deadline. Don't sweat it: you have the History palette as a safety net and, more importantly, everything you do on a layer mask is undoableif you mask too much of the image by painting on the layer mask in black, painting the layer mask in white reverses that. |


