Line Art
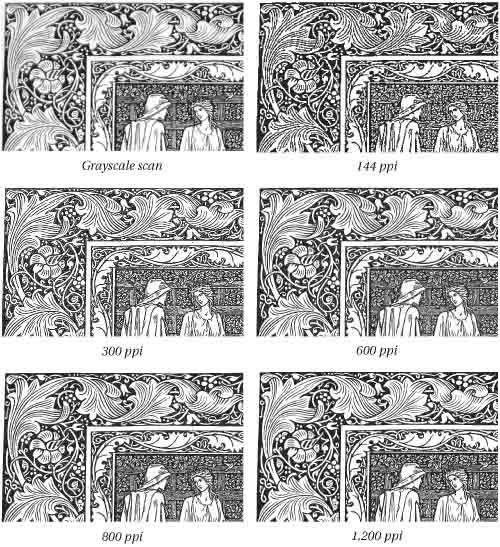
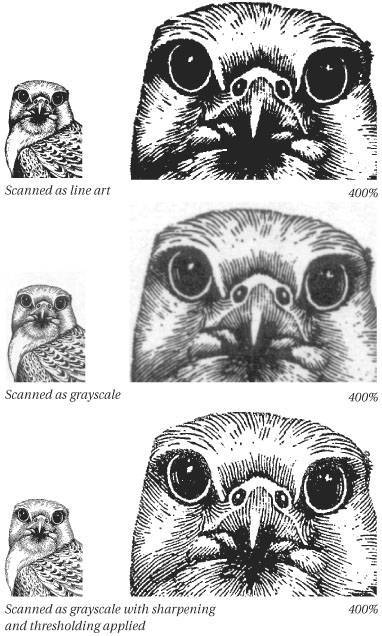
| With all the frenzy on the Photoshop scene that surrounds cool effects like fractalization, motion blurs, and drop shadows, it's easy to lose sight of the basics. And there are few scanned images more basic than line art. Line artthose black-and-white images (or bitmap images, in Photoshop terminology) with no halftoning, dithering, or anything elseare as simple as can be. Each pixel is either on or off, black or white, and you aren't concerned with levels of gray or halftones. Scanning, manipulating, and printing these things should be easy. And it isat least compared to the vagaries that surround grayscale and color images. Nonetheless, we've found that most people's line art images don't begin to approach the quality of (even mediocre) photographic reproduction. Edges are jaggy, fine lines break up, and dense patterns clog up. Many of you are going to be surprised when we tell you that it doesn't have to be that way. With line art, you can actually produce an image that matches the original to an extent that just almost never happens with grayscale and color images. With just a few techniques under your belt, you can achieve that ethereal, Platonic state of perfect line art reproduction, and with very little effort. The tricks lie in scanning mode, resolution, sharpening, and thresholding. Scanning in GrayscaleIt's essential that you scan in Grayscale mode to take advantage of the techniques covered in this chapter. If you scan in Bitmap mode (line art or 1-bit), you can't do much of anything to improve your image. In Grayscale mode, however, you can sharpen, adjust the black/white threshold to control line widths, and increase your effective line art resolution; each of these techniques helps create a beautiful reproduction. So avoid the temptation to scan line art as line art, and scan it as grayscale instead. Sure, your files are eight times as large, but it's only temporary. You can convert them to Bitmap mode when you're done with your manipulations. And the quality difference with these techniques is like the difference between... well... black and white. ResolutionWhen you're printing to an imagesetter, you need very high image resolution to match the quality of photographically reproduced line art. That means 800 ppi minimum image resolution. You can see the difference between 800- and 1,200-ppi line art (see Figure 12-4), so you may want to opt for the higher resolution if your printing method can hold it. On the other hand, if you're printing on newsprint, the spread of the ink as it hits the paper will likely blur any jaggies, so a lower resolution of 800 ppi should be fine. Figure 12-4. Line art resolution Of course, you never need image resolution higher than your output resolution. If you're printing your final artwork on a 600-dpi laser printer, for instance, you don't need more than 600-ppi image resolution. The additional data just gets thrown away. Tip: Scan Big for High Resolution "Great," you're saying. "They say we need 800-ppi images, but all we've got is a 600-ppi scanner. And they said back in the Image Essentials chapter that upsampling is useless. What are we supposed to do with this business card the client gave us?" You've got two ways to get a higher resolution out of a low-resolution scanner. First, you can scan a large original at your scanner's highest optical resolution and scale it down, increasing resolution. If you reduce the image to 50 percent, for instance, you double the resolution. You can either scale the image in a page-layout program, or adjust the size in Photoshop's Image Size dialog box while the File Size checkbox is turned on (see Chapter 3, Image Essentials). If you don't have a larger version of the artwork, you can enlarge your small version on a quality photocopier, and scan that. You still get a higher-quality image because the optical enlargement doesn't cause pixelization (there may be some cleanup work involved after the scan, of course). The second solution (which you can use in combination with this enlargement/reduction technique) is covered in the next tip. Tip: Doubling Your Scanner's Line Art Resolution The second method for going beyond your scanner's resolution essentially "steals" information from an 8-bit grayscale scan, converting that information into higher line art resolution.
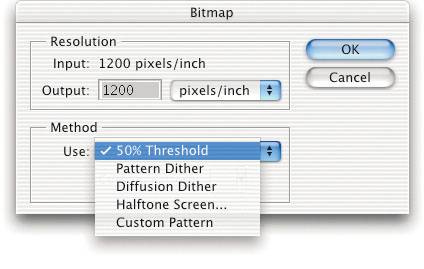
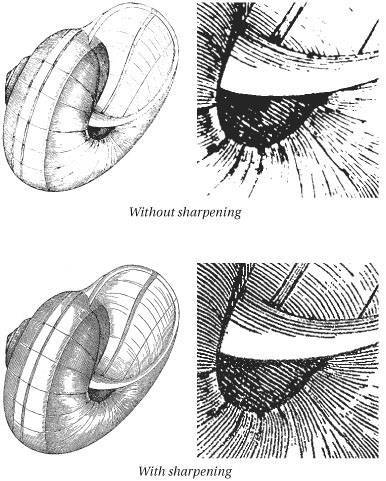
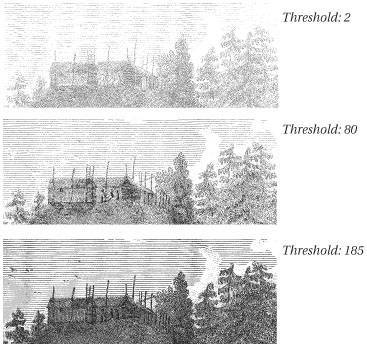
Voilà! A 1,200-ppi line art image from a 600-ppi scanner. While it isn't a true 1,200-ppi scan, it's so close that we dare you to find a difference. You may be able to raise the image's resolution above two times optical resolution, but that's pretty much the point of diminishing returns. Note that you can use this tip alongside the previous one to res up to 1,800 ppi or higher. SharpeningNothing will do more for the quality of your line art images than sharpening the grayscale scan (see Figure 12-6). 'Nuf said. We recommend running the Unsharp Mask filter twice with the settings 500/1/5. However, if the second USM makes the image look terrible (it often does if you're scanning poorly printed originals), undo it and stick with just one pass of unsharp masking. By the way, if your scanning software can sharpen, you may be able to save yourself a step, though most scanners' drivers don't do as good a job as Photoshop's Unsharp Mask filter. Figure 12-6. Line art with and without sharpening ThresholdingWhen you scan line art in Grayscale mode, lines aren't captured as hard lines, but as a collection of pixels with different values (see Figure 12-7). But although you scanned in grayscale, you ultimately want a straight black-and-white image. The way you get there is via the Threshold command (from the Adjust submenu under the Image menu). Threshold turns gray pixels above a certain value to black, and pushes all other pixels to white. Figure 12-7. Line art scanned as grayscale By adjusting the break point in the Threshold dialog box where pixels go to black or white, you can control the widths of lines in your scanned-as-grayscale line art image (see Figure 12-8). Figure 12-8. Threshold settings for line art For simple line art images that don't include very detailed and dense shadow areas, just set Threshold to 2 and press Return. With images that do include densely detailed shadows, try values up to about 55. As you move the slider to the left, you can see the fine lines start to break up. As you move right, the shadow areas start to clog. It's a lot like working the trade-off between shadow and highlight detail with the Levels dialog box on a grayscale image. As we noted earlier, there are no grayscale pixels left in the file after you use Threshold, so you might as well convert the image to Bitmap mode (in the Mode submenu of the Image menu). Bitmap images are one-eighth the size of Grayscale images. |
EAN: N/A
Pages: 220
- Chapter II Information Search on the Internet: A Causal Model
- Chapter VIII Personalization Systems and Their Deployment as Web Site Interface Design Decisions
- Chapter X Converting Browsers to Buyers: Key Considerations in Designing Business-to-Consumer Web Sites
- Chapter XI User Satisfaction with Web Portals: An Empirical Study
- Chapter XVIII Web Systems Design, Litigation, and Online Consumer Behavior
