Sharpening Techniques
| We use a host of techniques in the sharpening workflowsome obvious, others less so. Some attempt to avoid accentuating dust and scratches, noise, and film grain by sharpening through a mask. Others seek to make sharpening nondestructive, and editable after the fact, by applying the sharpening on a layer, and still others use localized sharpening applied with a brush, to pick out specific details in the image. In practice, we often mix these techniques into a single sharpening move, and we'll provide some examples. However, it's easier to digest the various techniques separately, so that's how we'll present them. Sharpening LayersWe prefer to do most of our sharpening on layers, for much the same reasons we prefer using adjustment layers to burning Curves or Levels directly into an imageit's nondestructive, it affords us control after the fact, and it allows us to use masking when we need to. In the first stage of the sharpening workflow, layer-based sharpening also provides an easy way to concentrate the sharpening in the midtones through the Blend If sliders in the Layer Options dialog box. Figure 9-8 shows the steps for creating a sharpening layer on a flat file, or on a layered one. The layer is set to Luminosity mode to avoid any color shifts or color fringesit produces essentially the same result as converting the image to Lab and sharpening the Lightness channel. You can then run the Unsharp Mask filter globally on the layer, or apply Unsharp Mask through an edge mask. Figure 9-8. Creating a sharpening layer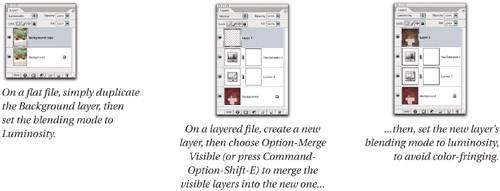 Tip: Use Fade to Luminosity If you really don't want to create a sharpening layer, but you want the benefit of sharpening in Luminosity mode, you can run the Unsharp Mask filter, then choose Fade from the Edit menu, and set the blending mode to Luminosity in the Fade dialog box. Edge MaskingEdge masks are an indispensable tool for both sharpening and noise reduction. When sharpening, we use an edge mask to concentrate the effects of the sharpen on the edges, so that flat areas such as skies, and textured areas such as skin tones, don't get oversharpened. For noise reduction, we use the same kind of mask, but inverted, so that the edges are protected from the noise reduction. Figure 9-9 shows the steps for building an edge mask. The first step is to create a channel that has good contrast between the edges and the nonedges. Sometimes one of the existing color channels will worksimply duplicate the channel to serve as the basis for the edge maskbut often you can achieve better results by using Channel Mixer or Calculations to create the channel. See "The Color of Grayscale" in Chapter 12, Essential Image Techniques, for a slew of methods for creating a grayscale version of the image. Figure 9-9. Building an edge mask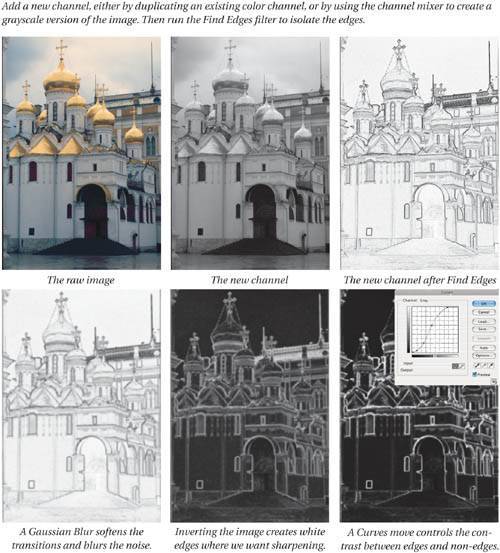 Once you have a grayscale version of the image, run the Find Edges filter to locate the edges, then use a combination of blurring and contrast adjustments to control the relationship of the edges and non-edges. Once you've created the edge mask, you can load it as a selection through which you apply the sharpening, or you can add it to the sharpening layer as a layer mask. Each approach has advantages and disadvantages. Edge mask as selectionTo load the edge mask as a selection, Command-click on the channel's tile in the Channels palette. We suggest hiding the selection's marching ants (Command-H). Then, with the sharpening layer targeted, you can run Unsharp Mask. The white areas in the edge mask get fully sharpened, the black areas are fully protected from sharpening, and the gray areas receive sharpening proportional to the gray value. The disadvantage is that you have no control over the transition between sharpened and unsharpened areas once you've applied the sharpening. Edge mask as layer maskInstead of sharpening through the mask as a selection, you can sharpen the layer globally, then add the edge mask as a layer mask: Load the edge mask as a selection, target the sharpening layer, and then click the Add Layer Mask icon in the layers palette (see Chapter 8, Making Selections). Once you've added the layer mask, you can tweak the contrast of the layer mask with Levels or Curves to fine-tune the relationship between the sharpened and unsharpened areas. The downside to using the edge mask as a layer mask (rather than just sharpening the selection) is simply that it creates a larger file. Figure 9-10 shows the steps for applying the edge mask as a selection, or as a layer mask. Figure 9-10. Applying the edge mask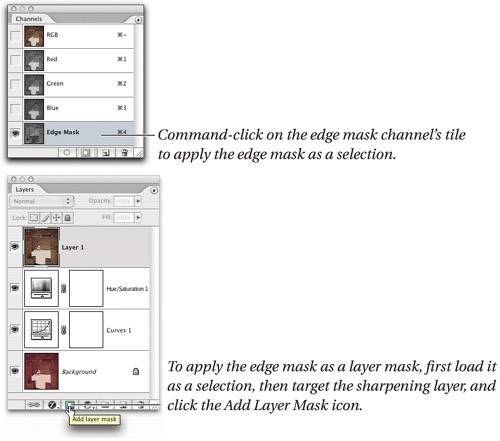 Edge mask for noise reductionYou can use approximately the same edge-masking technique to apply noise reduction instead of sharpening. Invert the mask (or omit the inverting step when creating the mask), leaving the edges black (so that they're protected from the noise reduction), and the non-edges white (so that they receive the full benefit of noise reduction). It's usually a good idea to use a slightly different blur, as well as different contrast, on the noise mask than on the edge maskif you simply invert them you can exaggerate the transition between the edges and non-edges in both the noise reduction and sharpening layers. Making the masks slightly different helps a great deal. We find that the Despeckle filter does a great job of minimizing film grain and digital noise, but we generally apply it separately to each color channel, because typically one channel will need more applications than another. With film or print scans, the blue channel is almost invariably the noisiest, so we may run Despeckle once on the red channel, twice on the green, and three or more times on the blue. On digital images captured as JPEG, we look at each channel to determine where the noise lies, and Despeckle accordingly. With digital raw images, unless they're extremely noisy, we rely on Camera Raw's noise reduction features (see "The Detail Tab" in Chapter 11, Building a Digital Workflow). If the noise is primarily in luminosity, as it is with transparency film, we prefer to carry out noise reduction on a layer set to Luminosity blending. Using separate layers for sharpening and noise reduction offers more control, but at the cost of a larger file size. We also use masks with the new Reduce Noise filter, especially on higher-resolution film scans, where the filter seems to want to preserve the grain as well as the detail. The ability to edit the layer mask adds a level of post-filtering control that we often find useful. Controlling the Tonal RangeOne of the keys to a successful multipass sharpening workflow is to concentrate the first round of sharpening on the midtones while protecting the extreme highlights and shadows. It's so much easier to do this using a sharpening layer that we don't even try to use a nonlayered sharpen. The trick to controlling the tonal range is to use the Blend If sliders in the Layer Style dialog boxchoose Layer Style>Blending Options from the Layer menu, or double-click the layer's tile in the Layers palette (see Figure 9-11). Figure 9-11. Controlling the tonal range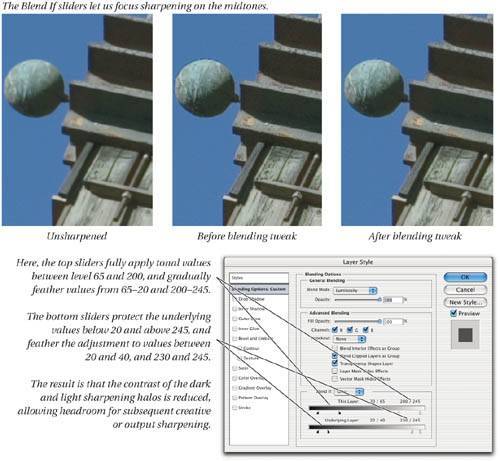 The Blend If sliders let you control which tonal values in the overlying (sharpening) layer get applied to the underlying layer (and, conversely, which tonal values in the underlying, unsharpened layers are affected by the sharpening layer). Bruce thinks of the overlying layer as a ton of bricks suspended over a basket of eggs (the underlying layers). The top Blend If slider controls which bricks fall, and the bottom Blend If slider dictates which eggs receive the impact. (If this makes no sense to you, don't worryBruce often thinks of things in weird ways.) Figure 9-11 shows some typical settings for the Blend If sliders for initial midtone sharpening. Depending on the image source (film or digital), and the amount of noise present, you may find that the shadow values need to be set higher or lower, but the basic principle is to set the bottom sliders to protect extreme highlights and shadows, and the top sliders to apply most of the sharpening in the midtones. Sharpening BrushesFor localized creative sharpening, nothing beats painting with a brush. We have two methods that we use to make a "sharpening brush," one using a layer, the other using History. Layer-based brushes offer more control because you can control the local opacity of the layer mask by brushing with different opacities, and you can control the global strength of the sharpen by varying the opacity of the layer itself. However, layers increase your file size. Using the History brush is less controllable (because your only control is through the brush opacity itself) but doesn't add to the size of the file. Keeping your file size down is important when you're working with huge files. Layer-based sharpening brushTo create a layer-based sharpening brush, first make a sharpening layer as we showed earlier in Figure 9-8. It's usually a good idea to apply slightly more sharpening to the layer than you ultimately desire, because that way you have more control after the fact. Next, add a layer mask set to Hide All. To brush in the sharpening, make sure that the layer mask is targeted, then choose the Brush tool, set the foreground color to white, and simply brush the sharpening in as desired. We prefer to use a brush set to substantially less than 100 percent opacity, because the lower opacity allows us more control. Figure 9-12 shows the results of a sharpening brush. Figure 9-12. A layer-based sharpening brush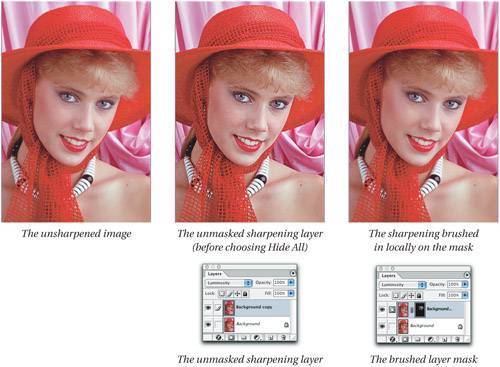 History Brush sharpeningIf you're too lazy to create masks, you're in a RAM-limited situation, or if you just want more interactivity than a mask offers, you can use the History Brush to paint sharpening into the image. This is a particularly handy technique with a pressure-sensitive stylus, because you can set the pressure-sensitivity to Opacity, and achieve fine control over both the strength of the sharpening, and exactly where it's applied. The basic technique is a simple three-step process:
Or, if you prefer, you can reduce the sharpening with the History Brush by leaving the History state at the Unsharp Mask step, and then loading the step before it as the History Brush source. We typically choose the method that will require least brushwork on the image at hand. The unsharpened image in Figure 9-13 is quite soft. (No, this isn't David or Bruce's child!) If we apply enough sharpening to pick up the texture in the fabric, it leaves the skin crunchy, which is bad at the best of times, but particularly so on babies! Figure 9-13. Global sharpening makes crunchy skin.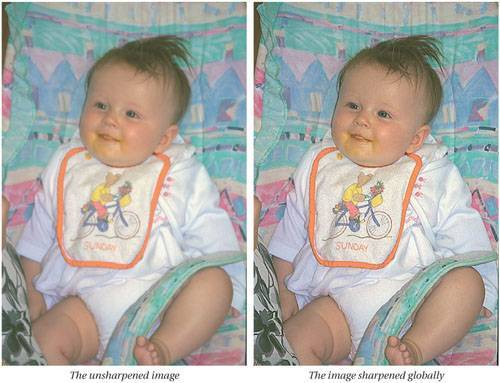 In this case, it's much less work to set the History Brush source to the unsharpened state, and brush out the crunchies than it would be brush them in. A few quick strokes with a soft, low-opacity History Brush produce the much more pleasing rendition shown in Figure 9-14. Figure 9-14. History Brush sharpening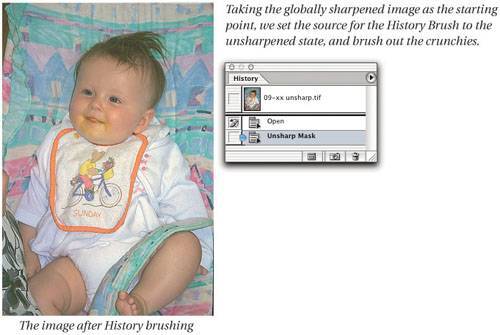 Tip: Luminosity Sharpening with History Earlier you saw that you can perform luminosity sharpening by selecting Fade from the Edit menu after running the Unsharp Mask filter (and setting the blending mode in the Fade dialog box to Luminosity). If you're brushing sharpening in rather than out, you can do the same thing by setting the blending mode for the History Brush to Luminosity using the Mode popup menu in the Options bar (see Figure 9-15). Figure 9-15. Luminosity sharpening with History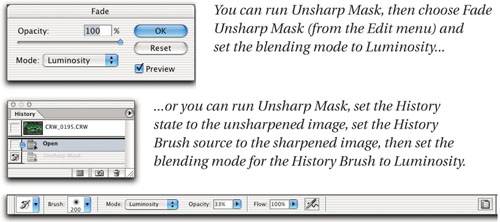 |
EAN: N/A
Pages: 220