| Audio in Liquid Edition comes from just two sources. WAV = Waveform Audio Don't get too hung up on what all these three letter acronyms (TLAs) actually mean. But for those of you with a burning curiosity to know, a WAV file is a Microsoft propriety file system used for audio. It is widely supported by many applications both on the PC and the Mac. |
However, although Liquid Edition supports many formats, audio is always converted to WAV format during import. This conversion makes little difference to your editing experience, but it does make Liquid Edition's life a little easier. Also, you'll find that you're able to use your files in more applications (more on this in Chapter 13). Copyright? You can't legally use music under copyright (anything owned by some else; like Sony, for example) in your own video productions. No legal rule says, "If you only use this song for your holiday DVDs, then that's okay"; if you use it, then you have broken the copyright agreement. It's that simple. Having said that, the chances of men in black turning up at your house with baseball bats and a subpoena are slim. However, the chances of you getting into a copyright wrangle increase if your video Project gains any kind of exposure. So, if you create a wedding video that will probably only ever be played by the Happy Couple in front of unwillingly guests, then you probably can include that much needed "Lady in Red" track. If you are producing a video brochure for a product you want to sell, then you should be aware that you may not be looked on favorably by the copyright owners. In this case, use copyright-free music; it is just an Internet search away. |
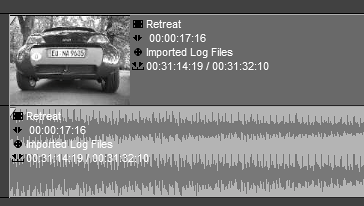
Once you've imported the audio file into Liquid Edition, you should treat it just like another media clip. You can trim it in the Source Viewer, on the Timeline, and in the Clip Viewer. You can copy it across your Project countless times, and you can adjust it either simply to alter the volume level, or using more complex filters to clean up and adjust the sound. Grouped and embedded audio In Chapter 6, my advice was to use embedded audio; that is, audio wrapped up inside the video and displayed on the Timeline as one item (Figure 7.1). Figure 7.1. The clip on the left is embedded audio; the clip on the right is disbanded audio. 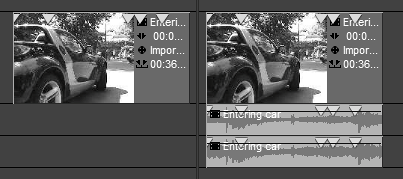
The reason for this is simple; once audio is separated from the video clip, it becomes vulnerable to synchronization problems caused by adding a new media clip into an occupied area of the Timeline. When an audio synchronization problem occurs, it can be dramaticthe sound may disappear for a few secondsor it can be subtlelip movements do not match the words being spoken. Remember, the eye can be fooled, but the ear cannot. A lip sync problem is the nemesis of video editing; once you have one, it can be very difficult to get rid of it and put things back in sync again. A much neater way is simply to avoid the problem altogether by using embedded audio at all times and only disbanding the audio clip when you really, absolutely have to.  Tips Tips
You can find a sectionKeeping Audio and Video in Synchdealing with synchronization problems that occur with disbanded audio later in this chapter. Whenever possible, try to keep the tracks Name 4 and 3 unoccupied so that disbanding clips have somewhere to go.
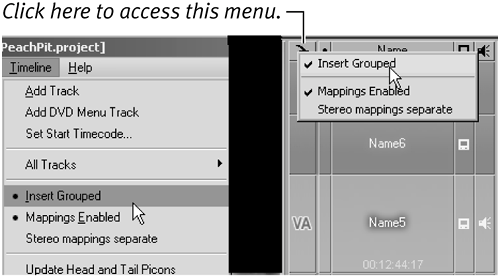
To use embedded audio Do one of the following: - Click the Timeline drop-down menu at the top of the interface and select Insert Grouped (Figure 7.2 left).
Figure 7.2. Two methods of selecting embedded audio. 
- Right-click the small arrow at the top of the Name column and select Insert Grouped (Figure 7.2 right).
This automatically causes all audio to become embedded when the Source Viewer sends it to the Timeline.
To disband audio on the Timeline 1. | Select the clip you want to disband.
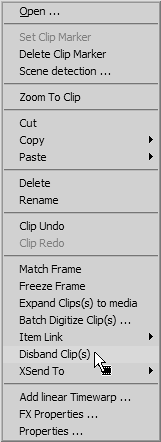
| 2. | Right-click and select Disband Clip(s) from the menu (Figure 7.3).
Figure 7.3. Right-clicking a clip allows you to select Disband Clip(s). 
The disbanded audio appears directly under the video clip.
|
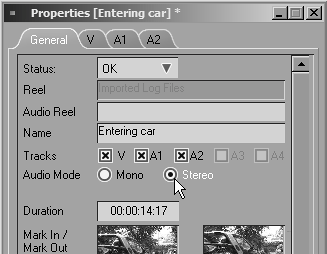
Stereo or Mono When a clip is disbanded, it can appear either with both stereo tracks on one Timeline track or with the left and right channels occupying a track each. You set the option in the actual media clip by right-clicking the track before you disband the audio and then selecting Properties (Figure 7.4). Here you can select Mono or Stereo for the audio mode. Figure 7.4. Selecting Stereo in the clip's properties. 
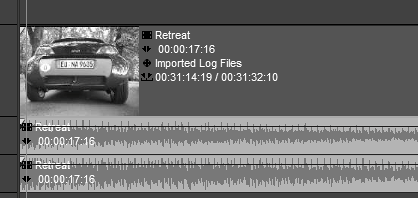
An alternative method involves right-clicking again on the audio after you have disbanded it. This causes a stereo track to disband into two mono tracks. After that, the disband option is grayed out (Figure 7.7). Figure 7.7. Stereo audio clip on the left, disbanded to mono on the right. 
This method works on imported audio tracks as well as the audio from a video clip (Figure 7.8). Figure 7.8. Video disbanded. 
|
|

 Tips
Tips