Using Groups
| [ LiB ] |
Using Groups
The benefits of using groups were described earlier in this chapter. This section describes how to use a group in a mix situation.
A group channel appears in the Mixer whenever a group track is created. After a group track is created, you can assign the output of other tracks to a group channel in the Mixer window. Group channels can be useful to create submixes , in which a series of related tracks are mixed and sent to a group. You can then use the group's fader as a general level control for all tracks routed to this group.
How To
To use a group as a submix group fader:
-
Start by creating a group channel track in the project window.
-
Name this group appropriately. In Figure 12.22, the group is called DrumKit.
Figure 12.22. Naming your group helps to identify it later when assigning channels.

-
In the Output Bus selection field found in the Inspector, in the Channel Settings panel, or in the Mixer (SX users only), select the group's name from the channel's Output Selection field. For example, in Figure 12.23, the channel is sent to the group channel named "DrumKit."
Figure 12.23. Selecting a group as the output for a channel.

-
Repeat Step 3 for all the channels you want to send to this group or any other group channel.
Now that you have assigned different channels to a group, you can adjust their relative level and use the group's channel fader to adjust the overall level being sent to the master fader.
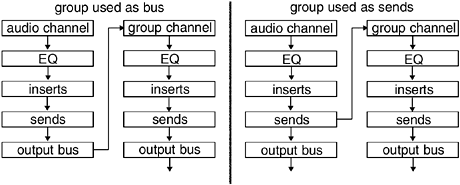
You can also create a monitor mix that can be sent to any external devices, such as headphones amplifier , effects or another recording device by using one of the send effects. Instead of sending the signal of this channel to an FX channel, you can route the signal to a group channel and then assign the output of this group channel to another available bus. Using this method allows you to send each channel to two sets of outputs (see Figure 12.24), giving you an independent control on levels being sent to each output. Note that you need at least two sets of outputs on your sound card to use this effectively.
Figure 12.24. Using the group channels as an output bus (left) or as a send destination (right).

How To
To use a group as a monitor mix (for headphones or external effect processing):
-
Start by creating a group channel; name it and choose an output bus for this Group.
-
Select the channel you want to send to the group channel using the send effects.
-
Click the Channel Settings Edit button. Cubase SX users can also use the Extended panel in the Mixer window and display the Send Effects panel for each channel.
-
In the Channel Settings panel, Activate an empty send effect slot.
-
In this empty effect slot, select the appropriate group as the send effect destination. In Figure 12.25, the group is named DrumKit .
Figure 12.25. Assigning a group channel as a send effect.

-
Adjust the level being sent to the send effect (in this case, the group output channel).
-
If you want to send another channel to a send effect assigned to a group, use the Select Channel menu in the Channel Settings' Common panel. If you are in the Extended panel (SX users), simply select another channel.
-
Repeat Steps 3 through 6 for each additional channel you want to send to this subgroup mix.
-
Adjust the group's level being sent to its output. You can also adjust the output level of output bus.
NOTE
 TIP
TIP
If you don't want to have to assign individual channels to a group through send effects in each channel, you can create a submix group. Let's take our previous example of the DrumKit group; you assign all channels to this group. Then you create a second group that you call something like "Headphone Mix." All you need to do is assign the send effect for the DrumKit group to the Headphone Mix output, and then you assign the Headphone Mix output to another bus and voil ! (See Figure 12.26 for a diagram of this example.)
Example displaying how the signal travels when using a group as a headphone submix.

| [ LiB ] |
- Structures, Processes and Relational Mechanisms for IT Governance
- Assessing Business-IT Alignment Maturity
- Linking the IT Balanced Scorecard to the Business Objectives at a Major Canadian Financial Group
- A View on Knowledge Management: Utilizing a Balanced Scorecard Methodology for Analyzing Knowledge Metrics
- Governance Structures for IT in the Health Care Industry