Archiving Data Using an Agent

In some cases, the size of the database can affect its overall responsiveness and performance. This section describes how to manage the database size and content by creating an agent that automatically moves documents older than a specific date to an archive database.

How It Works

Using a scheduled agent, all documents older than a specified date are automatically copied into a secondary database and then deleted from the primary database. This is achieved by computing the "cutoff" date and comparing it to the creation date of the document. Any document older than the cutoff date is moved to the new database. The cutoff date is calculated by using the AdjustDay method and the current date to compute a date in the past.

Its also important to understand the looping mechanism when archiving documents. To ensure that all documents in the view are checked, the routine must account for documents being removed from the view. Otherwise, the GetNextdocument method could skip documents or generate an error. This is corrected by utilizing a temporary object (tmpDoc) to store the handle to the next document object in the view or by setting the view AutoUpdate property to FALSE. For illustrative purposes, the following example includes the logic to track documents in the view (in case the AutoUpdate property is enabled).

Implementation

To implement this technique, complete the following instructions.

Step 1.

Create the archive database. To make the archive database, make a copy of the existing database. Select the File > Database > New Copy menu options. When prompted, change the title and file name. Consider including "archive" in the database title and file name to help to distinguish between the two databases. Also select the Database design only option. This will create a new copy of the database with no documents. Be aware that if database design relies on select documents for configuration purposes, you will need to manually copy these documents into the new database. Click OK to create the copy.

Note

Be sure to disable any agents in the "archive" database that no longer need to run.

Step 2.

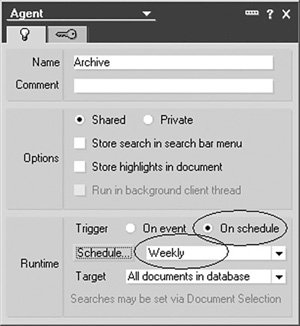
Create the archive agent. Open the original database in the Designer client. Select the Create > Design > Agent menu options to create the agent. After it is created, give the agent a name such as Archive (see Figure 18.12).

Figure 18.12. Scheduled agent property settings


Step 3.

(Optional) Specify the server to run the agent. If the database replicates to multiple Domino servers, you should designate which server will manage the database archiving. Click the Schedule button and designate the default server in the Run On field. Click OK to accept the settings.

Close the agent properties dialog after these configuration settings are defined.

Step 4.

Insert the code. In the Programmers pane, change the Language Selector from Simple action(s) to LotusScript and add the following LotusScript in the Initialize section. Be sure to replace VIEW, SERVER, and DATABASE with valid values.

Sub Initialize

 -----------------------------------------------------
  Define the objects
 -----------------------------------------------------
 Dim s As New NotesSession
 Dim db As NotesDatabase
 Dim dbArchive As NotesDatabase
 Dim view As NotesView
 Dim doc As NotesDocument
 Dim tmpDoc As NotesDocument
 Dim docArchive As NotesDocument
 Dim archiveDate As NotesDateTime
 Dim createDate As NotesDateTime
 Dim count As Integer
 Dim serverName As String
 Dim archiveName As String
 Set db = s.CurrentDatabase

 -----------------------------------------------------
  Set Cutoff date. This should be a negative number.
  For example, set to -90 to archive documents that
  are over 3 months old based on the creation date.
 -----------------------------------------------------
 Set archiveDate = New NotesDateTime( "Today" )
 Call archiveDate.AdjustDay( -90 )

 -----------------------------------------------------
  Specify the view that contains documents that
  might be archived.
 -----------------------------------------------------
 Set view = db.GetView("VIEW")
 view.AutoUpdate = False

 -----------------------------------------------------
  Specify the server and database name to be
  used to store the archived documents.
 -----------------------------------------------------
 serverName = "SERVER"
 archiveName = "DATABASE.NSF"
 Set dbArchive = New NotesDatabase( serverName, archiveName )

 -----------------------------------------------------
  Begin processing
 -----------------------------------------------------
 If dbArchive Is Nothing Then
 Print "Warning: unable to access archive database."
 Else
 -------------------------------------------------
  Start archive process
 -------------------------------------------------
 count = 0
 Set doc = view.GetFirstDocument
 While Not(doc Is Nothing)
 Set tmpDoc = view.GetNextDocument( doc )
 Set createDate = New NotesDateTime( "" )
 createDate.LocalTime = doc.Created

 If archiveDate.TimeDifference( createDate ) > 0 Then
 Set docArchive = New NotesDocument( dbArchive )
 Call doc.CopyAllItems( docArchive, True )
 Call docArchive.Save( True, True )
 Call doc.Remove( True )
 count = count + 1
 End If
 Set doc = tmpDoc
 Wend

 Print "Complete: "+Cstr( count )+" document(s) archived."
 End If

End Sub


Note

The archive cutoff date must be set to a negative number. In this example, the value is set to 90, which equates to three months. Increase the number of days to retain documents for a longer duration or decrease the number to retain them for a shorter period.

Tip

To test the agent, comment out the statement Call doc.Remove(True) by prefixing this statement with a single quote or the word REM. This will keep the documents in the originating database. When you are sure the agent is working as intended, uncomment the statement, and documents will be copied to the new database and removed from the original database. Using this approach will prevent documents from being deleted in the primary database but will create documents in the archive database. After the agent has been tested and verified to be working as designed, remember to uncomment the statement.

Step 5.

(Optional) Sign the agent or database. Signing the database or agent ensures that the agent will run with the appropriate authority level when executed. This step can be skipped if the person who last updated the agent has the authority to run scheduled agents on the target server. See Chapter 19, "Security," for additional information pertaining to database security.


An Introduction to the Lotus Domino Tool Suite

Getting Started with Designer

Navigating the Domino Designer Workspace

Domino Design Elements

An Introduction to Formula Language

An Introduction to LotusScript

Fundamentals of a Notes Application

Calendar Applications

Collaborative Applications

Reference Library Applications

Workflow Applications

Web Applications

Design Enhancements Using LotusScript

Design Enhancements Using Formula Language

View Enhancements

Sample Agents

Miscellaneous Enhancements and Tips for Domino Databases

Data Management

Security

Application Deployment and Maintenance

Troubleshooting

Appendix A. Online Project Files and Sample Applications

Appendix B. IBM® Lotus® Notes® and Domino®Whats Next?


Lotus Notes Developer's Toolbox(c) Tips for Rapid and Successful Deployment
Lotus Notes Developers Toolbox: Tips for Rapid and Successful Deployment
ISBN: 0132214482
EAN: 2147483647
Year: N/A
Pages: 293
Authors: Mark Elliott

Flylib.com © 2008-2020.
If you may any questions please contact us: flylib@qtcs.net