Project: Building a Domino Web Site
Project Building a Domino Web Site
|
Difficulty Level: |
Advanced |
|
Completion Time: |
5 to 7 hours |
|
Project Materials: |
3 Forms, 4 Subforms, 4 Shared Fields, 3 Views, 1 Script Library, 1 Page, 1 Outline, 1 Navigator, 2 Graphic Images |
|
Languages Used: |
Formula Language, LotusScript, JavaScript, and HTML |
|
Special Notes: |
Implementation may require coordination with the System Administrator |
Create the Database
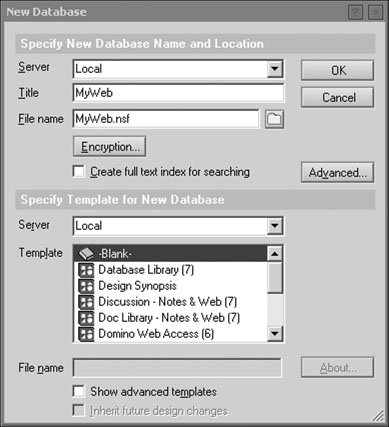
To start this project, launch the Lotus Domino Designer client. When the Designer client is running, select the File > Database > New menu options. Specify an application title and file name such as MyWeb (see Figure 12.3). Be sure to select -Blank- as the template type.
Figure 12.3. New Database dialog
Create the Website LotusScript Library
The LotusScript library will hold a number of common subroutines used to create and manage document updates made from a Web browser.
Tip
The following code is available in the developer's toolbox. Simply open the "Project Library" database in your Lotus Notes client and navigate to the "Script Library" section for the appropriate project. After you locate the project, copy and paste the code into the Designer client for the current project. Be sure the programmer's pane has focus before pasting the code. Alternatively, you can elect to manually type the code. You can then save and close the library. When prompted for a name, specify WebsiteLibrary.
To create the library, select the Create > Design > Script Library > LotusScript Library menu options.
Declarations
Declare common objects to be used in the various LotusScript subroutines.
%INCLUDE "lsconst.lss"
Dim s As NotesSession
Dim db As NotesDatabase
Initialize
Establish common objects to be utilized for the subroutines.
Sub Initialize

 Set s = New NotesSession
 Set db = s.CurrentDatabase

End Sub
Create the SaveWebOutput Subroutine
This subroutine displays an acknowledgement message to the user when a document is saved. This lets the user know the document updates have been applied to the database. This subroutine requires two parametersa Web page URL and a message string. Both parameters are embedded in the message that is presented to the user.
By default, the Web page will automatically return the user to the default view. However, if the browser does not redirect to the correct Web page, the user can manually click on the URL link (embedded in the message) to return to the Web site. The second value is also included in the message. Here you can pass a text string such as "Your document has been saved."
[View full width]
Sub SaveWebOutput (urlStr As String, msg As String) Print {} Print {
}+msg+{} Print {
If page does not return in a couple of seconds, click href = "}+_ urlStr+{">Return
} End Sub
|
A.12.4 |

Create the AssignTrackingNumber Subroutine
This subroutine assigns a unique record number to each newly created document when the document is saved for the first time. The subroutine is utilized by both the Lotus Notes and Web browser clients. The record number is assigned by querying the "(RecordNo)" view. This view is sorted in descending order such that the first document in the view contains the most recently created record number. The subroutine retrieves this number, increments it by one, and assigns it to the newly created document.
Sub AssignTrackingNumber (docRef As NotesDocument)

 Dim num As Integer
 If docRef.RecordNo(0) = "" Then
 Dim numView As NotesView
 Set numView = db.GetView ("(RecordNo)")
 Dim numDoc As NotesDocument
 Set numDoc = numView.GetFirstDocument
 If (numDoc Is Nothing) Then
 num = 1000
 Else
 num = numDoc.RecordNo(0) + 1
 End If
 docRef.RecordNo = num
 End If

End Sub
Save and close the library. When prompted, name the library WebsiteLibrary.
Create the wSaveDocAgent Agent
This agent manages document updates made from the Web site. The agent is called every time a new or existing document is saved. To create the agent, select the Create > Design > Agent menu options.
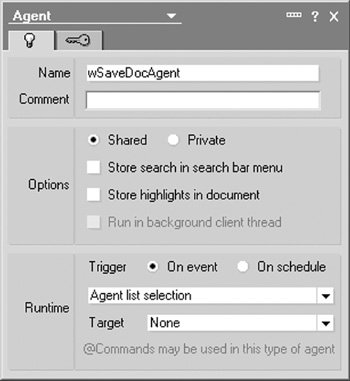
After the agent is created, the properties dialog will display. Name the agent wSaveDocAgent and verify that the option type is set to Shared. In the Runtime section, select Agent list selection and None for the target type (see Figure 12.4). Close the properties dialog window.
Figure 12.4. Agent properties dialog
To build the agent, change the Language Selector from Simple action(s) to LotusScript and insert the following statements.
Note
The following code is available in the developer's toolbox. Simply open the "Project Library" database in your Lotus Notes client and navigate to the "Script Library" section for the appropriate project. After you locate the project, copy and paste the code into the Designer client for the current project. Be sure the programmer's pane has focus before pasting the code. Alternatively, you can elect to manually type the code.
(Options)
This agent will utilize the LotusScript library created earlier in the project. In order to utilize the library, a Use statement needs to be inserted in the (Options) section. The Use statement ties the agent and script library together. Without this statement, the agent is unable to locate the subroutines and functions in the LotusScript library. If you omit this statement, the agent will not be able to run, and users will not receive messages in their Web browsers. Locate this section and insert the following statements in the Programmer's pane.
Option Public
Use "WebsiteLibrary"
Initialize
The Initialize section contains the main statement for the agent. First, the agent checks to see if a document number has been assigned and assigns one if the "RecordNo" field is empty. After the document has been saved, a message is displayed to let the user know the updates were successful. These actions are triggered by the value of the "SaveMode" field. These actions occur anytime the document is saved (using a browser) and the "SaveMode" field is set to "save".
The agent also includes the framework for expanding the functionality of the database. For example, should you decide to implement workflow in the database, this field could be used to trigger events based on the field value. By changing the field value and saving the form, additional actions or messages could be displayed. For now, just be aware that this functionality has been included in the agent.
Locate the Initialize section and insert the following statements in the Programmer's pane.
Sub Initialize
 '-----------------------------------------------------------
 ' Initialize variables
 '-----------------------------------------------------------
 Print "Content-Type:text/html"
 Print {
} On Error Goto oops Dim urlStr As String Dim msg As String Dim doc As NotesDocument Set doc=s.DocumentContext '----------------------------------------------------------- ' Create record number if not assigned yet '---------------------------------------------------------- If doc.RecordNo(0) = "" Then Call AssignTrackingNumber(doc) End If '----------------------------------------------------------- ' Set the web browser message '----------------------------------------------------------- msg = {Document }+_ Cstr(doc.RecordNo(0))+{ has been saved.} doc.Form= "Asset" urlStr = doc.URLRedirectTo(0) '----------------------------------------------------------- ' Perform addition actions based on doc status '----------------------------------------------------------- Select Case doc.saveMode(0) Case "save" msg = msg + "
Thank you for your update." Case "future use" msg = msg + "
Thank you for your submittal." Case Else msg = msg + "
Thank you." End Select '----------------------------------------------------------- ' Display the message in the web browser '----------------------------------------------------------- Call SaveWebOutput (urlStr, msg) doc.SaveStatus = "No Errors" Print "
" Print "" Exit Sub Oops: doc.SaveStatus = "Error " & Err() & ": " & Error() Print "" Print "" Resume End Sub
Save and close the agent.
Create the Shared Fields
This project includes a number of shared fields. With shared fields, you can create a field once and use it across multiple design elements in the application. This creates a single design object that, when changes are needed, can be maintained from a single location. For this project, these shared fields will store data values to allow documents to be displayed in a Web browser.
To create the shared fields, select the Create > Design > Shared Field menu options for each of the following fields. Be sure to set the data type and default value formula for each shared field. After the shared field is created, close the design element and create the next shared field.
|
Field Name |
Type |
Default Value Formula |
Remarks |
|---|---|---|---|
|
Roles_d |
Text, Computed for Display |
@UserRoles |
Contains the roles assigned to the person and can be used to manage read/write access permissions. This field is used if users are required to log in to the Web site. The field is not used for anonymous login. |
|
SaveMode |
Text, Editable |
"save" |
Contains the status of the document. The value in this field determines the action to be taken in the wSaveDocAgent. This value is case sensitive and must be in lowercase. |
|
Server_Name |
Text, Computed for Display |
Server_Name |
Contains the Domino server name. This field is required to build the URL link. |
|
URLRedirectTo |
Text, Computed |
[View full width] REM {Reminder: the following must contain a valid view name};"/"+@ReplaceSubstring (@Subset(@DbName; -1); "\"; "/") +"/ View1?OpenView" view name};"/"+@ReplaceSubstring (@Subset(@DbName; -1); "\"; "/") +"/ View1?OpenView"
|
Contains the default view to display after saving the document. |
Create the wMenuTop Subform
This subform is used to generate the Web page when the database is accessed from a Web browser. This form contains the HTML used to display the company logo, Web site name, and left-side navigation.
|
A.12.5 |
The majority of this subform is built using HTML, but it does include several Domino design elements as well. To create the form, select the Create > Design > Subform menu options. This will create a blank subform.
Note
The design and layout of the Web site has been provided as a basis for the project. If you are familiar with HTML development, the Web site design can be modified or replaced. However, it is strongly recommended that you implement the current design and make changes after the project is completed.
Create the Hidden Fields
This form will contain two hidden fields. Both fields are required to display the document in a Web browser. These fields will contain the direct path to the application on Domino server. Select the Create > Field menu options and create both fields on the first line of the subform.
|
Field Name |
Type |
Default Value Formula |
Remarks |
|---|---|---|---|
|
DBPath |
Text, Computed for Display |
@WebDbName+"/" |
|
|
DBPathWeb |
Text, Computed for Display |
@WebDbName |
These two fields are computed fields and should be hidden. However, because text properties carry over from line to line, it's very important to add several blank lines after the first line before setting the hide formula. This way, the hide formula will not inadvertently carry over to the next line in the subform, causing all text to be hidden.
After you have added several blank lines, use your mouse to highlight the first line and select the Text > Text Properties menu options. In tab 5, check the Hide paragraph if formula is true checkbox and set the formula to 1. Change the font color of the field to RED to indicate that these are hidden fields.
Build the Web Page
To create the Web page, add the following HTML statements to the form.
| WEBSITE NAME | |
|
Using your mouse, select all statements. With the HTML statements highlighted, select the Text > Pass-thru HTML menu options. This will enable the HTML statements to be processed by the Web browser. Save and close the design element. When prompted, name the subform wMenuBottom.
Create the wNextPrevTop Subform
The wNextPrevTop and wNextPrevBottom subforms will contain navigation buttons to be displayed in the Web browser. These subforms will include the following functions:
- Ability to scroll forward and backward in the view using Next and Previous links
- Ability to Collapse and Expand the view if it is categorized
- Ability to display "Using This database" document by clicking on the Help button
To create the form, select the Create >Design >Subform menu options. Add the following on the first line of the subform. Use the vertical bar "|" to visually separate the various text strings. This is purely for visual purposes to help the users from a readability perspective.
Previous | Next | Expand All | Collapse All | Help
Using your mouse, select all statements and select the Text > Pass-thru HTML menu options. Repeat the process, selecting the
statements to convert them to pass-thru HTML.
Note
The HTML statement forces a "space" to be displayed in the browser. In this case, four spaces are inserted just prior to the action button hotspots.
Warning
Make sure only the and
statements are converted to pass-thru HTML. Do not convert the action hotspot buttons. This will cause the hotspots not to function in the Web browser.
Five text strings now need to be converted to action hotspots. They include "Previous", "Next", "Expand All", "Collapse All", and "Help". These functions will help the user to navigate the Web page.
Create the Previous Hotspot
The Previous button is used to scroll backward through the documents in the Web view. The number of documents displayed will be determined by a setting in the Domino server configuration. You will need to work with the Domino server administrator to adjust the number of documents displayed to an appropriate amount. Highlight Previous and select the Create > Hotspot > Action Hotspot menu options. Insert the following statement in the Click event of the Programmer's pane.
@DbCommand("Domino";"ViewPreviousPage")
Create the Next Hotspot
Then Next button is used to scroll forward through the list of documents in the Web page. Highlight Next and select the Create > Hotspot > Action Hotspot menu options. Insert the following statement in the Click event of the Programmer's pane.
@DbCommand("Domino";"ViewNextPage")
Create the Expand All Hotspot
The next two buttons are really intended for future use. For this project, none of the views are categorized. However, if there are views that include categorized sections, this button will expand all sections in the view. Highlight Expand All and select the Create > Hotspot > Action Hotspot menu options. Insert the following statement in the Click event of the Programmer's pane.
@Command([ViewExpandAll])
Create the Collapse All Hotspot
The Collapse All button is used to condense all sections in the view to just the category headings. Highlight Collapse All and select the Create > Hotspot > Action Hotspot menu options. Insert the following statement in the Click event of the Programmer's pane.
|
A.12.6 |
@Command([ViewCollapseAll])
Create the Help Hotspot
The Help button is used to display information from the "Using This Database" document. However, the "Using This Database" document must be created in order for this button to work. Highlight Help and select the Create > Hotspot > Action Hotspot menu options. Insert the following statement in the Click event of the Programmer's pane.
@Command ([HelpUsingDatabase])
Note
The Help button will only function if the "Using This Database" document is created. An error message will display in the Web browser if this design element is not created. You must create the "Using This Database" document first. This step will be covered later in the project.
Save and close the design element. When prompted, name the subform wNextPrevTop.
Create the wNextPrevBottom Subform
This subform will be a copy of the wNextPrevTop subform with one minor change. Locate the wNextPrevTop subform and select the Edit > Copy menu options. Then select the Edit > Paste menu options. After the subform has been created, double-click on the design element to edit the subform.
Select the Design > Subform Properties menu options to display the properties dialog. Change the subform name to wNextPrevBottom and close the properties dialog.
Next cut the
text string located at the end of the statement and paste it at the beginning of the statement. The
HTML command forces a new line to be inserted in the Web browser. Because this subform will be displayed at the bottom of the page, the line break will need to occur before the hotspots. The revised statement should look like the following.
Previous | Next | Expand All | Collapse All | Help
Save and close the design element.
Create the $$NavigatorTemplate for MainNav Form
This form will be used to display the welcome page for the Web site in the Web browser. This is a special Domino design element intended specifically for Web applications. It's important that this form be named exactly as described here because this form works in conjunction with the MainNav navigator (created later in the project). This form includes shared fields, a subform, and a number of additional fields. To create the form, select the Create >Design >Form menu options.
The first step is to create the hidden fields for the form. These fields will reside on the first line of the form. Select the Create > Resource > Insert Shared Field menu options. Insert the Server_name and Roles_d shared fields and a couple blank lines.
Next, highlight the first line and select the Text > Text Properties menu options. Change the font color of the field to RED to indicate that this is a hidden field. In tab 6, check the Hide paragraph if formula is true checkbox and set the formula to 1.
Insert the Top HTML Subform
To continue with the form design, the next step is to insert the HTML subform created previously in the project. Place the cursor on line 2 and select the Create > Resource > Insert Subform menu options. When prompted, select the wMenuTop subform. The form should now look like Figure 12.5.
Figure 12.5. Form with HTML added
Add the Welcome Text
To help users become acclimated to the Web site, scroll to the bottom of the form and add the following statements. After the statements have been added, highlight the text and select the Text > Pass-thru HTML menu options.
Welcome to the equipment inventory database.


Instructions:

To create a document, click on the "New Document"

button located in the left side menu. Existing documents

can be reviewed by selecting a view (also located in the

menu section.) Please contact the system administrator

if you have questions.
Insert the Bottom HTML Subform
At this point, the "top" and "middle" sections of the Web page have been designed. To complete the HTML, you will need to append the "bottom" menu subform to the form. This will complete the HTML for the form.
Place the cursor at the bottom of the form and select the Create > Resource > Insert Subform menu options. When prompted, select the wMenuBottom subform. This action will append the bottom portion of the HTML to the welcome page form.
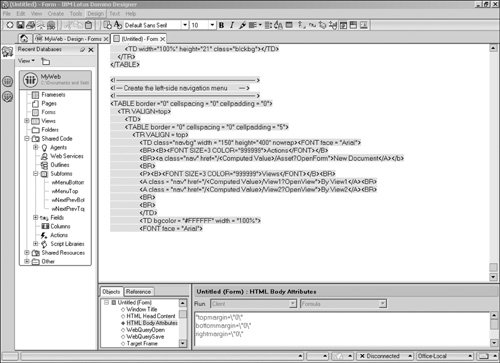
HTML Body Attributes
This section is used to configure the attributes for the body of the Web page. Locate the HTML Body Attributes section and insert the following in the Programmer's pane.
"topmargin="0"
bottommargin="0"
rightmargin="0"
leftmargin="0"
marginheight="0"
marginwidth="0""
Set Form Properties
This form is specifically used to display information in the Web browser. As such, users should not be permitted to create documents using this form, and this form should be excluded when users search the database. To disable these items, you will need to update the form properties.
Select the File > Document Properties menu options to display the properties dialog. On tab 1, name the form $$NavigatorTemplate for MainNav. Be sure that the name matches exactly. The form name must include "for MainNav" in order for the Web page to display properly. Then uncheck the Include in menu and Include in Search Builder options. Save and close the form.
Create the $$ViewTemplateDefault Form
The $$ViewTemplateDefault is another special design element. This form contains the HTML used to display the view in the Web browser. Because this form is very similar to the previous one, you will copy and modify the $$NavigatorTemplate form.
From the design pane, highlight the $$NavigatorTemplate for MainNav form and select the Edit > Copy menu options. Select the Edit > Paste menu options to create a copy of the form.
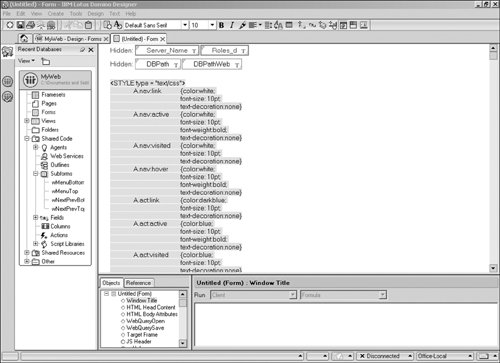
After the form has been created, double-click on the design element to open the form in design mode. Starting with the line
Welcome to the company document library, select this line and all remaining statements and delete the statementsleaving the wMenuTop subform in place. The updated form should now look like Figure 12.6.
Figure 12.6. Form with left navigation HTML added
Insert the Top Hotspots Subform
Now place the cursor at the bottom of the form and select the Create > Resource > Insert Subform menu options. When prompted, select the wNextPrevTop subform. This action will append the various Web buttons just below the wMenuTop subform. Insert a blank line after this subform.
Create the $$ViewBody Field
The $$ViewBody field is a special field that stores the "view name" to be displayed on the Web browser. Select the Create > Field menu options. Configure the field based on the following settings.
|
Field Name |
Type |
Default Value Formula |
Remarks |
|---|---|---|---|
|
$$ViewBody |
Text, Editable |
A special design element that stores the view to be displayed on the Web browser. |
Insert the BottomHotspots Subform
Insert another line and select the Create > Resource > Insert Subform menu options. When prompted, select the wNextPrevBottom subform. This action will append the various Web buttons just below the newly created field.
Insert the Bottom Menu Subform
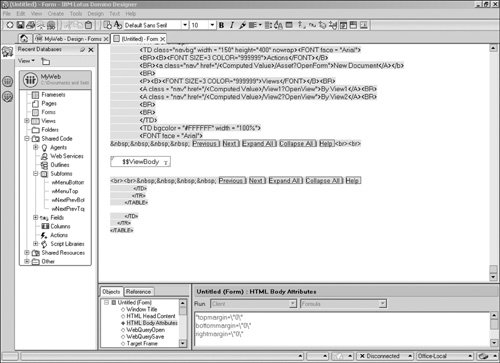
To complete the form, the bottom half of the HTML needs to be inserted. Select the Create > Resource > Insert Subform menu options. When prompted, select the wMenuBottom subform. The bottom half of the form should now look like Figure 12.7.
Figure 12.7. Form with bottom navigation added
Select the Design > Form Properties menu options. Change the form name from Copy of $$NavigatorTemplate for MainNav to $$ViewTemplateDefault. Save and close the form.
Create the AssetForm
This form is being created for illustrative purposes to demonstrate the Web site database. For the purposes of this project, this form has arbitrarily been designed to track department or corporate assets. However, the form is generic in nature and can be modified (or renamed) to meet your needs after the project is complete. To create the form, select the Create >Design >Form menu options and add a couple blank lines to the form.
Similar to the other forms in the database, the first line in the form will contain hidden, computed fields. These fields will contain data values required for Web browser navigation. At the first line, select the Create > Resource > Insert Shared Field menu options. Insert the Server_name, Roles_d, SaveMode, and URLRedirectTo shared fields.
Next, highlight the first line and select the Text > Text Properties menu options. In tab 5, check the Hide paragraph if formula is true checkbox and set the formula to 1. Change the font color of the field to RED to indicate that this is a hidden field.
Create Web Page Buttons
In order to manage the document from a browser, several buttons will need to be added to the formEdit, Save, Home, and Help. These buttons will only be visible when the document is accessed from a browser. The buttons will be placed on the form in a table. Similar to the Lotus Notes client, "Hide When" formulas will be used to control when the buttons are displayed.
Select Create > Table and select 1 row and 4 columns. To set the column widths, select the Table > Properties menu options. If the Table menu option is not visible, first click on the table. When the properties dialog is displayed, click on each cell and set the width to 1.000".
Now highlight all cells in the table and return to the properties dialog. Switch to tab 2 and select the Set All to 0 button. This will hide the table lines from displaying on the form.
Create the Edit Button
Place the cursor inside cell one and select the Create > Hotspot > Button menu options. In the properties dialog, name the button Edit and set the width to Fit Content on tab 1. On tab 5, select Notes R4.6 or later and the Opened for editing checkbox. Add the following formula in the Programmer's pane for the button.
@Command([EditDocument])
Create the Save Button
Place the cursor inside cell two and select the Create > Hotspot > Button menu options. In the properties dialog, name the button Save & Close and set the width to Fit Content on tab 1. On tab 5, select Notes R4.6 or later and the Opened for reading checkbox. Add the following formula in the Programmer's pane for the button.
@Command([FileSave]);
@Command([FileCloseWindow])
Create the Home Button
Place the cursor inside cell three and select the Create > Hotspot > Button menu options. In the properties dialog, name the button Home and set the width to Fit Content on tab 1. On tab 5, select the Notes R4.6 or later checkbox. Add the following formula in the Programmer's pane for the button.
REM {Reminder: the following must contain a valid view name};
webpage := @WebDbName + "/View1?OpenView";
@URLOpen(webpage)
Create the HelpButton
Place the cursor inside cell four and select the Create > Hotspot > Button menu options. In the properties dialog, name the button Help and set the width to Fit Content on tab 1. On tab 5, select the Notes R4.6 or later checkbox. Add the following formula in the Programmer's pane for the button.
@Command([HelpUsingDatabase])
The form should now look like Figure 12.8.
Figure 12.8. Hotspot buttons for Web browser client

At this point, the Web-related design elements have been incorporated into the form design. The next step will be to add the fields and labels used to store data. Skip a line below the table and give the form a descriptive title at the top of the formsuch as Asset Record. Then add the following text field descriptions down the left side of the form.
- Record:
- Author:
- Created:
- Subject:
- Body:
Create the following fields using the Create > Field menu options. Be sure to set the data type, formula, and other attributes for each field on the form using the properties dialog box and/or Programmer's pane.
|
Field Name |
Type |
Default Value Formula |
Remarks |
|---|---|---|---|
|
RecordNo |
Number, Computed |
@ThisValue |
|
|
RequestBy |
Names, Created when Composed |
@UserName |
|
|
CreateDate |
Date/Time, Created when |
@Now |
On tab 2, select the Display Time setting. Make sure Composed both the date and time options are selected. |
|
Subject |
Text, Editable |
||
|
Body |
RichText, Editable |
Set the "Global (Options)" Parameters
This form will utilize the LotusScript library. Locate the "Global (Options)" section and add the following in the Programmer's pane.
Option Public
Use "WebsiteLibrary"
Update the HTML Head Content Object
The statements in this object are utilized when the application is accessed from a Web browser. They specify the "Meta" tags, server name, and database path information. Locate the HTML Head Content section and add the following statements in the Programmer's pane.
nl := @NewLine;
vPath:=@WebDbName;
nl + "
" + nl + "" + nl
Update the WebQuerySave Event
This event is triggered every time a document is saved via a Web browser. When a document is saved, the wSaveDocAgent will assign a document number and return an informative message to the user. After the message is displayed for five seconds, the main Web page will be redisplayed.
@Command([ToolsRunMacro]; "wSaveDocAgent")
Update the QuerySave Event
This event is triggered when the document is saved via the Lotus Notes client. When a document is saved, a document number is assigned, if needed, and the user is returned to the previously selected view.
Sub Querysave(Source As Notesuidocument, Continue As Variant)

 Dim w As New NotesUIWorkspace
 Dim uidoc As NotesUIDocument
 Dim doc As NotesDocument
 Set uidoc = w.CurrentDocument
 Set doc = uidoc.Document
 Call AssignTrackingNumber (doc)

End Sub
The form should now look similar to Figure 12.9.
Figure 12.9. Asset Record form with fields, labels, and hotspots
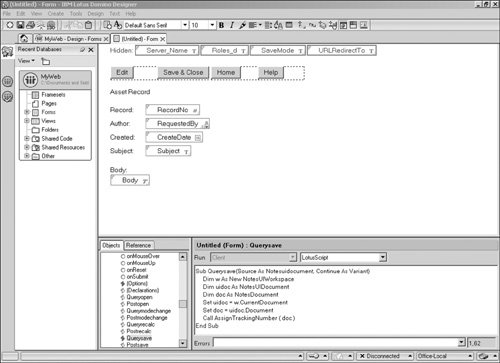
Save and close the form. When prompted, name the form Asset|Asset.
Tip
If you decided to rename the form, all references to Asset will need to be updated in the database. Updates include the following: (1) change the form name in the Form Properties dialog, (2) edit the By View1 view and change the View Selection Formula, and (3) edit the By View2 view and change the View Selection Formula. To ensure that all references have been updated, navigate to the Other section in the Design pane and select the Synopsis feature. When prompted, add all design elements. Then use the Edit > Find menu options to locate all references to the keyword Asset. No references should be found. If you do locate an additional reference, you will need to edit that design element and update the item.
Create View 1
By default, a view called (untitled) is automatically created when the database is first created. To configure this view, navigate to Views in the Design pane and double-click on the view called "(untitled)". When the view is displayed, the Designer client will immediately display the properties dialog for the view. Specify By View1 as the view name and View1 as the alias name. Close the properties dialog.
Column 1
This column will display the record number for all documents stored in the application database. Double-click on the default column and rename the column title to Record in the properties dialog. Switch to tab 2 and set the sort order to Descending. Close the properties dialog.
To set the column value, change the display type from Simple Function to Field and select the following field.
RecordNo
Column 2
The second column will display the subject for the document. Select the Create >Append New Column menu options to add the column. In the properties dialog, set the column name to Subject and column width to 40 on tab 1. Change the display type from Simple Function to Field and select the following value.
Subject
Set the View Selection Criteria
Click inside the view (as opposed to a column header) to give the view focus. Next, change the programming language from Simple Search to Formula and add the following to the View Selection section of the Programmer's pane.
SELECT Form = "Asset"
Save and close the view.
Create View 2
With one view already in place, you will use this as the basis for the second view. From the Design pane, highlight By View1 and select the Edit > Copy menu options. Now select the Edit > Paste menu options. Double-click on the Copy Of By View1 to open it in design mode. When the view is opened, the view properties dialog should automatically appear. Change the view title to By View2 and alias name to View2.
Next, drag the Subject column to the first column. This will make the subject column the first column in the view followed by the document number. In the properties dialog for the column, switch to tab 2 and set the sort order to Ascending.
Save and close the view.
Create the RecordNo View
The record number view is an administrative view used to compute the record number for documents. As new requests are submitted, the top-most number is incremented by one and assigned to the new request. This view will be hidden from the users.
To create the view, select the Create > Design > View menu options. When prompted, set the view name to (RecordNo)|RecordNo. Next, change the Copy style from view field to -Blank-. To set this value, click the Copy From button. Finally, change the selection conditions to By Formula and insert the following in the dialog box.
SELECT RecordNo != ""
Click Save and Customize to create the view and open it in edit mode.
Column 1
This column will display the record numbers, sorted in descending order, for all existing documents. Click on the column header and select the Design > Column Properties menu options. Set the column name to Record No. Switch to tab 2 and set the sort order to Descending. Close the properties dialog.
Note
Be sure the column sort order is set to Descending in the properties dialog. The record numbers will not generate correctly if the sort type is not set to Descending.
To set the column value, change the display type from Simple Function to Field and select the following value.
RecordNo
Save and close the view.
Import Graphics
Sample graphics have been provided for this project, and you can enhance them with your company logo or other design elements after the project is complete. Graphic files are created external to Domino Designer and then imported into the application design. You will need to work with a graphic artist or utilize a graphics application if you want to modify or create new graphics for this project
To import the files, access the files on the companion Web site. Then select the Create > Design > Image Resource menu options. Be sure to select the Image Resource menu option. This option is used specifically for images and is different from the File Resource menu option, which is used to store reference files (such as spreadsheets or PDF files).
Two files will be used in this project. The first graphic will be used as the background navigation image when users access the application from a Lotus Notes client. The second image represents the company logo and will be displayed on the Web site.
Locate the file background.gif and click OK to import the image. Repeat the process for the logo.jpg graphic. You will need to change the file type from GIF Image to JPEG Image in order to locate the second file on the companion Web site.
Create the MainNav Navigator
The navigator will be used to determine the default view to display when the application is accessed. This design element will be used by several design elements in the database. To create the document, select the Create > Design > Navigator menu options.
Next, select the Design > Navigator Properties menu options to display the properties dialog window. Set the name to MainNav and select By View1 as the initial view to display (see Figure 12.10).
Figure 12.10. Navigator properties dialog

Save and close the design element.
Create the Notes Client Navigation
To enrich the overall appearance of the tool, you will create a custom user interface using an outline, page, and frameset. The combination of these three elements will be used to display and navigate the application interface from both a Lotus Notes client and Web browser.
Create the Outline
The outline will define the navigational elements and will be displayed in the left pane of the frameset. To create the outline, select the Create > Design > Outline menu options.
To create a descriptive title for the user interface, click the New Entry button located at the top of the display window. In the properties dialog, label the entry Documents. This is an arbitrary title and can be set to any text value.
To create a spacer, or a blank line between the outline title and the display options, select the New Entry button but do not specify a label.
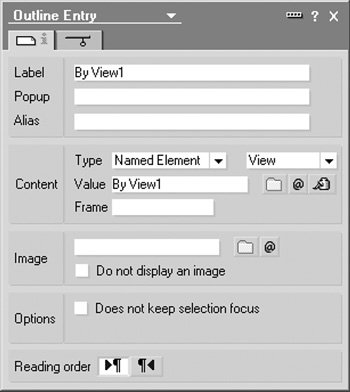
To add a view to the outline, select the New Entry button and label the entry By View1. Next, set the type field to Named Element and View (see Figure 12.11). In the Value field, enter By View1 as the view name. Repeat this process and add By View2.
Figure 12.11. Outline Entry properties dialog
Note
As a general practice, you should always use the alias name when working with design elements. However, outlines automatically default to the primary name and do not allow the alias name to be specified. This means that if the view name is changed, you'll also need to update the outline to reflect the name change.
Tip
By default, icons are displayed next to the view design element when the application is accessed via the Lotus Notes client. To disable the icon from displaying (or to change the icon), double-click on the By View1 to display the properties dialog. Then check the Do not display image option. To change the icon, import a graphic resource file and then select it from the properties dialog.
Save and close the outline. When prompted, name the design element MainOutline.
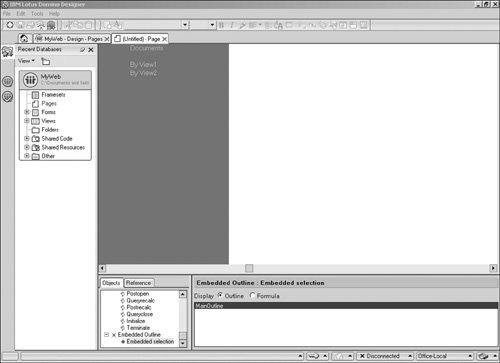
Create the Page
To create the page, select the Create > Design > Page menu options. The page will display the outline created in the previous step. Select the Create > Embedded Element > Outline menu options. When prompted, select MainOutline to add the design element to the page.
To add some flare to the display, we'll add a background graphic to the interface. Single-click on the outline element and select the Element > Outline Properties menu options. The Element menu will only display if MainOutline is the active design item.
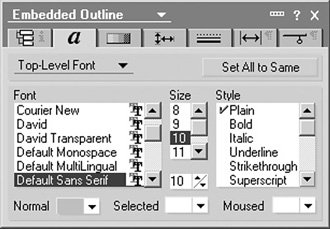
When the outline properties dialog is displayed, switch to tab 2 to set the text colors. Select light gray for the Normal setting and white for the Selected and Moused options (see Figure 12.12). These settings will make the text more visible to the users.
Figure 12.12. Embedded Outline dialog
Next, add the background image to the outline. Select the Design > Page Properties menu options. Switch to tab 2. Specify background.gif in the Resource field and select Repeat once in the Options section (see Figure 12.13).
Figure 12.13. Page properties dialog

The page should now look like Figure 12.14.
Figure 12.14. Completed page
Save and close the design element. When prompted, name the item MainPage.
Create the Frameset
To complete the navigation setup, a two-pane frameset must be created. The left pane will contain the outline, and the right pane will display data. To create the frameset, select the Create > Design > Frameset menu options. When prompted to select a design, click OK to accept the default settings.
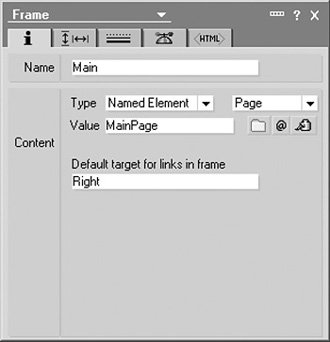
The frameset is configured in two steps. First, you will configure the left pane and then the right pane. To start, click on the left pane and select the Frame > Frame Properties menu options. Set the name to Main, set the Type to Named Element and Page, enter MainPage as the value, and set Default target for links in frame to Right (see Figure 12.15).
Figure 12.15. Left frame properties dialog settings
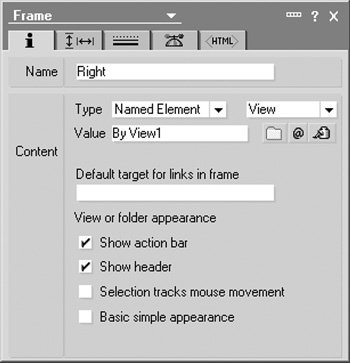
With the property window still displayed, click on the right pane. Set the name to Right, set the Type to Named Element and View, enter By View1 as the value, and set Default target for links in frame to Right (see Figure 12.16).
Figure 12.16. Right frame properties dialog settings
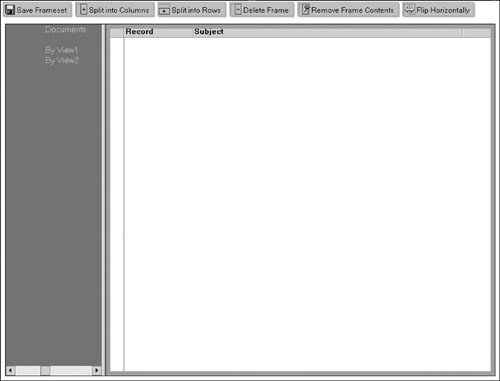
You have now completed the frameset configuration. Select File > Save and name the design element MainFrame. The frameset should now look like Figure 12.17.
Figure 12.17. Completed frameset
Set the Database Default
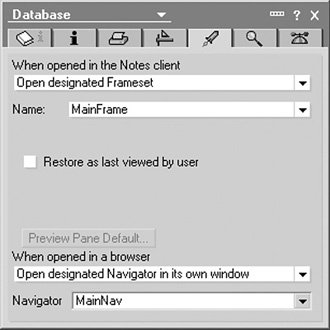
To activate the frameset, the database properties must be updated. Select the File > Database > Properties menu options and switch to tab 5. Change When opened in the Notes client to Open designated Frameset and set the name to MainFrame.
Then change When opened in a browser to Open designated Navigator in its own window and set the navigator to MainNav (see Figure 12.18).
Figure 12.18. Set default navigator for the database
Update the "Using This Database" Document
In order to use the Help button, the "Using This Database" document must be created. To create this design element, navigate to the Other section and select Database Resources from the Design pane. Edit the "Using This Database" document. Add a title to the top of the document and describe the purpose of the database. Save and close the design element when complete.
Tip
You can add files such as word processor documents, spreadsheets, or PDF files in the "Using This Database" design document. When accessed via the Lotus Notes client, the user can save the file to their workstation. When accessed from a Web browser, users can download the file.
Tip
You can selectively display help information by setting the "Hide When" text formulas in the "Using This Database" document. This enables you to customize the help information. Lotus Notes users can view information specific to the Notes client, while Web users can view information suited for Web navigation. To set the "Hide When" formulas, highlight the text and select the Text > Properties menu options. Then select the appropriate checkbox to hide the text from either Web or from Notes 4.6 or greater. However, be sure to select either one option or the other. Selecting both will result in no text being displayed.
An Introduction to the Lotus Domino Tool Suite
Getting Started with Designer
- Getting Started with Designer
- Installing the Designer Client
- Launching the Designer Client
- Creating My First Notes Database
- Links to developerWorks
Navigating the Domino Designer Workspace
- Navigating the Domino Designer Workspace
- An Introduction to Designer
- The Design Pane
- The Work Pane
- The Object Pane
- The Programmers Pane
- The Action Pane
- Design Tabs
- Language Selector
- Client and Browser Selector
- Status Bar
- Links to developerWorks
Domino Design Elements
- Domino Design Elements
- Building Blocks of a Notes Database
- Naming Design Elements
- Working with Forms
- Working with Fields
- Working with Layout Regions
- Working with Sections
- Working with Buttons
- Working with Views
- Working with Application Menus
- Working with Folders
- Working with Framesets
- Working with Pages
- Working with Shared Code
- Working with Shared Resources
- Links to developerWorks
An Introduction to Formula Language
- An Introduction to Formula Language
- What Is Formula Language?
- What Is a Formula?
- Working with Variables
- Formula Language Keywords
- Working with Operators
- General Syntax Rules
- What Are Functions and Commands?
- What Are Commands?
- Working with Text Strings
- Working with Conditional Branching
- Working with Iterative Loops
- Working with Lookup Functions
- Working with Dates
- Working with Lists
- Working with User Prompts
- Links to developerWorks
An Introduction to LotusScript
- An Introduction to LotusScript
- Introduction to Object-Oriented Programming
- LotusScript Classes
- Keywords
- Variables
- Constants
- Operators
- Comments
- Defining Variables and Constants
- Defining Object Reference Variables
- Working with Conditional Branching
- Working with Iterative Loops
- Communicating with Users
- Working with Arrays
- Using Formula Language in LotusScript Code
- Compiling LotusScript Code
- Links to developerWorks
Fundamentals of a Notes Application
- Fundamentals of a Notes Application
- The Five Primary Application Types
- The Application Development Life Cycle
- Elements of a Project Plan
- Elements of a Project Schedule
- Questions to Ask When Designing a Database
- Designing a Notes Application
- Links to developerWorks
Calendar Applications
- Calendar Applications
- Application Architecture
- Managing Recurring Events Using Single Documents
- Managing Recurring Events Using Multiple Documents
- Project A: Build an Event Calendar
- Project B: Build a Conference Room Reservation System
- Links to developerWorks
Collaborative Applications
- Collaborative Applications
- Project A: Build a Discussion Forum
- Project B: Build a Project Control Notebook
- Links to developerWorks
Reference Library Applications
- Reference Library Applications
- Project A: Build a Connection Document Database
- Project B: Build a Spreadsheet Generator
Workflow Applications
- Workflow Applications
- Defining a Workflow Application
- Project: Building a Workflow Database
- Links to developerWorks
Web Applications
- Web Applications
- Defining a Web Application
- Project: Building a Domino Web Site
- Security
- Troubleshooting
- Links to developerWorks
Design Enhancements Using LotusScript
- Design Enhancements Using LotusScript
- Custom LotusScript Functions and Routines
- Compare Two Dates
- Check for an Element in an Array
- Replace an Element in an Array
- Remove a Character from a String
- Remove an Element from an Array
- Compare Two Arrays
- Working with Dynamic Arrays
- Create a Custom Popup Dialog Box
- Refresh a Document from the User Interface
- Search for a Document
- Working with Dates and Times
- Compute the Day of the Week
- How to Reference $ Fields
- How to Set the ReturnReceipt for LotusScript-Generated Email
- Add Field Validation to a Form
- Display an Are You Sure? Message
- Format a Users Name
- Automatically Update a History Field When a Document Changes
- Prompt the User to Describe Document Changes and Update the History Log
- Create a Unique Document Record Number
- Limit the Ability to Create Documents on a Local Database
- How to Zero Pad a Text Number
- How to Add Text to a Rich Text Object
- How to Attach a File to a Rich Text Object
- How to Format Text in a Rich Text Object
- Change Document to Edit Mode
- Obtain the Current Roles Assigned to a User
- Generate a Document in Another Database
- Generate a New Document by Duplicating an Existing Document
- Prompt in LotusScript
- Sending Email to Multiple Recipients Using LotusScript
- Add a View Icon and Mood Stamp to an Email
- Retrieve and Update NOTES.INI Environment Values
- Assign One Rich Text Object to Another Rich Text Object
- Add a Document, View, or Database Link to a Rich Text Field
- Create a Button to Add a Calendar Event
- Links to developerWorks
Design Enhancements Using Formula Language
- Design Enhancements Using Formula Language
- Formula Language Enhancements
- Compare Two Lists
- Expand and Collapse All Document Sections
- Expand and Collapse All View Categories
- Get the Current Day of the Week
- Get the Current Month of the Year
- Create a Formatted Date String
- Create an Attach File Button
- Display the Windows File Finder Dialog
- Create a New Document
- Create a Last Updated By Field
- Create a Last Modified On Date Stamp
- Format a Users Name
- Hide Text and Design Elements Based on a Users Role
- Working with @DBColumn
- Working with @DBLookup
- Parse a Text String
- How to Format Field Values Using Input Translation
- How to Add Field Validation
- Display an Are You Sure? Warning Message
- Generate Email Using Formula Language
- How to Sort a List of Values
View Enhancements
- View Enhancements
- Create a New Document by Double-Clicking on a Calendar Date
- Display Documents in a View by Year and Month
- Display an Icon in a View
- Retrieve All Views in a Database
- Retrieve All Columns in a View
- Retrieve All Columns for Each View in a Database
- How to Manage Conflict Documents
- Display All Documents by Form Name
- Disable the Ability to Paste Documents into a View
- Links to developerWorks
Sample Agents
- Sample Agents
- Agent Enhancements
- Simple Action Agent to Modify All Documents
- LotusScript Agent to Modify All Documents Containing a Specific Field Value
- Agent to Manually Generate an Email Report
- Schedule Agent to Send a Daily, Weekly, or Monthly Email Report
- Links to developerWorks
Miscellaneous Enhancements and Tips for Domino Databases
- Miscellaneous Enhancements
- Disable the Ability to Print, Copy, Cut, and Forward Documents
- Using Field Hints on a Form
- Using Static Popups to Display Help Messages
- How to Inherit Fields Between Forms
- Add an Icon to an Action Button
- Create a Custom Application Interface
- How to Set the Field Tab Order on a Form
- Domino Shortcut Keys
Data Management
- Data Management
- Importing Data
- Exporting Data
- Migrating Data
- Creating Tables
- Modifying Data Using a LotusScript Agent
- Archiving Data Using an Agent
- Refreshing All Documents
Security
- Security
- Access Control List Fundamentals
- Managing Database Access
- How to Enforce Consistent ACL Settings Across Replicas
- Encrypt the Database
- Managing Access to Views
- Managing Access to Forms and Documents
- Managing Access to Fields
- Managing Access to Source Code
- Hiding a Database Design
- Hiding a LotusScript Library
- How to Sign a Database
- How to Cross Certify Domino Servers
- Links to developerWorks
Application Deployment and Maintenance
- Application Deployment and Maintenance
- What Are Templates?
- Establishing a Development Environment
- Migrating a Database Design
- Preserve a Copy of the Database Design
- Deploying the Production Database
- The Importance of Database Backups
- Process Synopsis
- Links to developerWorks
Troubleshooting
- Troubleshooting
- Troubleshooting LotusScript
- Troubleshooting Agents
- Common Database Problems
- Where to Find Additional Assistance
- Links to developerWorks
Appendix A. Online Project Files and Sample Applications
- Appendix A. Online Project Files and Sample Applications
- About the Online Materials
- About the Companion Web Site
- About the Development Tools and Files Folder
- Installing a Notes Database
Appendix B. IBM® Lotus® Notes® and Domino®Whats Next?
EAN: 2147483647
Pages: 293
