Database access is managed through the ACL. For a user to access the database, one of the following conditions must be true.
The -Default- access level is set to Reader, Author, Editor, Designer, or Manager.
The user is explicitly included in the ACL.
The user is a member of a group in the ACL.
Based on these rules, the user will either be permitted to utilize the database or denied access altogether. The following explains how to add users to the database. After they are added, you can specify the user type, access level, and (optionally) the roles associated with the users.
Note
Only users assigned "Manager" access can modify the ACL. Alternatively, depending on the setup of the Domino Directory, you may also have the authority to add and remove users from various access groups.
Setting the Default Access
All databases automatically incorporate a special user called -Default- in the ACL. The access permissions associated with this user are, by default, applied to any user not explicitly specified in the ACL or included in an access group. Follow these steps to modify the default access settings for a database application.
Step 1.
Locate and highlight the database in the Lotus Notes client workspace.
Step 2.
Open the ACL. Select the database and choose the File > Database > Access Control menu options. This will display the ACL dialog.
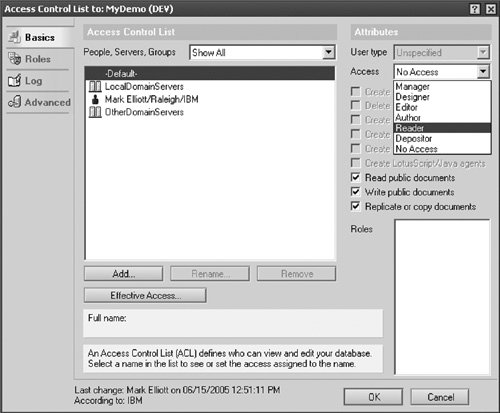
Step 3.
Modify the default access settings for the database. Locate and click on the -Default- user. Modify the database permissions and change the access level, user type, and roles as desired (see Figure 19.5).
Figure 19.5. Access type attribute associated with Person, Group, or Server
Caution
Depending on the version, Lotus Notes automatically assigns "Manager" access to the -Default- user when a new database is created. As a best practice, you should immediately change this value to something other than Manager or Designer after creating a new database. Otherwise, literally anyone will have the ability to modify the design, delete documents, and/or change the ACL settings.
Adding Users to the ACL
This section outlines the steps to add an individual user to the ACL. In general, this process should be used to manage a limited number of users. Where possible, consider using access groups (described in the next section) to manage a large number of users with similar attributes. To add users to the access list, you must have "Manager" authority. Follow these steps:
Step 1.
Locate and highlight the database in the Lotus Notes client workspace.
Step 2.
Open the ACL. Select the database and choose the File > Database > Access Control menu options. This will display the ACL dialog.
Step 3.
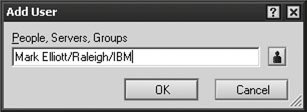
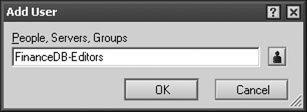
Add users. When the ACL dialog window displays, select the Add button. This will display the Add User dialog prompt (see Figure 19.6). At this point, you can either manually enter the users fully qualified Lotus Notes ID or click the icon (located to the right of the field) to select a user from the Domino Directory.
Figure 19.6. Add User dialog
Step 4.
After the user has been added to the ACL, set the User Type and Access level to be associated with the user.
Step 5.
Optionally, set any additional permissions such as the ability to Delete documents, Create private agents, Create personal folders/views, Create shared folders/views, or Create LotusScript/JavaScript agents.
Step 6.
Repeat this process for each new user that needs to be incorporated into the ACL. Click OK to apply all security changes to the database.
Tip
If you need to add a user to the ACL who happens to require similar security settings as another user, you can use the quick add function. First, click on the existing user in the ACL and then select the Add button. The new user will then have the same security properties as the existing user in the ACL.
Note
Some organizations restrict the ability to assign "Manager" access to users in the database ACL. If this is true for your organization, consider utilizing groups to manage database access. After the administrator has established a group in the ACL, users can be added and removed by editing the group stored in the Notes Address Book.
Adding Groups to the ACL
Start by creating the group name in the Domino Directory. After it is created, users can be added and removed from the group without having to modify the Notes database ACL. Next, add the group name. You add groups much as you would add a person by either manually typing the group name or selecting it from the Domino Directory and assigning permissions.
Step 1.
Locate and open the Domino Directory on the server where the database resides. The Domino Directory is the server address book (which is different from your Personal Address Book that is associated with your Lotus Notes client). Typically, the database title includes the server name followed by "directory". For instance, if the server name were MYSERVER, then the database title would be "MYSERVERs Directory".
Step 2.
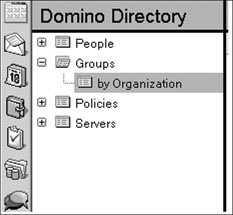
Create the Group. Expand the Groups category in the left navigation pane and select a view (such as by Organization). The view displayed may vary based on the database design (see Figure 19.7).
Figure 19.7. Location of the Groups view in the Domino Directory
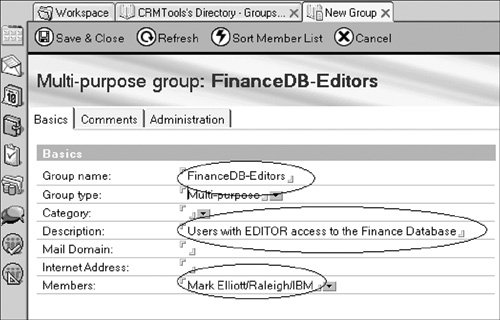
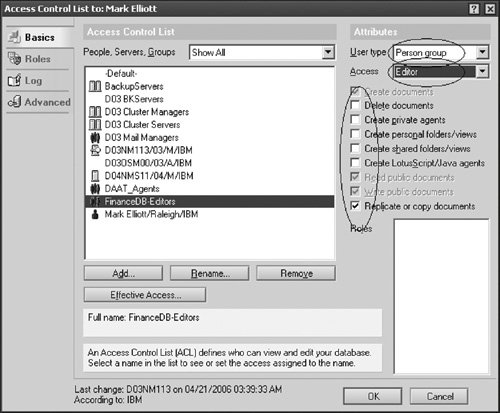
To create a group, select the Add Group button located at the top of the view and complete the form. Specify a group name and a brief description of the group and list all members associated with the group (see Figure 19.8).
Figure 19.8. Form used to create Groups in the Domino Directory
Note
Consider including the access level in the group name so that you can easily determine what group is assigned to a particular access level. For example, say you have a database that tracks business financials. You might have a group for users with Reader, Author, and Editor access. The group name for users with Editor access might be "FinanceDB-Editors". Using this approach, you can quickly determine the purpose of the group, database, and access level from the Domino Directory.
After these values are set, save and close the document. This will add the group to the Domino Directory, and it can now be used by the Lotus Notes client (such as for an email distribution list) or a Notes database (to assign database access to the users in the ACL).
Step 3.
Define access permissions for the group. Select the database and choose the File > Database > Access Control menu options. This will display the ACL dialog. Select the Add button from the ACL dialog window. This will display the Add User prompt (see Figure 19.9).
Figure 19.9. Specifying a group name in the Add User dialog
Manually enter the group name or click the icon (located to the right of the field) to select a group from the Domino Directory (see Figure 19.10).
Figure 19.10. Setting the user type and database attributes for a Group
Click OK to add the entry to the ACL.
Tip
When adding several different types of groups to the ACL, consider incorporating the access level in the group name. Lets say, for example, there are three unique groups associated with the "Defect" databaseusers with read-only access, author access, and editor access. Based on this scenario, example group names could include DefectReaders, DefectAuthors, or DefectEditors. Group names can include spaces. Whether spaces are included or omitted is a personal style or organizational preference.
Step 4.
Set access permissions. After the group has been created, change the User type to Person Group, Server Group, or Mixed Group and then set the Access level (such as Editor).
Step 5.
(Optional) Set any additional permission such as the ability to Delete documents, Create private agents, Create personal folders/views, Create shared folders/views, or Create LotusScript/JavaScript agents.
Step 6.
Repeat this process for each new group and click OK to apply all security changes to the database.
Configuration of the ACL group is now complete. Users can be added or removed from the database access list using the group stored in the Domino Directory.
Tip
Domino server administrators sometimes create special groups in the Domino Directory, such as "Administrators" and "DenyAccess", which are also included in the ACL for all databases. The "Administrators" group might contain a list of all Domino developers or server administrators. The access level for this group might be "Designer" or "Manager". The "DenyAccess" group, on the other hand, might contain a list of users that should not have access to the database. By adding this group to all databases, a user name can be inserted in the group and instantly denied access to all databases on the server. This might be used for a terminated or disgruntled employee. Work with your Domino server administrator regarding implementation of these groups and understanding the business policies in place for your server.
Creating Access Roles
To create a role, select the File > Database > AccessControl menu options to open the ACL dialog. By default, the Basics tab should be active. Next, click on the Roles tab (left side) and select the Add button (located at the bottom of the dialog window). This will display a new popup window called Add Role. Specify the name of the role and click OK to apply the change. Repeat this process for each role associated with the database.
With roles in place, switch back to the Basics tab. To assign the role to a user, server, or group, click on the entry and then select one or more roles. After all roles have been created and assigned, click OK to complete the ACL settings. Finally, incorporate the roles into the design of the database.