Useful COM Interop
Overview
As expansive as the Microsoft .NET Framework is, it would be unrealistic to expect it to duplicate all the features available in COM components today. In the previous chapters of this book, you've already seen how you can extend the functionality of .NET by leveraging features from the Win32 API, WMI, and COM components like the Windows Script Host. This chapter considers a few more useful features from the world of unmanaged code, including ADO classic (recipe 19.1), components for Web pages with Microsoft Internet Explorer (recipes 19.2 and 19.3), components for automating Microsoft Word and Excel (recipes 19.4 and 19.5), and ActiveX controls for animated movies and masked text boxes (recipes 19.7 and 19.8). And best of all, even though these controls and components exist outside the .NET class library, the .NET Framework's support for COM interoperability makes using them seamless.
Use ADO Classic
Problem
You want to use the ADO data access libraries for interoperability with an existing application or (rarely) to access some functionality that isn't available in Microsoft ADO.NET, like dynamic server-side cursors.
Solution
Use the ADO interop assembly ADODB.dll, which is included with the .NET Framework.
Discussion
Even though the .NET Framework is tailored for the new disconnected data access model of ADO.NET, you can still use the original ADO COM objects if required. You simply need to add a reference to the Microsoft ActiveX Data Objects 2.7 Library (msado15.dll) by right-clicking your project, selecting Add Reference, and choosing the COM tab. A reference will be added to the primary interop assembly ADODB.dll, which is included with the .NET Framework and installed in the global assembly cache (GAC). All the ADO objects are contained in a namespace named ADODB.
The ADO objects always connect through OLE DB, and thus you must use the OLE DB syntax for connection strings. You can manipulate Connection, Command, and Recordset objects directly, and you can even copy the data from a connected Recordset into a disconnected ADO.NET DataSet using the OleDbDataAdapter. The following Console application demonstrates this technique.
Public Module ADOTest

 ' Note that the connection string must use OLE DB syntax.
 Private ConnectionString As String = "Provider=SQLOLEDB;" & _
 "Data Source=localhost;Integrated Security=SSPI;" & _
 "Initial Catalog=Northwind"

 Public Sub Main()
 ' Create the ADO classic objects.
 Dim ADOCon As New ADODB.Connection()
 ADOCon.ConnectionString = ConnectionString
 Dim SQL As String = "SELECT * FROM Customers"
 Dim Rs As ADODB.Recordset

 ' Create the ADO.NET adapter that will transfer the Recordset
 ' data to a table in the DataSet. Note that only the OLE DB
 ' provider exposes this functionality.
 Dim Adapter As New System.Data.OleDb.OleDbDataAdapter()
 Dim Ds As New DataSet()

 Try
 ' Open the Recordset.
 ADOCon.Open()
 Rs = ADOCon.Execute(SQL)

 ' Copy the Recordset to the DataSet.
 Adapter.Fill(Ds, Rs, "Customers")
 Catch Err As Exception
 Console.WriteLine(Err.ToString())
 Finally
 ADOCon.Close()
 End Try

 Console.WriteLine("Retrieved " & Ds.Tables(0).Rows.Count & " rows.")
 Console.ReadLine()
 End Sub

End Module
Display a Web Page with Internet Explorer
Problem
You want to display an HTML page (or another type of document supported by Internet Explorer) in a Windows application.
Solution
Use the Web browser ActiveX control included with Internet Explorer.
Discussion
The .NET Framework does not include any controls for rendering HTML content. However, this functionality would be useful, either to display some local HTML content (like a rich help document) or some information from the Web (for example, a Web page that lists downloads a user might use to update an application).
To show an HTML page, you can add an Internet Explorer window to your Windows applications. This window not only supports HTML, it also supports JavaScript and Visual Basic Scripting Edition (VBScript) code, ActiveX controls, and various plug-ins depending on your system configuration (including Word, Excel, and Adobe Acrobat Reader). In fact, you can even use the Web browser control to browse the folders on a local drive or show the files on an FTP site.
To add the Web browser to a project, right-click the Toolbox and choose Customize Toolbox. Then select the COM Components tab, and check the Microsoft Web Browser control (shdocvw.dll). This will add the Explorer control to your Toolbox. When you drop this control onto a form, the necessary interop assemblies will be generated and added to your project.
When using the Web browser, you'll commonly use these methods:
- Navigate redirects the page to the URL you specify.
- GoBack and GoForward navigate to pages in the history list.
- GoHome navigates to the home page set on the current computer, and GoSearch shows the search page.
In addition, the user will be able to trigger page navigation by clicking page links (if they exist). You can retrieve the current URL from the LocationURL property and determine if the control is still rendering the page by examining the Busy property. In addition, you can react to a variety of events, including ones that fire when navigation starts and stops.
Figure 19-1 shows a simple test application that allows the user to visit two pages (and follow any links they provide).
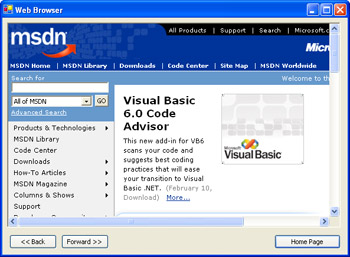
Figure 19-1: Using the Web browser control.
Public Class Form1
 Inherits System.Windows.Forms.Form

 ' (Designer code omitted.)

 Private Sub Form1_Load(ByVal sender As System.Object, _
 ByVal e As System.EventArgs) Handles MyBase.Load
 Explorer.Navigate2("http://www.prosetech.com")
 End Sub

 Private Sub cmdBack_Click(ByVal sender As System.Object, _
 ByVal e As System.EventArgs) Handles cmdBack.Click
 Try
 Explorer.GoBack()
 Catch
 MessageBox.Show("Already on first page.")
 End Try
 End Sub

 Private Sub cmdForward_Click(ByVal sender As System.Object, _
 ByVal e As System.EventArgs) Handles cmdForward.Click
 Try
 Explorer.GoForward()
 Catch
 MessageBox.Show("Already on last page.")
 End Try
 End Sub

 Private Sub cmdHome_Click(ByVal sender As System.Object, _
 ByVal e As System.EventArgs) Handles cmdHome.Click
 Explorer.GoHome()
 End Sub

End Class
Drive Internet Explorer
Problem
You want to show a separate Internet Explorer window, but retain control over that window.
Solution
Use Automation and the Microsoft Internet Explorer control to drive Internet Explorer.
Discussion
Microsoft provides more than one way to access the functionality of Internet Explorer. You can host an Internet Explorer browser window directly on a form, as shown in recipe 19.2, or you can use Automation to drive a standalone Internet Explorer window. In either case, the object model is virtually identical.
To use Automation with Internet Explorer, you must first add a reference to the necessary COM library. Right-click your project in the Solution Explorer, select Add Reference, and choose the COM tab. Find the Microsoft Internet Controls (shdocvw.dll) item in the list, and add it. The necessary interop assemblies will be generated and added to your project immediately.
As with the Web browser control, you can direct the window to various URLs and handle navigation events. In addition, you can control whether or not the window is visible (by setting the Visible property), and you can close the window by calling Quit.
The following Console application launches a standalone Internet Explorer window to show the indicated URL. It then handles the NavigateComplete2 event, displaying new URLs as the user accesses them. You can close the Internet Explorer window by pressing Enter in the Console window.
Public Module IETest

 Public Sub Main()
 ' Create the IE instance.
 Dim IE As New SHDocVw.InternetExplorer()

 ' Connect an event handler that responds after navigations.
 AddHandler IE.NavigateComplete2, AddressOf IE_NavigateComplete2

 ' Navigate to a new page.
 IE.Navigate("http://www.prosetech.com")

 ' Show the window.
 IE.Visible = True

 Console.WriteLine("Press any key to exit.")
 Console.ReadLine()

 Console.WriteLine("Closing the IE window.")
 IE.Quit()
 End Sub

 Public Sub IE_NavigateComplete2(ByVal pDisp As Object, _
 ByRef URL As Object)
 Console.WriteLine("Visited: " & URL.ToString())
 End Sub

End Module
Drive Microsoft Word
Problem
You want to interact with Microsoft Word, either to automate a business task or to read and write Word documents.
Solution
Use the Word Automation objects included with Microsoft Office.
Discussion
Microsoft provides a rich object model that you can use to interact with Word and other Office applications. You can use these objects to create and read Word documents, automate complex or repetitive batch tasks, and even access Word features like the spelling dictionary.
To use Automation with Microsoft Word, you must first add a reference to the necessary COM library. Right-click your project in the Solution Explorer, select Add Reference, and choose the COM tab. Find the Microsoft Word Object Library item in the list, and add it. The exact name of the Automation objects depends on the version of Word you have installed. With Word 2000, the library is version 9.0, whereas Word 2002 (included with Office XP) uses version 10. The necessary interop assemblies will be added to your project immediately. The objects are located in a Word namespace.
| Note |
You can download primary interop assemblies for Office XP directly from Microsoft at http://msdn.microsoft.com/library/default.asp?url=/downloads/list/office.asp. These .NET assemblies wrap the Office COM components and include certain refinements that make the Office object model easier to use in a .NET application. Once you have downloaded the assemblies and installed them in the global assembly cache, they will be used automatically when you add a reference to any of the Office COM components. |
The following Console application uses the Word Automation objects in several ways. It creates a document in the background, accesses the spelling checker, displays some document information, displays a print preview, and programmatically prints a document.
Public Module DriveWord

 Public Sub Main()
 ' Start Word in the background.
 Dim App As New Word.Application()
 App.DisplayAlerts = Word.WdAlertLevel.wdAlertsNone

 ' Create a new document (this is not visible to the user).
 Dim Doc As Word._Document = App.Documents.Add()

 Console.WriteLine()
 Console.WriteLine("Creating new document.")
 Console.WriteLine()

 ' Add a heading and two lines of text.
 Dim Range As Word.Range = Doc.Paragraphs.Add().Range
 Range.InsertBefore("Test Document")
 Range.Style = "Heading 1"

 Range = Doc.Paragraphs.Add().Range
 Range.InsertBefore("Line one." & vbCrLf & "Line two.")
 Range.Font.Bold = True

 ' Use Word as a dictionary.
 Console.Write("Enter a word to look up: ")
 Dim TestWord As String = Console.ReadLine()
 If App.CheckSpelling(TestWord) = False Then
 Console.WriteLine(TestWord & " is not in the dictionary.")

 Console.WriteLine("Suggestions include:")
 Dim Suggestion As Word.SpellingSuggestion
 For Each Suggestion In App.GetSpellingSuggestions(TestWord)
 Console.WriteLine(Suggestion.Name)
 Next
 Else
 Console.WriteLine(TestWord & " is in the dictionary.")
 End If
 Console.WriteLine()

 ' Save and close the current document.
 Doc.SaveAs(App.StartupPath & "	est.doc")
 Doc.Close()
 Doc = Nothing

 ' Now open the document again, show a print preview, and make
 ' Word visible.
 Doc = App.Documents.Open(App.StartupPath & "	est.doc")
 Doc.PrintPreview()
 App.Visible = True

 ' Display some document information
 Dim Words As Integer
 Words = Doc.ComputeStatistics(Word.WdStatistic.wdStatisticWords)
 Console.WriteLine("This document has " & Words.ToString() & " words.")

 ' Attempt to convert to a PDF file using Adobe Acrobat Distiller
 ' printing. This fails if you do not have the full Adobe Acrobat
 ' installed.
 Try
 App.ActivePrinter = "Acrobat Distiller"

 Console.WriteLine("Press any key to print this document.")
 Console.ReadLine()
 Doc.PrintOut()
 Catch
 Console.WriteLine("Printer not found.")
 End Try

 ' Close and quit Word.
 Console.WriteLine()
 Console.WriteLine("Closing Word.")
 Doc.Close()
 CType(App, Word._Application).Quit()
 End Sub

End Module
Here's an example of this application's output. The generated Word document is shown in Figure 19-2.
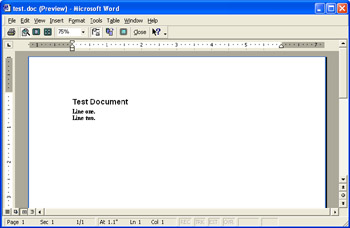
Figure 19-2: Generating a Word document programmatically.
Creating new document.

Enter a word to look up: huggly
huggly is not in the dictionary.
Suggestions include:
hugely
ugly
haggle
haggy

This document has 6 words.
Press any key to print this document.

Closing Word.
| Note |
It's usually easiest to debug with the Word window fully visible, by setting Word.Application.Visible to True. When you have perfected your code, you can hide the window so that the user can't interfere with it. |
Drive Microsoft Excel
Problem
You want to interact with Microsoft Excel, either to automate a business task or to read and write Excel documents.
Solution
Use the Excel Automation objects included with Microsoft Office.
Discussion
Microsoft provides a rich object model you can use to interact with Excel, allowing you to read and write spreadsheets and manipulate charts and other advanced Excel features. To use Automation with Microsoft Excel, you must first add a reference to the necessary COM library. Right-click your project in the Solution Explorer, select Add Reference, and choose the COM tab. Find the Microsoft Excel Object Library item in the list, and add it. The exact name of the Automation objects depends on the version of Excel you have installed. With Excel 2000, the library is version 9.0, whereas Excel 2002 (included with Office XP) uses version 10. The necessary interop assemblies will be added to your project immediately. If you've installed the primary interop assemblies for Office XP (available at http://msdn.microsoft.com/ library/default.asp?url=/downloads/list/office.asp), they will be used automatically. Otherwise, a new interop assembly will be generated. The objects you need to use are located in an Excel namespace.
The following Console application creates a new Excel document, adds some data, generates a chart, and copies the chart data into a Windows Form. These steps are all performed with the Excel window fully visible, although you could change this behavior by setting the Excel.Application.Visible property to False.
Public Class DriveExcelForm
 Inherits System.Windows.Forms.Form

 ' (Designer code omitted.)

 Private Sub Form_Load(ByVal sender As System.Object, _
 ByVal e As System.EventArgs) Handles MyBase.Load
 ' Start and show Excel.
 Dim App As New Excel.Application()
 App.Visible = True

 ' Create a new document.
 Dim Doc As Excel.Workbook = App.Workbooks.Add()
 Dim Sheet As Excel.Worksheet = Doc.Sheets(1)

 ' Format the table headings.
 Sheet.Range("A1").Value = "Month"
 Sheet.Range("B1").Value = "Number of Days"

 ' The range expression 1:1 selects all cells in the first row.
 Sheet.Range("1:1").Font.Size = 12
 Sheet.Range("1:1").Font.Bold = True
 Sheet.Range("1:1").RowHeight = 20

 ' The range expression A:A selects all cells in the first column.
 Sheet.Range("A:A").ColumnWidth = 20
 Sheet.Range("B:B").ColumnWidth = 20

 ' Populate the sheet with some tabular data.
 Dim Days As Integer
 Dim i As Integer
 For i = 1 To 12
 Days = DateTime.DaysInMonth(DateTime.Now.Year, i)
 Sheet.Range("A" & (i + 1)).Value = _
 DateTimeFormatInfo.CurrentInfo.GetMonthName(i)
 Sheet.Range("B" & (i + 1)).Value = Days
 Next

 ' Create and format a new 3D column chart.
 Dim Chart As Excel.Chart = Doc.Charts.Add(, Sheet)
 Chart.ChartType = Excel.XlChartType.xl3DColumn
 Chart.SetSourceData(Sheet.Range("A1:B13"))

 ' Copy the chart to a PictureBox on this form, using the clipboard.
 Chart.ChartArea.Select()
 Chart.ChartArea.Copy()

 ' Retrieve the picture.
 Dim ChartImage As Image = _
 CType(Clipboard.GetDataObject().GetData(DataFormats.Bitmap), Bitmap)

 ' Shrink the picture to fit the form.
 Dim ScalingRatio As Single = PictureBox1.Width / ChartImage.Width
 ChartImage = ChartImage.GetThumbnailImage( _
 ChartImage.Width * ScalingRatio, ChartImage.Height * ScalingRatio, _
 Nothing, Nothing)

 PictureBox1.Image = ChartImage

 ' Modify the chart so it appears alongside the Excel table,
 ' instead of in a separate window.
 Chart.Location(Excel.XlChartLocation.xlLocationAsObject, "Sheet1")
 End Sub

End Class
Figure 19-3 shows the automatically generated Excel data and chart. Figure 19-4 shows the chart after it has been copied into the Windows application.
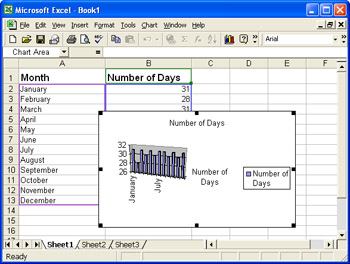
Figure 19-3: Generating an Excel document with a chart.
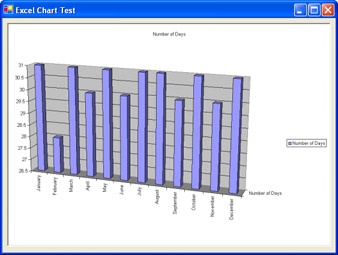
Figure 19-4: Copying an Excel chart to a Windows Form.
Use MAPI to Send E Mail Messages
Problem
You want to send an e-mail message, but you don't have a Simple Mail Transfer Protocol (SMTP) mail server configured for the computer.
Solution
Use the MAPI (Message Application Programming Interface) COM component, which interacts with the mail account configured on the current computer.
Discussion
MAPI is an interface that allows you to interact with the mailing features that are integrated into the Windows operating system. You can use MAPI (either through its unmanaged API, or through the MAPI COM component) to interact with the default mail client (usually Microsoft Outlook or Outlook Express). Tasks include retrieving contact information from the address box, retrieving the messages in the Inbox, and programmatically composing and sending messages. You should note that the MAPI control is not included with .NET—it's installed with earlier versions of Visual Studio, such as Visual Basic 6. Although you can redistribute the MAPI ActiveX control with applications that use it, you'll need to have a product such as Visual Basic 6 in order to develop with it.
To use MAPI, right-click your project in the Solution Explorer, select Add Reference, and choose the COM tab. Find the Microsoft MAPI Controls 6.0 (msmapi32.ocx) item in the list, and add it. The necessary interop assemblies will be added to your project immediately. The objects are located in an MSMAPI namespace.
Figure 19-5 shows a simple e-mail client that uses MAPI to download a list of messages in the local Inbox and send a test message.
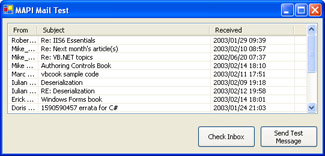
Figure 19-5: A simple MAPI e-mail client.
The code simply creates and logs into a MAPI session using a MAPISession object, and then accesses mail services through a MAPIMessagesClass object.
Public Class EmailClient
 Inherits System.Windows.Forms.Form

 ' (Designer code omitted.)

 Private Sub cmdSend_Click(ByVal sender As System.Object, _
 ByVal e As System.EventArgs) Handles cmdSend.Click
 ' Start a new session.
 Dim Session As New MSMAPI.MAPISession()

 ' You can disable the user interface, provided you have
 ' already configured the account correctly.
 Session.LogonUI = False

 ' Do not retrieve mail from the mail server.
 Session.DownLoadMail = False

 ' Start a session.
 Session.SignOn()

 ' Create a new message.
 Dim Messages As New MSMAPI.MAPIMessagesClass()
 Messages.SessionID = Session.SessionID
 Messages.Compose()

 ' Specify some message information.
 Messages.RecipDisplayName = "matthew@prosetech.com"
 Messages.MsgNoteText = "Hey this is great the MAPI code works fine :)"
 Messages.Send(False)

 ' End the session.
 Session.SignOff()
 End Sub

 Private Sub cmdReceive_Click(ByVal sender As System.Object, _
 ByVal e As System.EventArgs) Handles cmdReceive.Click
 ' Start a new session.
 Dim Session As New MSMAPI.MAPISession()
 Session.LogonUI = False

 ' Do not retrieve mail from the mail server.
 Session.DownLoadMail = False

 ' Start a session.
 Session.SignOn()

 ' Fetch the e-mail in the Inbox.
 Dim Messages As New MSMAPI.MAPIMessagesClass()
 Messages.SessionID = Session.SessionID
 Messages.Fetch()

 ' Add all the messages to the ListView control.
 Dim i As Integer
 For i = 0 To Messages.MsgCount - 1
 Messages.MsgIndex = i
 Dim lvItem As New ListViewItem(Messages.MsgOrigDisplayName)
 lvItem.SubItems.Add(Messages.MsgSubject)
 lvItem.SubItems.Add(Messages.MsgDateReceived)
 lstInbox.Items.Add(lvItem)
 Next

 ' End the session.
 Session.SignOff()
 End Sub

End Class
Play Media Files
Problem
You want to play movie video (for example, MPEG files) or MP3 audio files.
Solution
Add the ActiveX MCI control for multimedia, and connect it to a PictureBox control if you need to display video.
Discussion
The .NET Framework does not include any classes for playing multimedia such as sounds, videos, or MIDI files. Recipe 10.14 described how you can use the Win32 API to play WAV files. Even more functionality is available if you use the MCI ActiveX control. However, the MCI ActiveX control is not included with .NET—it's installed with earlier versions of Visual Studio, such as Visual Basic 6. Although you can redistribute the MCI ActiveX control with applications that use it, you'll need to have a product such as Visual Basic 6 in order to develop with it.
To add the MCI control to a project, right-click the Toolbox and choose Customize Toolbox. Then select the COM Components tab, and check the Microsoft Multimedia Control 6.0 (mci32.ocx) item. This will add the MMControl to your Toolbox. When you drop this control onto a form, the necessary interop assemblies will be generated and added to your project.
The MCI control appears on a form as a bar of playback controls. Usually, these controls will be hidden from the user. Your application code can interact with the MCI control to start and stop playback. You perform actions such as opening a file, playing it, and so on, by setting the control's Command property with an action string like Open or Play.
Figure 19-6 shows a simple demonstration of the MCI control that adds two custom playback buttons.
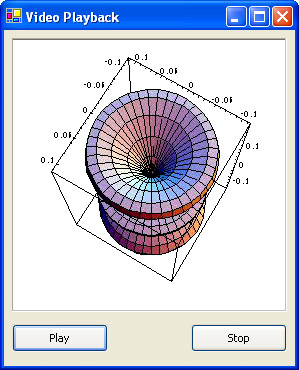
Figure 19-6: Video playback with the MCI control.
When the form loads, a sample MPEG file is opened, and a PictureBox is bound to the control. The code then uses the Command property to start and stop playback.
Public Class VideoForm
 Inherits System.Windows.Forms.Form

 ' (Designer code omitted.)

 Private Sub Form_Load(ByVal sender As System.Object, _
 ByVal e As System.EventArgs) Handles MyBase.Load
 ' Open the file.
 MMC.FileName = Application.StartupPath & "	est.mpg"
 MMC.Command = "Open"

 ' Hide the playback bar.
 MMC.Visible = False

 ' Show video in the PictureBox pic.
 MMC.hWndDisplay = pic.Handle.ToInt32()
 End Sub

 Private Sub cmdPlay_Click(ByVal sender As System.Object, _
 ByVal e As System.EventArgs) Handles cmdPlay.Click
 ' Rewind to the beginning.
 MMC.Command = "Prev"

 ' Start playback.
 MMC.Command = "Play"
 End Sub

 Private Sub cmdStop_Click(ByVal sender As System.Object, _
 ByVal e As System.EventArgs) Handles cmdStop.Click
 ' Stop playback.
 MMC.Command = "Stop"
 End Sub

End Class
| Note |
If you need more extensive multimedia capabilities, you might want to use the Windows Media Player 9 Series Software Development Kit, which can be downloaded from http://www.microsoft.com/downloads. Microsoft also provides a managed DirectX toolkit for more ambitious multimedia development. |
Use Masked Text Boxes
Problem
You want to have a fine-grained control over user text entry.
Solution
Use the masked ActiveX edit control, which can restrict and format data according to an input mask.
Discussion
The masked edit control looks like the text box control, but it includes enhancements for masked input and formatted output. If you don't use an input mask, the masked edit control behaves like a standard text box.
To define an input mask, you set the Mask property with a string. The mask can include two types of characters: placeholders, which map to user supplied characters, and literal characters, which are entered automatically as the user types. The literal characters serve as visual cues that indicate the type of input that is being entered (such as the parentheses around the area code portion of a telephone number). The placeholders provide input validation. If the user attempts to enter a character that conflicts with the input mask, the control generates a ValidationError event, and the character won't appear. Table 19-1 indicates the placeholders you can use. To retrieve the formatted text that's currently in the control, you use the Text property.
|
Mask character |
Description |
|---|---|
|
# |
Digit placeholder. |
|
. |
Decimal placeholder. The actual character used is the one specified as the decimal placeholder in your international settings. This character is treated as a literal for masking purposes. |
|
, |
Thousands separator. The actual character used is the one specified as the thousands separator in your international settings. This character is treated as a literal for masking purposes. |
|
: |
Time separator. The actual character used is the one specified as the time separator in your international settings. This character is treated as a literal for masking purposes. |
|
/ |
Date separator. The actual character used is the one specified as the date separator in your international settings. This character is treated as a literal for masking purposes. |
|
|
Treat the next character in the mask string as a literal. This allows you to include the #, &, A, and ? characters in the mask. This character is treated as a literal for masking purposes. |
|
& |
Character placeholder. Valid values for this placeholder are ANSI characters in the following ranges: 32–126 and 128–255. |
|
> |
Convert all the characters that follow to uppercase. |
|
< |
Convert all the characters that follow to lowercase. |
|
A |
Alphanumeric character placeholder (entry required). For example: a–z, A–Z, or 0–9. |
|
a |
Alphanumeric character placeholder (entry optional). |
|
9 |
Digit placeholder (entry optional). For example: 0–9. |
|
C |
Character or space placeholder (entry optional). This operates exactly like the & placeholder, and ensures compatibility with Microsoft Access. |
|
? |
Letter placeholder. For example: a–z or A–Z. |
To add the masked text box control to a project, right-click the Toolbox and choose Customize Toolbox. Then select the COM Components tab, and check the Microsoft Masked Edit Control (msmask32.ocx). This will add the MaskedEdBox to your Toolbox. When you drop this control onto a form, the necessary interop assemblies will be generated and added to your project.
This code snippet assigns a masked code that consists of numbers and automatically capitalized letters, separated by hyphens:
' This box holds data like 123-ABC-abc.
EditBox.Mask = "###->???-
The control, with some partially entered data, is shown in Figure 19-7.
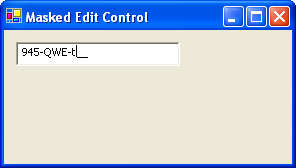
Figure 19-7: A masked text box.
Introduction
- Strings and Regular Expressions
- Numbers, Dates, and Other Data Types
- Arrays and Collections
- Objects, Interfaces, and Patterns
- Files and Directories
- XML
- Multithreading
- Network Programming
- Reflection
- Windows Programming
- Windows Controls
- Printing and Drawing with GDI+
- Windows Services
- ADO.NET
- ASP.NET Web Applications
- Web Services
- Remoting and Enterprise Services
- Security and Cryptography
- Useful COM Interop
EAN: 2147483647
Pages: 376
