Tab Panels
Dialog boxes are great examples of packing lots of stuff into a small space. Think about how the Layout Setup dialog box (Figure 6-18) works. When you first open the dialog box, you see a tab called General, which consolidates the most popular tools in one place. Two other tabs (Views and Printing) keep those categories of options out of your way until you need them. The Tab Panel tool and its controls help you use these same concepts to organize lots of objects on a single layout.
6.8.1. Creating a Tab Panel
If you want to add another set of fields to hold the work addresses of the contacts in your People database, you have to make the layout bigger in order to hold your new fields. But there are times when you just can't stretch a layout any farther. Maybe some of your employees have smaller monitors and you don't want them to have to scroll to see everything on the layout. Or you may feel you've already created a beautiful layout, with perfect proportions, and stretching it just to add a few more fields would ruin the design you worked so hard to create. Whatever the reason, if you don't want to make a layout bigger, you can organize lots more fields by adding a tab panel (Figure 6-36)
Here's how to use your existing detail layout (in the People database) to create a new layout using a three-tab panel:
- In the People database, go to detail layout and switch to Layout mode. Then choose Layout
 Duplicate Layout.
Detail Copy.
- Choose Layouts Layout Setup. Change the layouts name to Data Entry.
The original detail layout was useful for printing, but this one helps you organize the fields for entering data. As your databases grow more complex, you could end up with dozens of layouts used for all different purposes, so painfully descriptive names like Data Entry make a lot of sense.
- On the Data Entry layout, select everything below the Last Name field and drag it over to the right side of your layout.
You're clearing a space for your new tab control.

Figure 6-36. You make a more space available on your layout by using tab panels to organize fields. These tabs are left aligned, but they can also be centered, right aligned or justified across the full width of the panel.
- Click the Tab Panel tool (it looks like a file folder icon). Then, draw a tab panel like the one in Figure 6-37.
The Tab Control Setup dialog box appears. Here's where you tell the panel how many tabs it needs and what to name them.

Figure 6-37. The standard settings for Tabs are left aligned, with rounded corners. But you can have square corners instead if you like them better. Left, center and right justified tabs are just wide enough to enclose the names you give them. But fully justified tabs stretch out and divide the space to fill the width of the entire panel.
- In the Tab Name field, type Address, and then click the Create button.
In the Tabs list, the Address tab appears. Repeat this step for two more tabs: Contact and Notes.
- When you're done, click OK to close the Tab Control Setup dialog box.
Your new tab panel, complete with three tabs, sits highlighted in place on your layout. Notice that there are four selection handles at each corner, and a dark box around each of the three tabs. Any changes you make to the tab panel now affects all three tabs.
Tip: You can change the tab panels individually if you want to. Click outside the tab panel to deselect it, then click the tab you want to change independently of the others. To reselect the whole panel, use the rubber band technique (Section 4.4.6.2).
- Change the tab panels to a lighter gray, using the Fill Color palette.
You can also change the tab panels' font, font size, style and color if you wish.
- Click the Address tab to make it active.
You're getting ready to move the fields into place on the tab panel.
- Select the set of address fields you moved out of the way earlier and drag them onto the Address panel.
Repeat steps 2 and 3 to move the Phone and Email fields to the Contact panel and the Notes field to the Notes panel.
- Switch to Browse mode to test your panel.
Click the panels to see how the fields appear and disappear along with their panels.
There's plenty of room on the Address panel for another set of address fields to hold a separate work address. You can define them now, if you like, and place them on the Address panel. (See Section 3.2 for a step-by-step tutorial on defining new fields.)
All the fields you've moved onto the tab panels are now firmly attached to those panels. If you move the panel, all the fields move along with it, so there's no need for fancy selection techniques. Just drag the panel to your new location, and you're golden. You can even copy the whole panel and paste it onto another layout. It works just as it did in the original location.
Warning: Tab panels are brand-new in FileMaker 8. Although earlier versions can open .fp8 files, some features, like tab controls, don't work in those versions. Folks using FileMaker 7 or earlier can't see your lovely tab panels, for example. Instead, they see a jumble of fields piled on top of one another.
6.8.2. Editing Tab Panels
You can edit a tab panel by double-clicking it to summon the Tab Control Setup dialog box.
- Reorder your existing tabs by dragging the little arrow that sits to the left of each tab. All the objects attached to the tab move along with it.
- Add a new tab by typing a new name and clicking the Create button. The new tab appears at the end of your list, but you can move it with the arrow. New tabs start out empty, but you can move any fields, buttons, or other objects onto the tab after you click OK.
- Change a tab's name by selecting the tab from the list. Type the new name, then click Change. Objects on the tab are unaffected.
- Delete a tab by selecting it from the list, and then clicking Delete. You delete any unlocked objects on the tab at the same time.
| POWER USERS' CLINIC Extra-Strength Tabs |
|
As useful as they seem on the surface, tab panels have a few hidden secrets that you can use to your advantage.
You can nest tab panels inside one another for even more space. So long as the new panel sits entirely inside an existing tab, it behaves just like any other object on a panel. It sits there quietly behind the scenes and doesn't make an appearance until you click its enclosing panel. Then, up the new panel pops, in all its tabbed glory. Download the file People Tab Panels from www.missingmanual.com/filemaker to see this trick in action. 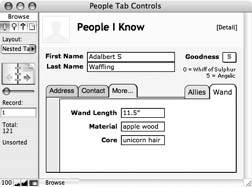 |
If you make a set of changes and realize you've made a mistake, just click the Cancel button. All changes you've made to the tab panel since you opened the dialog are swept away, even if you deleted some panels, added some and rearranged the furniture while you were in there. But once you click OK, your changes are written in stoneat least until you revisit the Tab Control Setup dialog box.
6.8.3. Deleting a Tab Panel
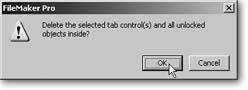
If you don't want a tab panel after all, just select it and choose Edit Clear or tap Delete. FileMaker warns you that its about to delete all unlocked objects on the tab panel as well (Figure 6-38). If that's the way you want it, click OK. If you need to keep fields or objects on the tab panels, though, click Cancel, then move the keepers off the panel (way to the right of your layout, perhaps) for safekeeping.
|
Part I: Introduction to FileMaker Pro
Your First Database
- Your First Database
- An Very Quick Database Tour
- Creating a New Database
- Opening and Closing Database Files
- Saving Your Databases
- Adding Records to Your Database
- Navigating Your Database
- Same Database, Multiple Windows
Organizing and Editing Records
- Organizing and Editing Records
- Views
- Advanced Find Mode
- Changing Multiple Records
- Sorting Records
- Editing Whats in Your Fields
- Paragraph Formatting
- Beyond Text: Container Fields
- Checking Spelling
- Printing and Preview Mode
Building a New Database
- Building a New Database
- Tables and Fields
- Defining Fields
- Advanced Field Options
- Bringing It All Together
Part II: Layout Basics
Layout Basics
Creating Layouts
Advanced Layouts and Reports
- Advanced Layouts and Reports
- Setting up Field Controls
- Adding Field Controls to Layouts
- Field Behavior
- Tab Order
- Print-Related Layout Options
- Format the Number/Date/Time/Graphic
- Adding Buttons
- Tab Panels
- Reports and Summary Fields
Part III: Multiple Tables and Relationships
Multiple Tables and Relationships
- Multiple Tables and Relationships
- Relational Databases Explained
- Modeling Your Database
- Creating a Relational Database
- Relational Databases
Advanced Relationship Techniques
- Advanced Relationship Techniques
- Creating Related Records
- Table Occurrences
- Managing Data with Data Tunneling
- Building a Data Tunneling Interface
- Connecting Databases
- Lookups
- Advanced Relationships
Part IV: Calculations
Introduction to Calculations
- Introduction to Calculations
- Understanding Calculations
- The Structure of a Calculation
- Creating a Calculation Field
- Auto-Enter Calculations
- Validate Data Entry with a Calculation
- Replacing Data Using a Calculation
- Comments
Calculations and Data Types
- Calculations and Data Types
- Number Crunching Calculations
- Going Beyond Basic Calculations
- Text Parsing Calculations
- Date and Time Calculations
- Containers in Calculations
Advanced Calculations
- Advanced Calculations
- Stored, Unstored, and Global Fields
- Logical Functions
- The Let Function and Variables
Extending Calculations
Part V: Scripting
Scripting Basics
- Scripting Basics
- Your First Script
- The Importance of the Layout
- Running Scripts
- Branching and Looping in Scripts
Script Steps
- Script Steps
- Go to Layout
- Scripting for Fields
- Working with Records
- Finding Records
- Sorting Records
- Working with Windows
- Working with Files
- Printing
- Other Script Steps
Advanced Scripting
- Advanced Scripting
- Commenting Scripts
- Asking and Telling the User
- Organizing Complex Scripts
- Handling Errors
- Putting a Complex Script Together
Part VI: Security and Integration
Security
Exporting and Importing
- Exporting and Importing
- Exporting a File
- Export Formats
- Importing Data
- Import Data Sources
- Importing and Exporting in a Script
Sharing Your Database
- Sharing Your Database
- FileMaker Network Sharing
- Sharing Over the Internet
- FileMaker Server
- Server Hardware
Developer Utilities
- Developer Utilities
- Script Debugger
- Disable Script Steps
- The Database Design Report
- Tooltips
- Copying Database Structure
- Custom Menus
- Developer Utilities
- File Maintenance
Part VII: Appendixes
Appendix A. Getting Help
EAN: 2147483647
Pages: 176
