Finding Records
FileMaker has three nearly identical script steps to handle the grunt work of finding records. You can let your user tell the script what to find, you can decide what the script finds (a hard-coded find), or you can script a dynamic find using calculations. Deciding which one to use depends on whether your users know what they're looking foror how much work you want to save them. The upcoming sections go into this topic in detail. You'll also see a find script in action, and learn how to make a script pause and wait for information.
14.4.1. Performing the User's Find Requests
The first, Perform Find, is the equivalent of a visit to Find mode, followed by a click of the Requests  Perform Find menu command. Perform Finds single option lets you specify what find requests to use, but, surprisingly, you can skip it entirely. If you don't turn this option on, then Perform Find assumes you're already in Find mode with one or more requests, and works just like the Requests
 images/U2192.jpg border=0> Perform Find menu command (and the Find button in the status area). It looks for records that match the already defined find requests. All the matching records become the new found set.
But where do those find requests come from? Either the user creates them, or your script does. For example, many developers like to add special "Find" layouts to their databases. These layouts can show just the right fields, along with helpful text, to make things easier for the user. Figure 14-9 shows a Find layout for the Customers table.
|
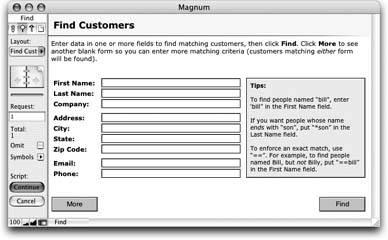
The best way to deal with a layout like this is to add a "Find" button on your normal Customers layout. When the user clicks this button, it runs a script that goes to the Find layout and puts the user in Find mode. The script then pauses (see the box on Section 14.4.1), giving the user a chance to enter find requests. When she's done, she clicks a button to Continue the script, which performs the find and switches back to the Customers layout.
To set this process up yourself, first create a Find Customers layout like the one shown in Figure 14-9. Then visit the Define Scripts window, click New, and name the script appropriately. Then follow these steps to define the script itself:
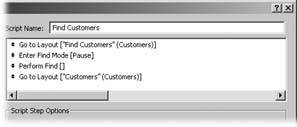
- Add the Go to Layout script step, targeting the Find Customers layout.
After all, you want to make sure the user's in the right contextthe new Find Customers layoutbefore the script enters Find mode.
- Add the Enter Find Mode script step to the script.
The step already has its Pause option turned on and its "Specify find requests" option turned off. That's just what you want. This step switches to Find mode and pause the script.
POWER USERS' CLINIC
Pausing a ScriptNormally when you run a script, FileMaker performs its steps one by one as fast as it can. When they're all finished, the script's done. But sometimes a script can pause. You can explicitly tell a script to pause. The Pause/Resume Script step, and some other steps (like Enter Find Mode) can pause the script automatically when their Pause option is turned on. When FileMaker gets to a step like this, it stops executing the script, but remembers where it left off. Later, the script continues, starting with the next step in line. While a script is paused, you're free to edit records, switch modes, change layouts, and so forth, You can't open the Define Database, Define Value Lists, Define Custom Functions, or Define Scripts windows, though, until the script finishes running.
While a script is paused, FileMaker adds two new buttons to the status area (shown in Figure 14-9). The Continue button causes the script to continue immediately (pressing the Enter key does the same thing). The Cancel button tells FileMaker you don't want to run the rest of the script. Your script stops and you get back full control of the program.
If you want to, you can tell FileMaker how long to pause by clicking the Specify button in the Script Step Options are when the Pause/Resume Script step is selected. The dialog box that appears has two choices, Indefinitely and For Duration. If you choose For Duration, you get to enter the number of seconds you want the script to pause, or click another Specify button to use a calculation to set the number of seconds. In either case, your pause duration can be fractionallike 4.5 secondsif needed. If you have set the script to pause for a specific duration, you can still do things with your database while the script is paused, including click the Continue or Cancel buttons.
With a name like "Pause/Resume Script" you'd think this step can also resume a paused script. But then again, if the script is paused, then how can the step possibly execute? Don't be fooled: This step can only pause.
Tip: If you want to start the user off with some basic criteria, you can specify them right in the Enter Find Mode step. FileMaker doesn't perform the find now. It just puts the user in Find mode and creates the requests you specify. The user's then free to modify or delete them as necessary.
- Add the Perform Find script step to the script.
Once the script continues, you assume the user has added the necessary find requests, so you're ready to use the Perform Find step with no find requests specified. (Be careful not to choose the Perform Find/Replace script step, which doesn't work in this script.)
- Add another Go to Layout script step to the script. This time, pick the Customers layout.
This step takes the user back to the Customers layout once FileMaker finds the correct records.
After you follow these steps, your completed Find Customer script should look like the one in Figure 14-10.
|
To complete your layout, you need the to put Find button on the Find Customers layout. Since the user's always in the middle of a paused script when she sees this layout, you just need to wire this button to the Resume Script action.
Tip: It's probably a good idea to hide the Find Customers layout from the Layouts pop-up menu so users don't accidentally switch to it without running your script. In the Layout Setup dialog box, turn off the "Include in layouts menu" checkbox (Section 4.4.2.15).
14.4.2. Static Find Requests
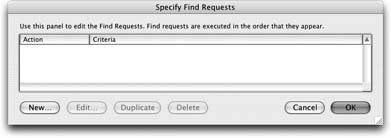
With the script you created on the previous few pages, your users can search for just about anything they want, by entering find requests. More often than not, you don't want to make users enter the find requests manually. After all, the whole point of a script is to have FileMaker do things so people don't have to. If you know ahead of time exactly what you want the script to find, use the Perform Find step all by itself: Just turn on the "Specify find requests" option and put those requests right in the dialog box and the search options stay the same each time the script runs. When you specify find requests in a script, you see the window shown in Figure 14-12.
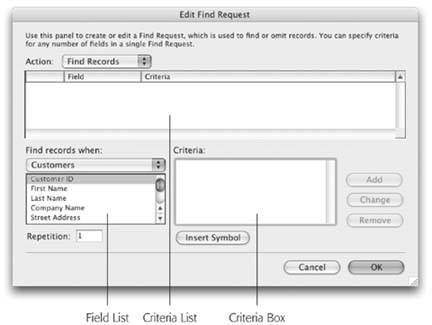
This window is pretty straightforward. To add a new find request, click New. To edit an existing request, select it first, and then click Edit (Figure 14-11). You can also delete or duplicate the selected step using the Delete and Duplicate buttons. Using the Specify Find Requests and Edit Find Request windows, you can tell the Perform Find step to do any find you can do from Find mode.
Tip: The Edit Find Requests dialog box is confusing until you get used to it. But there's a way you can learn how it translates requests into its own particular syntax. Perform a find manually, then write a test script with a Perform Find script step. FileMaker sets the dialog box with the criteria for the search you just did.
|
To define a particular find request, you first select a field from the Field list (if it's a repeating field, you can specify the repetition number in the Repetition box as well). Then you enter some text in the Criteria box. The Insert Symbol button gives you quick access to the same symbols you see in the status area in Find mode, and the Criteria box accepts all the standard symbols. Once you've finished entering the criteria, click Add to add it to the Criteria list.
- To edit an existing item in the criteria list, first select it. When you do, FileMaker automatically selects the matching field in the Field list and puts the criterion in the Criteria box. You can then make any changes necessary, and click Change.
- To remove a criterion from the list entirely, select it and click Remove.
- Finally, you get to choose whether this request should be used to find matching records, or to omit them (see Section 2.2.1). To turn this into an omitting find request, choose Omit Records from the Action pop-up menu.
- When you're finished adding criteria, click OK. Just like Find mode, you can add more find requests if you want. In the Specify Find Requests window, just click the New button a second time. When you're all finished adding requests, click OK again.
|
14.4.3. Dynamic Find Requests
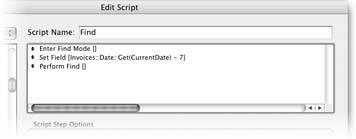
As dependable as static finds are, you may not always be able to predict what the user wants to find. Or the criteria for finding the same thing over and over can change, like when you're searching in a date field. For example, suppose you want to find all the invoices created one week ago. You can easily do so in Find mode: Just put the date from a week ago in the Invoices::Date field. But what you put in that field changes every day. For example, if today's November 7, and you create a script to find invoices from a week ago, you could attach this request to the Perform Find step:
Invoices::Date = "10/31/2005"
Unfortunately, as soon as November 8 rolls around, this script won't find week-old invoices. It always finds invoices from October 31, 2005. When you're faced with a situation like this, you do have an option: Make the script build the find request the same way you would in Find mode. In other words, tell your script to go to Find mode, have it put the right date in the field, and then perform the find. You can use the Set Field script step to put the date in the Invoices::Date field since it conveniently lets you use a calculation to determine the actual date.
The script would look like the one in Figure 14-13.
|
Note: If your find request can be handled using the symbols supported by Find mode (Section 2.2.1.3) then you can use Perform Find all by itself. For instance, to find invoices created today, tell Perform Find to find records with Invoices::Date = //. Since "//" stands for "today's date," it works on any day.
14.4.4. Constraining and Extending the Found Set
You may have already noticed that Perform Find doesn't have an option for the Requests Constrain Found Set and Requests images/U2192.jpg border=0> Extend Found Set commands. Thats because each of these is a separate script step. It makes sense really, because to Constrain or Extend a find, you have to have a find first. In other words, this process always takes two separate steps to complete.
The Extend Found Set and Constrain Found Set script step options work exactly like Perform Find. Everything you just learned about Perform Find still applies: You can hard-code the find requests, pause the script and let the user enter them, or build them in the script.
14.4.5. Omitting Records
The Omit Record script step lives a dual life. If you're in Browse mode when it runs, it simply omits the current record from the found set. If you're in Find mode, on the other hand, it turns on the Omit checkbox in the status area.
The Omit Multiple Records only works in Browse mode and does the same thing as the Records Omit Multiple command. As usual, you can specify the number of records to omit in the script, either as a number or calculation. You also get a "Perform without dialog option so you can decide whether or not the user gets to enter the number of records to omit.
Finally, the Show Omitted Only script step has the same effect as the Records images/U2192.jpg border=0> Show Omitted menu command.
| GEM IN THE ROUGH Mix and Match |
|
You've now seen that you have three options when performing a find in a script: You can let the user enter the find requests, hard-code the requests right in the Perform Find step, or build the requests bit by bit using script steps. But these aren't mutually exclusive choices: You can mix and match techniques. For example, suppose you need a relatively complex set of find requests thatfor the most partnever change, but one value in one field on just one request needs to be based on the current date. It would be tedious to have to add dozens of Set Field and New Record/Request steps to your script when all but one use a hard-coded value. Other times, it would be nice to let the user specify the find requests, but add a little more to it when they're done. You can start by turning on the "Specify find requests" option on the Enter Find Mode script step. This step tells FileMaker to go to Find mode and load it up with the requests you specify in a Specify Find Requests dialog box. Once you're in Find mode, though, you're free to use Set Field, New Record/Request and Go To Record/Request to modify the prefab requests to your heart's content. Just go to the right request and use Set Field to work the dynamic date value into it. Suppose you want to let the user search for invoices. You create a Find Invoices layout and a script just like the one for Find Customers. But this time, you want to restrict users to invoices created only in the last year. Before the Perform Find step, you can add these two steps: New Record/Request Omit Set Field [Invoices::Date; "…" & Get(CurrentDate) - 365] Now the script finds just what the user asks for, but omit records more than 365 days old. You've used the script to add a new request to the ones the user defined. What's more, your user doesn't even know you've controlled her find. |
14.4.6. Modify Last Find
The simplest find-related script step is Modify Last Find. It has exactly the same effect as the Records Modify Last Find command: It puts you in Find mode with the same requests you created the 14.4.7. Save Records as…
Now that you've mastered the scripted find, you can keep right on going and automate the process of putting your found set to good useoutside of FileMaker. The Save/Send Records commands (covered in full in Chapter 17) let you export records into formats other programs can understand.
14.4.7.1. Save Records as Excel
As with its manual counterpart, your users will need export privileges (Section 16.2.1.1) to run the Save Records as Excel script step. (Actually, any user with full access privileges can do it.) You need to make the same choices in this script step as you do from the menu command, but the options are divided up amongst the various dialog boxes a little bit differently. The Save Records as Excel script step has three options:
- Perform without dialog lets you control the step's options without input from your users. Don't turn on this option if you want users to be able to specify all the options they'd normally see in the Save Records as Excel dialog box.
- The Specify output file option lets you determine a where the file is saved. You can click the Browse button to select a location through the Open dialog box or simply type a file path. You also have access to the Automatically open file and Create email with file as attachment options.
- The Specify Options dialog is almost the same as the one you see when you chose this command manually and click the Options button. You can set a Worksheet name, document Title, Subject, and Author. Here's also where you specify whether you want to save the Records being browsed or just the Current Record.
Note: It'd be great if you could suppress one of these dialog boxes and leave the other one open for business…but you can't. If you tell the step to "Perform without dialog," both dialog boxes get shut down. You can, however, set up the options you want, show your users the dialog boxes, and instruct them that they should change only certain items. (Use of the phrase "under pain of reprisal" while you deliver these instructions is entirely optional.)
14.4.7.2. Save Records as PDF
Like its popular Excel twin, the Save Records as PDF script step is the automated version of a menu-driven counterpart. It requires printing privileges (Section 16.2.1.1) or Full Access privileges to do its work. Similarly, you can control all the step's myriad options by choosing the "Perform without dialog" option, or you can open the script up to input from your users. Check out the full instructions for "Save/Send as PDF" on Section 17.2.1.2 to see the ramifications of the full option set. The "Specify Options" button lets you choose output options appropriate to creating a PDF:
- The Save pop-up menu lets you choose between Records being browsed and the Current Record.
- The Options button produces a three-tabbed dialog box:
- Document. Set the Title, Subject, Author, Keywords, Compatibility and page numbers here.
- Security. Set passwords and access on this tab.
- Initial View. Choose the setup your users see when the PDF is first opened.
Part I: Introduction to FileMaker Pro
Your First Database
- Your First Database
- An Very Quick Database Tour
- Creating a New Database
- Opening and Closing Database Files
- Saving Your Databases
- Adding Records to Your Database
- Navigating Your Database
- Same Database, Multiple Windows
Organizing and Editing Records
- Organizing and Editing Records
- Views
- Advanced Find Mode
- Changing Multiple Records
- Sorting Records
- Editing Whats in Your Fields
- Paragraph Formatting
- Beyond Text: Container Fields
- Checking Spelling
- Printing and Preview Mode
Building a New Database
- Building a New Database
- Tables and Fields
- Defining Fields
- Advanced Field Options
- Bringing It All Together
Part II: Layout Basics
Layout Basics
Creating Layouts
Advanced Layouts and Reports
- Advanced Layouts and Reports
- Setting up Field Controls
- Adding Field Controls to Layouts
- Field Behavior
- Tab Order
- Print-Related Layout Options
- Format the Number/Date/Time/Graphic
- Adding Buttons
- Tab Panels
- Reports and Summary Fields
Part III: Multiple Tables and Relationships
Multiple Tables and Relationships
- Multiple Tables and Relationships
- Relational Databases Explained
- Modeling Your Database
- Creating a Relational Database
- Relational Databases
Advanced Relationship Techniques
- Advanced Relationship Techniques
- Creating Related Records
- Table Occurrences
- Managing Data with Data Tunneling
- Building a Data Tunneling Interface
- Connecting Databases
- Lookups
- Advanced Relationships
Part IV: Calculations
Introduction to Calculations
- Introduction to Calculations
- Understanding Calculations
- The Structure of a Calculation
- Creating a Calculation Field
- Auto-Enter Calculations
- Validate Data Entry with a Calculation
- Replacing Data Using a Calculation
- Comments
Calculations and Data Types
- Calculations and Data Types
- Number Crunching Calculations
- Going Beyond Basic Calculations
- Text Parsing Calculations
- Date and Time Calculations
- Containers in Calculations
Advanced Calculations
- Advanced Calculations
- Stored, Unstored, and Global Fields
- Logical Functions
- The Let Function and Variables
Extending Calculations
Part V: Scripting
Scripting Basics
- Scripting Basics
- Your First Script
- The Importance of the Layout
- Running Scripts
- Branching and Looping in Scripts
Script Steps
- Script Steps
- Go to Layout
- Scripting for Fields
- Working with Records
- Finding Records
- Sorting Records
- Working with Windows
- Working with Files
- Printing
- Other Script Steps
Advanced Scripting
- Advanced Scripting
- Commenting Scripts
- Asking and Telling the User
- Organizing Complex Scripts
- Handling Errors
- Putting a Complex Script Together
Part VI: Security and Integration
Security
Exporting and Importing
- Exporting and Importing
- Exporting a File
- Export Formats
- Importing Data
- Import Data Sources
- Importing and Exporting in a Script
Sharing Your Database
- Sharing Your Database
- FileMaker Network Sharing
- Sharing Over the Internet
- FileMaker Server
- Server Hardware
Developer Utilities
- Developer Utilities
- Script Debugger
- Disable Script Steps
- The Database Design Report
- Tooltips
- Copying Database Structure
- Custom Menus
- Developer Utilities
- File Maintenance
Part VII: Appendixes
Appendix A. Getting Help
EAN: 2147483647
Pages: 176
