Your First Script
To get a feel for how scripting works, you'll create a really simple script. Suppose you want to find all invoices with a balance due and view them in a sorted list. The following pages show how to go about preparing your database, planning, creating and polishing the script, and finishing off with a way to run it.
13.1.1. Preparing the Database
FileMaker is flexible enough to let you create fields and layouts on the fly, at the same time as you write a script, but it's easier to focus on the script if you create all the supporting material you need before you even open ScriptMaker. In this example, you use a layout that shows a list of invoices, so create that first:
- Switch to Layout mode in your database and choose Layout
 New Layout/Report.
From the "Show records from" pop-up menu, choose Invoices. In the Layout Name box, enter Invoice List.
Since you'll tell the script which layout it needs to use, it helps to name the layout appropriately so that you can pick it from the list of layouts later.
- In the "Select a layout type" list, select Columnar list/report, and then click Next. Leave the "Columnar list/report" radio button turned on, and then click Next again.
Now you get to pick which fields to include in the list.
- Using the techniques described on Section 4.4.4.4, add the following fields to the "Layout fields" list: Invoice ID, Jobs::Name, Date, Date Due, and Total Due. When you're finished, click Next.
FileMaker asks how you want the list sorted. Since this list isn't a report, you can simply ignore this setting. Click Next again.
- On the Themes screen, choose one that pleases you, and then click Next.
You now see the header and footer choices. You're ignoring these too, so click Next yet again. FileMaker then asks if it should create a script for you.
- Choose "Do not create a script" and click Next.
You're going to do that yourself, of course. The final screen asks if you'd like to view the layout in Preview mode or Layout mode.
- Select "View the report in Layout mode," and then click Finish.
FileMaker creates your new layout and shows it to you. (Feel free to decorate the layout now if you want, using any of the features described in Chapter 4.)
13.1.2. Planning Your Script
Before you dive in and create the script, you should review what you think it's supposed to do. Everything you can do yourself in FileMaker, you can have a script do insteadand this instance is no exception. A script is just a series of steps. When you're planning a script, it often helps to actually do what you want the script to do, so you can see whether it works. So go through the steps necessary to find the balance due, and take notes. You probably end up with something like the following:
- Switch to the Invoice List layout. This layout has the fields the script needs to create the invoice list. It's also going to display the final list, so you want to make sure the script runs in this layout.
- Choose View Find Mode. The script needs to In the Total Due field, enter >0, then press Enter. This step tells FileMaker what to find and puts it into action. When the script runs this step, FileMaker performs the find and shows the correct records, just as if you'd performed the find yourself.
Note: If none of your invoices has a balance due, just click Cancel when the error message pops up, and then choose Records Show All Records so you can do the next step. Jot down that your script needs to account for this message box if it pops up when someone runs your script.
images/U2192.jpg border=0> Sort and sort the records ascending by Date Due. You should now see your final list, properly sorted. Once you have the results that you want the script to produce, you know everything you need to know to build it.
Now that you know all the steps involved, you're ready to get acquainted with ScriptMaker.
13.1.3. Creating Your Script
|
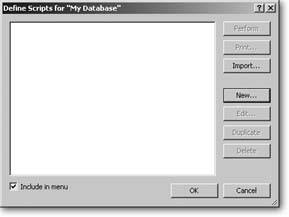
You create, edit, run, and delete scripts in FileMaker using ScriptMaker. It's always available as the first item in the Scripts menu. When you choose this item, you see the window shown in Figure 13-1.
Now it's time to build the script. FileMaker wants you to set up and name the script before adding the actual steps.
|
|||
|
- In the Script Name box, enter Find Unpaid Invoices.
Your script's name is important. It's how you'll identify it when you want to run it later.
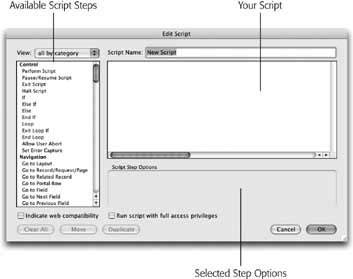
- From the View pop-up menu (top-left corner) choose, all by name.
The list of available script steps reorganizes to show you every step alphabetized by name.
You're now ready to add steps to your script. You'll be adding a script step for each of the actions you performed when you manually created the list of unpaid invoices back on Section 13.1.2.
- Scroll through the script step list (Figure 13-2) to Go to Layout, and then click to select it. Click the Move button, which is now available.
FileMaker adds (and selects) a "Go to Layout step to the list of current steps. This script step makes FileMaker go to a layout when the script is run. Your job is to choose which layout it should visit.
Tip: You can double-click a step in the list to avoid the trip to the Move button. For less mousing, you can type the first part of a step's name to scroll to it, and then press the Space bar to add it. You can also use the Tab key to move between the available step list, the current steps list, and the Script Name box.
- From the Specify pop-up menu (in the Script Step Options area), choose Invoice List. Click Move.
Now your script has just one step, or line. If you were to run it as is, it would simply take you to the Invoice List layout. (If you were already on the Invoice List layout, it wouldn't do anything.)
- From the available script step list, select Enter Find Mode, and then click Move.
FileMaker adds a second line to your script. The Script Step Options area now has new options (those that make sense with the Enter Find Mode step). Notice that the Pause option at the left side of the Script Step Options area is turned on.
- Turn off the Pause option.
Turning off this option tells the script not to wait for user input when it's run. (You'll learn more about pausing a script on Section 14.4.1.)
- Add a Set Field script step to the script.
The procedure is similar to the previous two steps: Select Set Field in the available field list and click Move.
The Set Field step lets you put (set) something into that field. You can use Set Field in Browse or Find mode. In Browse mode, it enters data; in Find mode it specifies find requests. In this case, you're specifying a find request for the invoices.
- In the Script Step Options area, turn on "Specify target field."
This tells FileMaker you want to indicate exactly which field to set. As soon as you turn this option on, FileMaker shows a slightly different Specify Field window (Figure 13-3).
Note: If you don't turn the Specify target field option on, the Set Field step modifies whichever field happens to be active when the step is carried out.
- In the field list, select Total Due, and then click OK.
The Set Field step in your script (Figure 13-4) shows the option you've selected. In the Script Step Options area, click the bottom Specify button (the one beside "Calculated result.")
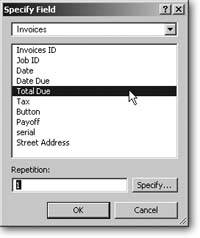
Figure 13-3. This Specify Field dialog box looks almost exactly like the one you've seen in Layout mode. The only difference is the Repetition box at the bottom. If you select a repeating field (Section 3.3.4.2), you can use this box to tell FileMaker exactly which repetition to set.
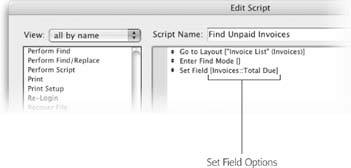
Figure 13-4. FileMaker shows all the steps in your script in the order they're performed. If a step has any options, they're displayed in brackets after the step name. In this example, you can clearly see that the Invoices::Total Due field is modified by the Set Field step.
FileMaker shows you the Specify Calculation dialog box, the same one you used to build calculation fields in the previous few chapters. Here, though, you're using a calculation to tell FileMaker what to put in the Total Due field. When this step runs, you're in Find mode thanks to the second step in this script, so the next step tells FileMaker what to look for.
- In the Calculation box, enter ">0" (including the quotes), and then click OK.
This bit of computerese sets the Total Due field to the appropriate value for finding unpaid invoices. FileMaker now shows the calculation beside the Set Field step as well. (Spoken out loud, this step reads, "Set the Invoices::Total Due field to greater than zero.")
- Add the Perform Find script step to your script.
This step carries out the find operation. It's the equivalent of clicking Find or pressing Enter if you were doing it yourself.
- Add the Sort Records script step to your script. Then, in the Script Step Options area (Figure 13-4), turn on "Perform without dialog."
This tells FileMaker you want the script to go ahead and sort, instead of opening the Sort dialog box every time it runs. Instead, since the sort's the same every time, you put it right here in the script.
- Turn on the "Specify sort order" checkbox.
Assuming you just went through the sort as described on Section 13.1.3, the Sort dialog box is already configured properly. (When you add a Sort Records step to your script, FileMaker configures it to match the last sort you performed.)
- Click OK in the Sort Records window. Then, in the Edit Script window, click OK again.
FileMaker shows you the Define Scripts window again. This time, though, your new scriptFind Unpaid Invoicesis in the otherwise empty list. Time to check your work.
- Click Perform.
FileMaker runs your script. You should immediately see the correct list of invoices, oroops!a message telling you no records were found. In the next section, you'll refine your script to help deal with these message boxes if they pop up when someone runs the script. (See the box on Section 13.1.4.)
Note: You can adapt the basic structure of this script for a host of purposes. Just edit the script's find or sort criteria and specify a different layout.
13.1.4. Improving Your Script
On the preceding pages, you created a script that mimics what you would do to get an unpaid invoice list, step by step. But ScriptMaker has a lot of options to make writing scripts fast and easy. Often, a script can get the results you want with fewer steps than it would take to do it yourself. For example, to see your unpaid invoice list, the steps boil down to the following:
- Switch to the Invoice List layout.
- Find the right invoices.
- Sort the records.
This version has just three steps instead of five because it assumes you can "find the right invoices" in one step. Luckily, ScriptMaker's Perform Find script step really can find what you want in one step. Here's how to revise your script to use the simpler form:
- Choose Scripts ScriptMaker. In the Define Scripts window, select the Find Unpaid Invoices script, and then click Edit.
Select the second and third steps in your script (Enter Find Mode and Set Field).
You can select both by clicking Enter Find Mode in your script, then Shift-clicking Set Field.
Note: You should be selecting the steps in your script (in the window on the right), not the steps in the available script steps list (on the left side of the window).
UP TO SPEED
To Be ContinuedIf your database has no unpaid invoices when you run the Find Unpaid Invoices script (Section 13.1.3), you see the message shown here. The message is the same as the one you see if you perform the find manually, with one exception: This time you get a Continue button.
Since FileMaker was running a script when the error occurred, it gives you the choice to cancel the script (in other words, stop in the middle and return control to the user) or continue the script (or keep going and pretend nothing went wrong). In this case, Cancel and Continue do the same thing since the error happened on the last step in the script.
If you don't want the user to make this choice, you can tell FileMaker to capture the errors as they happen and let you deal with them inside the script. You'll learn about this process on Section 15.4.

- Click the Clear button.
FileMaker removes the two selected steps from the script. It now has two steps that look a lot like the simplified process above. Also notice that the Perform Find step is already selected, since FileMaker automatically selects the next step when you clear one or more steps from the script.
- Turn on the "Specify find requests" checkbox in the Script Step Options area.
The Specify Find Requests dialog box (Figure 13-5) appears. Since the find request FileMaker created for you is exactly what you want, you don't need to do anything in the Specify Find Requests window.
- Click OK.
When you click OK, you see the Edit Script window again. Figure 13-6 shows how your script should look now. The script is now finishedand it's just three lines.
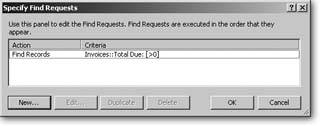
Figure 13-5. This window opens whenever you attach specific find requests to a Perform Find script step. From here you can add new find requests to your script. If you look in the list, you see that FileMaker's already added a line for you. It has an Action of Find Records and Criteria that look like this: Invoices::Total Due: [>0]. Like the sort order, this is the last find you performed, and it's also just what you want.

Figure 13-6. Your finished script should look like this. It wasn't too hard to build, and it's very easy to understand. No other scripting tool makes writing scripts this easy. And as you'll find out soon, this ease doesn't mean the scripts themselves have to be simple.
- Click OK again, and then click the Perform button.
You see your unpaid invoice list again.
This new, simpler script does everything the first script did. It's simpler because you didn't have to script all the steps involved in performing a find: Enter Find Mode; Set Field; Perform Find. Instead, you let FileMaker do all of that in one Perform Find step. You'll find that you can reduce many of FileMaker's common multi-step operations to a single step in ScriptMaker.
Part I: Introduction to FileMaker Pro
Your First Database
- Your First Database
- An Very Quick Database Tour
- Creating a New Database
- Opening and Closing Database Files
- Saving Your Databases
- Adding Records to Your Database
- Navigating Your Database
- Same Database, Multiple Windows
Organizing and Editing Records
- Organizing and Editing Records
- Views
- Advanced Find Mode
- Changing Multiple Records
- Sorting Records
- Editing Whats in Your Fields
- Paragraph Formatting
- Beyond Text: Container Fields
- Checking Spelling
- Printing and Preview Mode
Building a New Database
- Building a New Database
- Tables and Fields
- Defining Fields
- Advanced Field Options
- Bringing It All Together
Part II: Layout Basics
Layout Basics
Creating Layouts
Advanced Layouts and Reports
- Advanced Layouts and Reports
- Setting up Field Controls
- Adding Field Controls to Layouts
- Field Behavior
- Tab Order
- Print-Related Layout Options
- Format the Number/Date/Time/Graphic
- Adding Buttons
- Tab Panels
- Reports and Summary Fields
Part III: Multiple Tables and Relationships
Multiple Tables and Relationships
- Multiple Tables and Relationships
- Relational Databases Explained
- Modeling Your Database
- Creating a Relational Database
- Relational Databases
Advanced Relationship Techniques
- Advanced Relationship Techniques
- Creating Related Records
- Table Occurrences
- Managing Data with Data Tunneling
- Building a Data Tunneling Interface
- Connecting Databases
- Lookups
- Advanced Relationships
Part IV: Calculations
Introduction to Calculations
- Introduction to Calculations
- Understanding Calculations
- The Structure of a Calculation
- Creating a Calculation Field
- Auto-Enter Calculations
- Validate Data Entry with a Calculation
- Replacing Data Using a Calculation
- Comments
Calculations and Data Types
- Calculations and Data Types
- Number Crunching Calculations
- Going Beyond Basic Calculations
- Text Parsing Calculations
- Date and Time Calculations
- Containers in Calculations
Advanced Calculations
- Advanced Calculations
- Stored, Unstored, and Global Fields
- Logical Functions
- The Let Function and Variables
Extending Calculations
Part V: Scripting
Scripting Basics
- Scripting Basics
- Your First Script
- The Importance of the Layout
- Running Scripts
- Branching and Looping in Scripts
Script Steps
- Script Steps
- Go to Layout
- Scripting for Fields
- Working with Records
- Finding Records
- Sorting Records
- Working with Windows
- Working with Files
- Printing
- Other Script Steps
Advanced Scripting
- Advanced Scripting
- Commenting Scripts
- Asking and Telling the User
- Organizing Complex Scripts
- Handling Errors
- Putting a Complex Script Together
Part VI: Security and Integration
Security
Exporting and Importing
- Exporting and Importing
- Exporting a File
- Export Formats
- Importing Data
- Import Data Sources
- Importing and Exporting in a Script
Sharing Your Database
- Sharing Your Database
- FileMaker Network Sharing
- Sharing Over the Internet
- FileMaker Server
- Server Hardware
Developer Utilities
- Developer Utilities
- Script Debugger
- Disable Script Steps
- The Database Design Report
- Tooltips
- Copying Database Structure
- Custom Menus
- Developer Utilities
- File Maintenance
Part VII: Appendixes
Appendix A. Getting Help
EAN: 2147483647
Pages: 176
