Opening and Closing Database Files
Each database you create with FileMaker Pro is stored in a file on your hard drivejust like your Microsoft Word documents, Excel spreadsheets, and all the PowerPoint presentations you've ever created. This file contains all the information about how the database is structured, plus all the information stored inside it, which means you can open, close, copy, or back up a database as you would any other file. But if you need a bit more explanation, this section explains how to do those tasks, including some quirks that are particular to FileMaker files.
1.3.1. Opening a Database
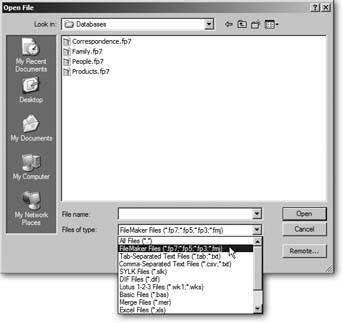
To open a database that already exists, open FileMaker Pro and choose File  Open Database. Now select the file you want to work with (Figure 1-6). If you prefer, you can find the file using Windows Explorer (Windows) or the Finder (Mac OS X) and double-click its icon.
When you open a database, you'll see one or more windows on your screen. If you've opened the Contact Management Template you created on Section 1.1.2.2, you have one database open, and that database has one window displayed.
|
1.3.2. Closing a Database
To close a database, close all of its windows in FileMaker: Choose File  Close or press Ctrl-W ("images/command.jpg">-W) When you have more than one database open, it isn't always easy to tell which windows go with each database.
If you're not sure what to close, there's an easy way to close all the windows in all the databases you currently have open. Hold down the Alt key (Windows) or the Option key (Mac), then click the trusty File menu. In place of the Close command, you'll see the more powerful Close All. Choose it and FileMaker closes all its open windows, which also closes all your open databases.
| WORKAROUND WORKSHOP The Other New Database Dialog Box |
|
If you don't see the box pictured in Figure 1-4 when you choose File
every time you make a new database. Instead, just follow the steps above, but turn "Show templates in New Database dialog box" off. Now, when you choose File  |
Part I: Introduction to FileMaker Pro
Your First Database
- Your First Database
- An Very Quick Database Tour
- Creating a New Database
- Opening and Closing Database Files
- Saving Your Databases
- Adding Records to Your Database
- Navigating Your Database
- Same Database, Multiple Windows
Organizing and Editing Records
- Organizing and Editing Records
- Views
- Advanced Find Mode
- Changing Multiple Records
- Sorting Records
- Editing Whats in Your Fields
- Paragraph Formatting
- Beyond Text: Container Fields
- Checking Spelling
- Printing and Preview Mode
Building a New Database
- Building a New Database
- Tables and Fields
- Defining Fields
- Advanced Field Options
- Bringing It All Together
Part II: Layout Basics
Layout Basics
Creating Layouts
Advanced Layouts and Reports
- Advanced Layouts and Reports
- Setting up Field Controls
- Adding Field Controls to Layouts
- Field Behavior
- Tab Order
- Print-Related Layout Options
- Format the Number/Date/Time/Graphic
- Adding Buttons
- Tab Panels
- Reports and Summary Fields
Part III: Multiple Tables and Relationships
Multiple Tables and Relationships
- Multiple Tables and Relationships
- Relational Databases Explained
- Modeling Your Database
- Creating a Relational Database
- Relational Databases
Advanced Relationship Techniques
- Advanced Relationship Techniques
- Creating Related Records
- Table Occurrences
- Managing Data with Data Tunneling
- Building a Data Tunneling Interface
- Connecting Databases
- Lookups
- Advanced Relationships
Part IV: Calculations
Introduction to Calculations
- Introduction to Calculations
- Understanding Calculations
- The Structure of a Calculation
- Creating a Calculation Field
- Auto-Enter Calculations
- Validate Data Entry with a Calculation
- Replacing Data Using a Calculation
- Comments
Calculations and Data Types
- Calculations and Data Types
- Number Crunching Calculations
- Going Beyond Basic Calculations
- Text Parsing Calculations
- Date and Time Calculations
- Containers in Calculations
Advanced Calculations
- Advanced Calculations
- Stored, Unstored, and Global Fields
- Logical Functions
- The Let Function and Variables
Extending Calculations
Part V: Scripting
Scripting Basics
- Scripting Basics
- Your First Script
- The Importance of the Layout
- Running Scripts
- Branching and Looping in Scripts
Script Steps
- Script Steps
- Go to Layout
- Scripting for Fields
- Working with Records
- Finding Records
- Sorting Records
- Working with Windows
- Working with Files
- Printing
- Other Script Steps
Advanced Scripting
- Advanced Scripting
- Commenting Scripts
- Asking and Telling the User
- Organizing Complex Scripts
- Handling Errors
- Putting a Complex Script Together
Part VI: Security and Integration
Security
Exporting and Importing
- Exporting and Importing
- Exporting a File
- Export Formats
- Importing Data
- Import Data Sources
- Importing and Exporting in a Script
Sharing Your Database
- Sharing Your Database
- FileMaker Network Sharing
- Sharing Over the Internet
- FileMaker Server
- Server Hardware
Developer Utilities
- Developer Utilities
- Script Debugger
- Disable Script Steps
- The Database Design Report
- Tooltips
- Copying Database Structure
- Custom Menus
- Developer Utilities
- File Maintenance
Part VII: Appendixes
Appendix A. Getting Help
EAN: 2147483647
Pages: 176
