Custom Menus
FileMaker's menus are all about power. Through them, you can controland limityour users' access to the whole feature set. As the developer, you need all those commands to do your design and development of your database, but there are plenty of commands that give too much power to your users, particularly folks who don't much computer experience or who aren't shy about experimenting with commands…even if they aren't sure what might happen at the other end of a dialog box.
Brand new to version 8 is the power to customize FileMaker's menus. You can remove the Delete All Records and the Replace Field Contents commands for all your users, or you can remove them only from certain users' privilege sets. If you're the type of developer who likes to take charge of the user interface (see the box on Section 14.6.5, Custom Menus are your dream come true.
Here are just a few of the things you can do:
- Remove potentially destructive items from menus (Delete All Records, for example).
- Edit menu commands: Change Modify Last Find to read Repeat Last Find, perhaps.
- Add, edit, or remove keyboard shortcuts: If you can't remember that Ctrl+S (Windows) or
 -S (Mac) does not mean Save in FileMaker, you can at least prevent that pesky Sort dialog box from popping up every time.
 - Remove entire menus, like the Window menu, which can be confusing for folks new to FileMaker Pro.
- Run a script from a new or edited menu item: Substitute a custom Delete Record script (complete with a custom warning), for FileMaker's normal Delete Record command.
- Change menus when a user changes layout: Create a special menu that runs commands or scripts that pertain to invoices and only shows up on the Invoice layout.
- Make one set of menus for Mac and another for Windows. For example, you may want to suppress the Window
 New Window command in Windows, since it bafflingly resizes Make menu sets that match privilege sets: Give Admin-level users a special menu showing the scripts only they can run.
You can create and edit Custom Menus only in FileMaker Advanced, but anyone can use them with FileMaker Pro or in a runtime version of your database. These menus don't transfer to files you publish on the Web, though (Section 18.2). When you create Custom Menus for a database, be sure to provide a User Guide or similar documentation explaining what your custom commands do.
You can use Custom Menus to supplement, and even go beyond, privilege set features. For example, if you want to limit data entry people to using the copy and paste buttons that run your scripts, remove the Edit menu for users with that privilege set. They won't be able to use keyboard shortcuts to cut, copy, or paste. Removing the View menu prevents the Mode pop-up menu, toolbar, and all related keyboard shortcuts from working. (But you'll need to do some work providing replacement commands in your buttons and menus.)
Note: As powerful as Custom Menus are, they're no substitute for good security practices, as discussed in Chapter 16.
19.6.1. Editing a Menu
|
All new files you create use FileMaker's standard menu set unless you tell them to use a custom set. Just as each new file contains three default privilege sets, you get one set of custom menus that you can edit to suit your needs. And as with privilege sets, some items are in brackets and cannot be edited or duplicated, but you're free to create new menus with the same name and customize them. Your goal for this exercise in customizing menus is to remove menu items that might confuse your users. When people are just learning FileMaker, simplified menus are less intimidating than masses of unfamiliar commands. You can also help protect your database from damage by someone unwittingly choosing the wrong command. You start the process by editing the View menu so that only a few items show up.
|
||
|
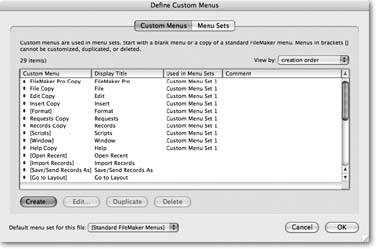
- Click "View copy" in the Custom Menu list, and then click Edit.
Or you can double-click an item to edit it. The Edit Custom Menu window appears (Figure 19-12). This where you tell the custom menu what it should look like and how it should behave.
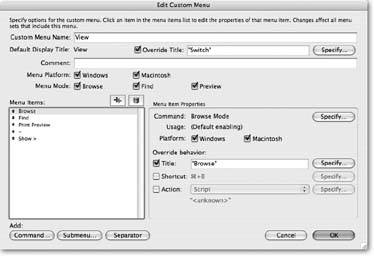
Figure 19-12. This dialog box has many splendors. You can specify that a menu appears only when your user's on a Mac, or only when she's in Find mode. You can even make specific menu commands appear only on Windows computers, but not on Macs. You can add, change or remove keyboard shortcuts. You can even take the liberty of replacing a command's normal action with a script.
- Click the checkbox beside the Override Title field, and then type Switch in the field.
The Override Title option changes what the user sees in his menu bar. You changed it to Switch since the word "View" is too vague for beginning users. Plus, you don't want them getting confused if they pick up FileMaker's manual (or this book) for help. The changed menu name should clue people in that they need to look at your custom documentation for help.
The menu's name in this dialog box remains View Copy; that's how you know it originated from the normal View menu, not from scratch.
Warning: If you customize menus even in the slightest, consider turning off the built-in Help menu as well. It opens FileMaker's online Help file, which can't answer people's questions about your custom menus.
- Select the first hyphen below "Go to Layout >" in the Menu Items list, and then press Shift as you select the last item in the list. Click the trash can Icon. Then select Layout Mode and delete it.
All highlighted items disappear when you click the trash can icon (those hyphens represent divider lines in menus). You should have only three mode menu items, a hyphen and a Go to Layout menu (a total of five items) remaining in the list.
- Click the Browse Mode menu item. As with View mode in step 2, turn on the override checkbox and change the title to "Browse".
This menu item title replaces the text that appears in the list. Your users will see a command called Browse, not Browse Mode. Notice the quotation marks around "Browse." If you forget (or refuse) to type the quotes, FileMaker obstinately puts them back in for you. That's your indication that FileMaker considers that text a character string, and that's a further cue that the Specify button gives you access to the calculation dialog box.
- Repeat the previous step for Find Mode, Preview Mode and Go to Layout>. Change Find Mode's title to "Find," change Preview Mode's title to "Print Preview," and change Go to Layout>'s title to "Show." When you've made these changes, click OK.
Use terms that are easy for folks to comprehend. Most people already understand what Print Preview does, but the meaning of Preview Mode is a little murky.
- Choose "Custom Menu Set 1" from the Default menu set for this file pop-up menu, and then click OK.
You've just told FileMaker to display the customized version of your View menu.
The View menu now says "Switch." When you click it, there are only four items. Notice that the Layout tool is grayed out, and Layout Mode has disappeared from the Layout pop-up menu at the bottom of your screen. Also, the commands in the pop-up menu match the changes you made in the View custom menu.
By editing menus to suppress items that might confuse those who haven't had indepth FileMaker training, you've made your database a friendlier place to work. But don't stop there: In the next section, you'll learn how to create menus that show lists of commands you do want people to see, like your scripts.
19.6.2. Creating a New Menu
Using the steps described in the previous tutorial, you can edit FileMaker's menus to your heart's content, renaming them, and deleting extraneous commands to make room for new ones. If you don't necessarily want to delete any existing menus or commands, or even if you do, you can always create additional menus from scratch.
- In Define Custom Menus, click Create. In the Create Custom Menu window that appears, choose "Start with an empty menu." Click OK.
If an existing menu is similar to what you need, you can use it as a template when you create new menus. But in this case, you don't need any existing menu commands because you'll attach your scripts to a new menu. When you click OK, the Edit Custom Menu window appears, just as in Figure 19-12. This time, though, you won't edit it, you'll build the menu from the ground up.
- Type "Invoices" in the Custom Menu Name fields. Also type "Invoices" in the Override Title field.
Since you started with an empty menu, FileMaker assumes you want a custom name. If you don't type a name, the word "Untitled" appears in your menu bar.
- Turn off the Menu Mode options for Find and Preview modes.
You don't want your scripts run from either Find or Preview modes, so by telling the menu not to even show up in those modes, you're adding another layer of security.
- Click the Command button. In the Specify FileMaker Command dialog box, choose the "No command assigned" option above the list of available commands, and then click OK
This action creates a new command, but doesn't use one of FileMaker's canned actions. You could use this method to build a new menu that picks and chooses from various default menus, but in this instance, you're going to run your scripts from the new Invoices menu.
- In the Title field, type Create invoice for unbilled expenses, and then click Specify (to the right of the Action pop-up menu). From the list in the Specify Script Options window, choose the "Create Invoice for Job" script, and then click OK.
The Specify Script Options shows all the scripts you've created in this database file. To add more scripts to this menu, repeat the last two steps until you've created new commands for all the scripts you want. The arrows to the left of each item let you rearrange them. Click the Separator button to create a divider line in the menu.
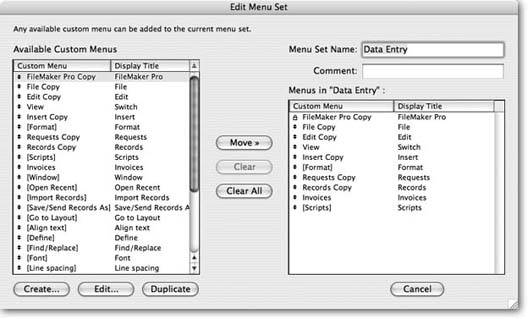
- Click the Menu Sets tab of the Define Custom Menus dialog box. If necessary, select "Custom Menu Set 1" in the list, and then click Edit.
The Edit Menu Set window appears.
- Scroll through the list of Available Custom Menus until you see Invoices. Select it, and then click the Move button. Click the arrow to the left of the Invoices menu and move it up, so that it appears above [Scripts]. Click OK until you're back in your database.
The Invoices custom menu is now a part of the new custom menu set and it appears between the Records and Scripts Menu.
So far, you've simplified one of FileMaker's menus and created a custom menu from scratch. Now you need to get rid of a menu that strikes fear even in the hearts of experienced FileMaker users: You're going to completely suppress the Windows menu.
19.6.3. Removing a Menu
At first glance through the Define Custom Menus dialog box, you might think that you just click an item in the Custom Menu list, and then click Delete to remove it. But you'll run into problems if you do. First, if you highlight menus with brackets around their names, the Delete button is inactive. And if you select an item where the Delete button remains active (Help), and then delete it, you get a nasty surprise when you click OK and return to your file. You see the text "Missing Menu" inserted in the menu bar, and the Help menu stays right where it was. Despite these obstacles, you can remove an entire menu; you just have to dig a little deeper to do it.
Tip: Troubleshoot a file for missing menu items by running a DDR (Section 19.3), or by checking Get ( LastError ) after you load a menu set in a script.
As mentioned previously (Section 1.7.2.1), the Window menu can cause problems for new users. For example, the Show command lists files that they may not know are open. Hiding and showing windows is also perilous for new users if they don't understand how FileMaker manages windows. Instead of bothering people with stuff they don't need to know, you can just suppress this menu entirely by removing it from the menu bar.
- In the Define Custom Menus dialog box, click the Menu Sets tab. Select Custom Menu Set 1, and then click Edit.
The Edit Menu Set dialog box appears.
- In the Menus Set Name field, type "Data Entry."
This descriptive name helps you remember the menu set's purpose. If you like, type additional information in the Comment box.
- In the "Menus in 'Data Entry'" list, click the [Window] menu. Click Clear, and then click OK until you're back in your database.
Usually brackets on a list item indicate you can't delete it. But you can delete it from the display list, as you've just done. The [Window] menu remains in the Available Custom Menus list at left. If you change your mind, you can move it back into the display list to restore it.
Back in your database, the Window menu is gone entirely from the menu bar. This menu configuration is ideal for your data entry people, but not so great for administrative users, who understand the Window menu and use it all the time. Read on to find out how to tailor sets of menus for people with different privilege levels.
19.6.4. Installing Custom Menu Sets
FileMaker Pro Advanced lets you create a set of custom menus (see Figure 19-13) and use it as the default for a file, meaning that everyone who uses your database sees it, every time. But since the people using your database may have different levels of skill (and trust), you may want your custom menus to adapt accordingly. In fact, if you've read this book's chapters on layouts and privilege sets, you have all the tools you need to make the right menus appear to the right people at the right time. It's a simple matter of assigning menu sets to these existing features. You can conceal certain menus and commands from people who don't need them, but keep them available for everybody else. Or maybe you just want menu items to show up when they make sense for the active layout.
|
Once you've created menu sets using the steps outlined earlier in this chapter, you can install them in any of several ways:
- As the default for a file. That's what you did in the tutorial in the "Editing a Menu" section on Section 19.6.1. Unless you tell FileMaker otherwise, everybody gets the same custom menus. This option works great for a runtime file, or any situation where all users are at the same level.
- On individual layouts. In this scenario, when someone switches layouts, either by menu command or via a script, the menu set changes to a layout-specific one of your choosing. Choose Layout Layout Setup to attach a custom menu set to a layout.
- By mode. This option offers the ultimate in elegance. It lets you do things like create a set with only one menu and just a few items, and make it the only menu people see when they're in Find mode. Instead of a gaggle of buttons to perform and cancel finds, write the appropriate scripts and display them in the one menu, short and sweet.
- When a script is run. By checking the privilege set in a script that runs when someone logs into your file, you can load a set of menus customized to that person's level of privilege. Use the Get ( PrivilegeSetName ) step to check privileges (Section 16.2) and the Install Menu Set script step to specify which menu set installs. (If you have a Re-login script, you need to make sure that the right menu set is installed each time users re-login.)
Warning: Since you're effectively removing features for your users when you customize menus, thorough testing is a critical part of the process. Be sure to test menus with all affected layouts, privilege sets, scripts and across platforms. In FileMaker Pro Advanced, choose Tools Custom Menus to switch among sets as you test them.
Part I: Introduction to FileMaker Pro
Your First Database
- Your First Database
- An Very Quick Database Tour
- Creating a New Database
- Opening and Closing Database Files
- Saving Your Databases
- Adding Records to Your Database
- Navigating Your Database
- Same Database, Multiple Windows
Organizing and Editing Records
- Organizing and Editing Records
- Views
- Advanced Find Mode
- Changing Multiple Records
- Sorting Records
- Editing Whats in Your Fields
- Paragraph Formatting
- Beyond Text: Container Fields
- Checking Spelling
- Printing and Preview Mode
Building a New Database
- Building a New Database
- Tables and Fields
- Defining Fields
- Advanced Field Options
- Bringing It All Together
Part II: Layout Basics
Layout Basics
Creating Layouts
Advanced Layouts and Reports
- Advanced Layouts and Reports
- Setting up Field Controls
- Adding Field Controls to Layouts
- Field Behavior
- Tab Order
- Print-Related Layout Options
- Format the Number/Date/Time/Graphic
- Adding Buttons
- Tab Panels
- Reports and Summary Fields
Part III: Multiple Tables and Relationships
Multiple Tables and Relationships
- Multiple Tables and Relationships
- Relational Databases Explained
- Modeling Your Database
- Creating a Relational Database
- Relational Databases
Advanced Relationship Techniques
- Advanced Relationship Techniques
- Creating Related Records
- Table Occurrences
- Managing Data with Data Tunneling
- Building a Data Tunneling Interface
- Connecting Databases
- Lookups
- Advanced Relationships
Part IV: Calculations
Introduction to Calculations
- Introduction to Calculations
- Understanding Calculations
- The Structure of a Calculation
- Creating a Calculation Field
- Auto-Enter Calculations
- Validate Data Entry with a Calculation
- Replacing Data Using a Calculation
- Comments
Calculations and Data Types
- Calculations and Data Types
- Number Crunching Calculations
- Going Beyond Basic Calculations
- Text Parsing Calculations
- Date and Time Calculations
- Containers in Calculations
Advanced Calculations
- Advanced Calculations
- Stored, Unstored, and Global Fields
- Logical Functions
- The Let Function and Variables
Extending Calculations
Part V: Scripting
Scripting Basics
- Scripting Basics
- Your First Script
- The Importance of the Layout
- Running Scripts
- Branching and Looping in Scripts
Script Steps
- Script Steps
- Go to Layout
- Scripting for Fields
- Working with Records
- Finding Records
- Sorting Records
- Working with Windows
- Working with Files
- Printing
- Other Script Steps
Advanced Scripting
- Advanced Scripting
- Commenting Scripts
- Asking and Telling the User
- Organizing Complex Scripts
- Handling Errors
- Putting a Complex Script Together
Part VI: Security and Integration
Security
Exporting and Importing
- Exporting and Importing
- Exporting a File
- Export Formats
- Importing Data
- Import Data Sources
- Importing and Exporting in a Script
Sharing Your Database
- Sharing Your Database
- FileMaker Network Sharing
- Sharing Over the Internet
- FileMaker Server
- Server Hardware
Developer Utilities
- Developer Utilities
- Script Debugger
- Disable Script Steps
- The Database Design Report
- Tooltips
- Copying Database Structure
- Custom Menus
- Developer Utilities
- File Maintenance
Part VII: Appendixes
Appendix A. Getting Help
EAN: 2147483647
Pages: 176
