Paragraph Formatting
Sometimes you put lots of information in a field. For example, suppose you decide to keep track of all your correspondence with your customers. You might make a database to store letters and emails so you can search them or print them out, as needed. In a database like this, you usually end up typing (or pasting) long blocks of text into a field, where you need to control more than just the font, size, style, and color.
2.6.1. Align Text
Text alignment is perhaps the most important aspect of your document's appearance. You can have text rigidly justified on both right and left, or with a loose right margin for a more casual look. If you use FileMaker to send party invitations to your contacts, you can use centered alignment for an attractive, social look. People may not think about text alignment much, but it really sets the whole tone of a document. FileMaker puts these settings right on the Format menu.
The Format images/U2192.jpg border=0> Align Text menu offers four useful choices:
- Choose Left to make every line of text start at the left edge of the field. As the text wraps from line to line, the right edge appears jagged.
- Choose Center to make every line of text center itself in the field. In this case, both edges are jagged.
- Choose Right if you want every line to end exactly at the right edge of the field. As you can probably guess, this options means the left edge is jagged.
- The Full text alignment (sometimes called Justified in other programs) tells FileMaker to take special care to make every line start on the left edge of the field and end on the right edge. It adds a little space between words and letters as necessary so that everything lines up.
Note: The Format  Align Text menu also has three perpetually disabled items: Top, Center, and Bottom. These items control vertical alignment of the text within the field. The reason they're gray is that you can choose them only when you're designing your layouts (Chapter 4), not when you're entering data.
2.6.2. Line Spacing
Format Line Spacing lets you single- or double-space the text. Text is singlespaced normally, and if you choose Double instead, FileMaker spreads out your lines of text, giving them a little breathing room. This menu also has a Custom option, which is primarily just a shortcut to the Paragraph dialog box. As youll learn on Section 2.6.4, you can use the Paragraph dialog box to control several aspects of text formattingincluding more fine-grained control of line spacing.
Note: Unlike the other format options, alignment and line spacing apply to an entire paragraph, not just the selected text.
2.6.3. The Text Ruler
A FileMaker field is much more than a mere container for plain text. Like a mini word processor, you can set left and right indents and FileMaker makes sure your text stays between them. You can even set a first-line indent so the first line of each paragraph is automatically indented a little more (or less) than the rest of the text. Finally, you have complete control over tab stops: where they are and which direction the text goes when you tab to them.
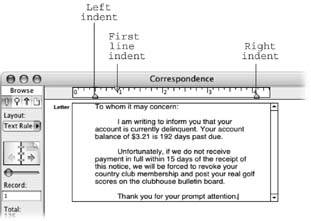
The Text Ruler (View Text Ruler) lets you set indents and tab stops for instant visual gratification. The ruler has an arrow icon for the Left, Right, and First Line indent settings (Figure 2-16), which you just drag to the spot on the ruler where you want the indent set. (For greater precision, you can also set indents in the Paragraph dialog box, as discussed in the next section.) Youll learn how to set tab stops on Section 2.6.5.2.
When you turn on the Text Ruler, FileMaker adds a space along the top of the window to hold the ruler. When you're in a field, the ruler itself appears in the portion of this space that is directly above the field, with the zero point on the ruler lined up with the left edge of the field. (When you're not in a field, the ruler just measures the width of the content area.)
|
2.6.4. Detailed Formatting in the Paragraph Box
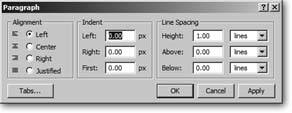
This multitalented window offers three groups of settings: Alignment, Line Spacing, and Indents. You can get to the Paragraph dialog box in one of two ways. Either choose Format images/U2192.jpg border=0> Line Spacing
images/U2192.jpg border=0> Custom, or choose Format
images/U2192.jpg border=0> Text and then click Paragraph. The dialog box opens, as shown in Figure 2-17.
|
Warning: When you click Paragraph in the Text Format dialog box, FileMaker immediately applies any formatting settings you've made. To avoid unintentional reformatting, make sure you don't have any text selected when you choose Format Text. (Better yet, bypass the Text Format dialog box altogether by choosing Format images/U2192.jpg border=0> Line Spacing
images/U2192.jpg border=0> Custom instead.)
- The Alignment options are almost exactly the same as those found in the Format Align Text menu. There is one small exception, though: Full alignment is called Justified, though it means the exact same thing. (Dont ask.)
- Next in line are the Indent settings. Here, you can specify how far the text indents from the left and right edges of the field. The Left setting applies to every line in the field, giving you the specified space between the left edge of the field and the beginning of each line. The Right setting works the same way, only it applies to the right edge of the field. The First setting, meanwhile, applies only to the first line of each paragraph. It tells FileMaker to insert more space before the first line, in addition to what's specified for Left indent.
Note: If you want a hanging indent, where the first line sticks out to the left of the rest of the paragraph, specify a negative value for the First indent option, and a positive value for the Left indent. - The Paragraph window also gives you more fine-grained control over Line Spacing. For instance, you can give your text 1.5 line spacing instead of single-or double-spacing by entering 1.5 in the Height box and choosing "lines" from the popup menu beside it. The Above and Below options refer to spacing before and after each paragraph. Unlike the indent settings, the spacing options let you pick the units right in the dialog box. You can choose Pixels (little dots on the screen), Inches, or Centimeters from the pop-up menu.
When your text is positioned and aligned just the way you want it, you have two options: Click OK to make the changes and close the Paragraph dialog box, or click Apply to inspect your changes so far. The Apply button leaves the Paragraph box open, so you can peek at your database window and see how it looks, then continue tweaking. Click OK when you're satisfied.
2.6.5. Tabs
Since a field can hold just about any kind of text, you might eventually need to use tab stops within a field. For example, you could have a nice large field into which you paste rows of text from a spreadsheet. To make things line up properly, you can set tab stops for each column of text. To move the insertion point to the next tab, press Ctrl-Tab (Option-Tab). This is a special keystroke, obviously, because in FileMaker pressing Tab jumps you to the next field. See Section 6.4 to learn how Field Controls make plain old tabs work the way you're used to.
Like most word processing programs, FileMaker provides two ways to create tab stops: the Text Ruler described on Section 2.6.2, and the Tabs dialog box.
2.6.5.1. Setting tabs in the Text Ruler
To insert a new tab stop, simply click anywhere in the ruler. A small right-pointing arrow appears where you clicked, representing a left tab stop. (The arrow shows you what direction text will go when you start typing.) FileMaker also supports other kinds of tab stops, but to get them, you have to visit the Tabs dialog box, described next.
| TROUBLESHOOTING MOMENT Units |
|
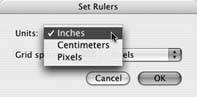
In the pictures shown here, the Indent options are specified in Inches (you see "in" next to each text box). FileMaker actually has a setting for the unit used here and other places. FileMaker comes factory-set to inches, but it's nothing if not flexible. You can use inches, centimeters, or pixelsthe choice is yours. If you're used to the Metric system, by all means tell FileMaker to use centimeters. Or choose pixels for really precise control over text positioning. Here's how to change how FileMaker displays measurements: If the Paragraph dialog box is open, click Cancel. The remainder of these steps will work only if your database's main window is in front.
 |
2.6.5.2. Setting tabs in the Tabs dialog box
The Tabs dialog box is a laborious way of setting tabs, but it gives you more options because you can control all aspects of each tab stop manually. Here's the drill:
- Choose Format Text.
The Text Format dialog box appears.
- Click Paragraph.
The Paragraph dialog box makes its entrance.
- Click Tabs.
Ta-da! You found the Tabs dialog box (Figure 2-18).
Note: If the Text Ruler is showing (Figure 2-19), you can get to the Tabs dialog box quickly. Just double-click any tab stop in the ruler. The Tabs dialog box opens with the clicked tab preselected.
|
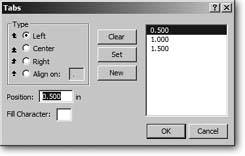
To make a new tab stop, simply select the appropriate options as described below, and then click New. A new entry will appear in the list named after the Position you specified. You can create up to 20 tab stops, after which the New button becomes disabled. If you try to add a tab stop at a position where one already exists, the new stop simply replaces the old one.
2.6.5.3. Editing tab stops in the Tabs dialog box
Once you've created tab stops, you can change them anytime using the same Tabs dialog box. Select a Tab stop in the list to see its settings. The Type radio buttons, as well as the Position and Fill Character fields, change to reveal the settings for the selected stop. To change them, modify the values in any way, then click Set. To delete the selected tab stop, click Clear.
Finally, you've probably noticed that the Tabs dialog box has an Apply button just like the Paragraph dialog box, and it works the same way. Click Apply, and the tab stops showing in the list will be reflected in the current field. Sometimes it can be tough to position your tab stops in just the right place. Use the Apply button to see how things line up. When you're satisfied with the tabs, click OK.
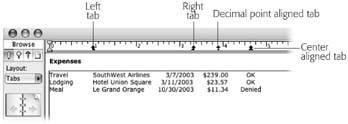
Type. A Tab stop's type effects how text entry behaves when you tab to that particular stop. Figure 2-19 shows how these different tab stops look in action.
- A Left tab causes the next text you type to be anchored to the tab stop on its left side. As you type, the text moves to the right just like normal Left aligned text.
- A Right tab works in the other direction. When you tab to one, everything you type is anchored on the right, like right-aligned text. As you type, the text moves to the left, towards the beginning of the line.
- A Center tab causes the text you type to be centered at the point of the stop. As you type, the text moves in both directions.
- The Align on tab lets you specify any character (letter, number, or punctuation) to act as the point of alignment. For instance, if you specify a period for the alignment character, the period or decimal point you type will anchor to the tab stop. Any text you type before the period will be right aligned and any text after the period will be left aligned. You use this feature most often to line up lists of numbers by their decimal points.
|
Position. In addition to a type, every stop has a position, which is measured from the left edge of the field, in the same units used for Indent settings (such as inches and centimeters). For example, if you're storing a little two-column list in a text field, you might set tab stops at .5 inches and 2 inches.
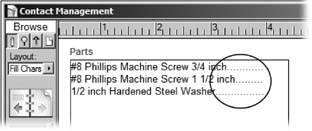
Fill Character. FileMaker also accepts a fill character for each tab. This character is repeated as many times as necessary to fill the blank space leading up to a tab. Most often you use a period for the fill character (as shown in Figure 2-20), but any character is allowed.
|
Part I: Introduction to FileMaker Pro
Your First Database
- Your First Database
- An Very Quick Database Tour
- Creating a New Database
- Opening and Closing Database Files
- Saving Your Databases
- Adding Records to Your Database
- Navigating Your Database
- Same Database, Multiple Windows
Organizing and Editing Records
- Organizing and Editing Records
- Views
- Advanced Find Mode
- Changing Multiple Records
- Sorting Records
- Editing Whats in Your Fields
- Paragraph Formatting
- Beyond Text: Container Fields
- Checking Spelling
- Printing and Preview Mode
Building a New Database
- Building a New Database
- Tables and Fields
- Defining Fields
- Advanced Field Options
- Bringing It All Together
Part II: Layout Basics
Layout Basics
Creating Layouts
Advanced Layouts and Reports
- Advanced Layouts and Reports
- Setting up Field Controls
- Adding Field Controls to Layouts
- Field Behavior
- Tab Order
- Print-Related Layout Options
- Format the Number/Date/Time/Graphic
- Adding Buttons
- Tab Panels
- Reports and Summary Fields
Part III: Multiple Tables and Relationships
Multiple Tables and Relationships
- Multiple Tables and Relationships
- Relational Databases Explained
- Modeling Your Database
- Creating a Relational Database
- Relational Databases
Advanced Relationship Techniques
- Advanced Relationship Techniques
- Creating Related Records
- Table Occurrences
- Managing Data with Data Tunneling
- Building a Data Tunneling Interface
- Connecting Databases
- Lookups
- Advanced Relationships
Part IV: Calculations
Introduction to Calculations
- Introduction to Calculations
- Understanding Calculations
- The Structure of a Calculation
- Creating a Calculation Field
- Auto-Enter Calculations
- Validate Data Entry with a Calculation
- Replacing Data Using a Calculation
- Comments
Calculations and Data Types
- Calculations and Data Types
- Number Crunching Calculations
- Going Beyond Basic Calculations
- Text Parsing Calculations
- Date and Time Calculations
- Containers in Calculations
Advanced Calculations
- Advanced Calculations
- Stored, Unstored, and Global Fields
- Logical Functions
- The Let Function and Variables
Extending Calculations
Part V: Scripting
Scripting Basics
- Scripting Basics
- Your First Script
- The Importance of the Layout
- Running Scripts
- Branching and Looping in Scripts
Script Steps
- Script Steps
- Go to Layout
- Scripting for Fields
- Working with Records
- Finding Records
- Sorting Records
- Working with Windows
- Working with Files
- Printing
- Other Script Steps
Advanced Scripting
- Advanced Scripting
- Commenting Scripts
- Asking and Telling the User
- Organizing Complex Scripts
- Handling Errors
- Putting a Complex Script Together
Part VI: Security and Integration
Security
Exporting and Importing
- Exporting and Importing
- Exporting a File
- Export Formats
- Importing Data
- Import Data Sources
- Importing and Exporting in a Script
Sharing Your Database
- Sharing Your Database
- FileMaker Network Sharing
- Sharing Over the Internet
- FileMaker Server
- Server Hardware
Developer Utilities
- Developer Utilities
- Script Debugger
- Disable Script Steps
- The Database Design Report
- Tooltips
- Copying Database Structure
- Custom Menus
- Developer Utilities
- File Maintenance
Part VII: Appendixes
Appendix A. Getting Help
EAN: 2147483647
Pages: 176
