An Very Quick Database Tour
Every FileMaker Pro database has two things in common: One, it stores heaps of information; and two, it gives you the tools to manage that information. Whether you start from one of FileMaker's templates (Section 1.1.2.2) or a completely blank slate (Section 1.2.1), your new database starts out data-free. It's an empty vessel waiting to be filled. (It would be nice if the program could figure out what data you want and enter it for you, but that probably won't happen until FileMaker Pro 8008.) You have to take care of the data entry yourself. At first, all you see in the window are the toolsbuttons, controls, and pop-up menusthat you use to fill the database up with data.
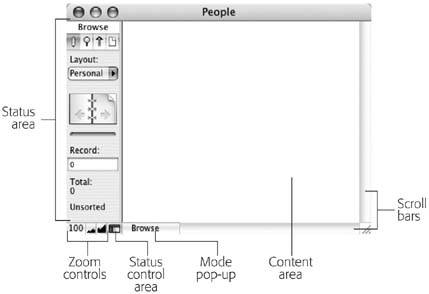
Every database window has the same basic structure. FileMaker provides a handful of special items around the window, as you can see in Figure 1-1.
|
1.1.1. Content Area
While some features like the status area, zoom controls, and Mode pop-up menu stay the same no matter which database you're using, what's inside the content area is the actual information (data) that makes each database unique.
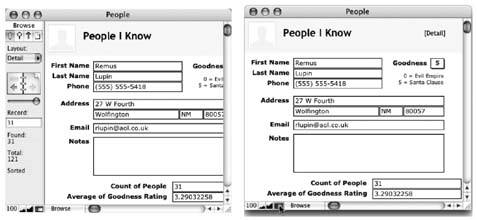
When you create a new FileMaker database, you start with something that looks a little like Figure 1-1: plain and simple. That's because you haven't added any content yet. In Figure 1-2, you can see what your database will look like once you've started to fill it in. Depending on how you want to look at your information, you can use the controls described below to alter how your content appears onscreen.
1.1.2. Mode pop-up menu
This unassuming menu may not be the most prominent control in the window, but it's one of the most important. Each of FileMaker's four modes is a work environment unto itself, specially designed to help you view, edit, organize, or present your information in a specific way. Use this menu to switch modes depending on what you need to do.
- In stark contrast to rational expectations, you use Browse mode for more than browsing. In this mode, you can add, change, and view data in your database. Browse is the view shown in Figure 1-2, and it's where you'll spend most of this chapter.
- When you have a lot of data, looking through it all for a particular bit of info can be tedious. Use Find mode to let FileMaker do the looking for you. You tell FileMaker what you're looking for in Find mode; when it's done looking, FileMaker returns you to Browse mode and shows what it found. You'll see Find mode in action on Section 1.6.3.

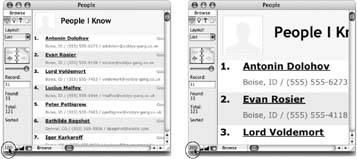
Figure 1-2. Unlike the stark emptiness shown in Figure 1-1, this database is well underway, as you can see by the abundance of the content area. Left: The status area is part of all FileMaker databases, regardless of what they contain. Right: Maximize your view of the content area by hiding the status area with a simple click on its control.
- In addition to using databases (viewing, finding, sorting, adding, and changing data), you can use FileMaker to build databases. Layout mode is where you design the screens (or layouts) that present your database information to best advantage. Part 2 is all about Layout mode.
- Although computers make maintaining and manipulating mountains of information a breeze, there's still no avoiding paper. Eventually you'll want to print something out, like a set of mailing labels or a paper backup of all your records. If you're ever curious about how something will look when printed, switch to Preview mode. It shows a one-page-at-a-time view of your data exactly as it will appear when printed.
To use the Mode pop-up menu, just click it and choose one of the four modes. Your FileMaker window instantly switches to the new mode. You can also glance at the pop-up menu to see which mode you're currently in. (The Mode pop-up menu is the most popular way to mode-hop, but there are plenty more; see the box on Section 1.2.)
1.1.2.1. Status area and the status area control
No matter what mode you're in, the status area (Figure 1-1, left) is your central command center. This slim panel lets you see how much information you've got in your database and your current position within it. It also has the controls you'll use most often for both adding information to your database and accessing it later. If you're like most people, at some point you'll come to resent the fact that the status area takes up so much space on your screen. Despite the fact that it usually contains just a few numbers and icons, it eats up a good inch of space along the entire left edge of every window. Luckily, you can easily conceal the status area when you don't need it, as shown in Figure 1-2.
| UP TO SPEED A Tour of the Templates |
|
FileMaker Pro's standard templates make it easy to perform routine tasks found in typical businesses, schools, and homes. Just choose a template and get right to work. Chances are one of the 40 templates built into FileMaker is set up to manage the kind of information you're working with, so you waste no time on setup. Here's an overview of the nine basic template categories:
|
1.1.2.2. Zoom controls
One of FileMaker's neatest features is the zoom control. No matter what you're doing, you can always zoom in for a closer look or zoom out for the big picture. This feature works no matter what mode you're ineven when you're previewing a printout.
To use FileMaker's zoom control, click the Zoom In button for a closer look (each click zooms in a little more). You can zoom in up to 400%, so that everything is four times bigger than normal. If you click Zoom Out, everything shrinks, as small as one quarter of its normal size. The Zoom Level shows your current level, and clicking it takes you back to 100%. Clicking the Zoom Level a second time returns you to the last zoom level you were viewing (see Figure 1-3).
Note: Since you probably don't need to examine the words and numbers in your database on a microscopic level, you'll probably use the zoom control mostly in Preview mode to fit the whole page on the screen, or to adjust the contents of your FileMaker window to the most easily readable size (depending on the resolution of your monitor).
|
1.1.2.3. Scroll bars
Every window has horizontal and vertical scroll bars that appear whenever you have more content than the window can display. (For an example, see Figure 1-3.) If everything in the content area fits in the window, you won't see scroll barsafter all, you don't need them. FileMaker's scroll bars work just like the ones in any other program, and you can use your keyboard to scroll up and down as well. Press Page Up to scroll up one screenful. Page Down scrolls the other direction. To scroll all the way to the top or bottom, use the Home and End keys respectively. (Don't toss out your mouse yet, though. There's no way to scroll right or left with the keyboard.)
If your mouse has a scroll wheel, you'll notice that it works a little differently in FileMaker. What you scroll through varies based on where you put your mouse cursora feature called contextual scrolling. The wheel scrolls through the window when the cursor is inside the content area of the window. It scrolls through the records in your database if you run the cursor over the Book icon in the Status area (Section 1.1.2.1). And if you put your cursor over a field that has a scroll bar (Section 4.4.7.2), the scroll wheel scrolls through the text in the field.
Note: Don't be alarmed when the menus across the top of your screen change a bit when you switch modes. That's just FileMaker being smart. Some commands aren't useful in some modes, so the program doesn't clutter up your screenor your brain spacewith menus when you don't need them. For example, the Insert and Format menus change from black to gray (meaning unavailable) when you enter Find mode. The Request menu, though, appears only in Find mode.
| UP TO SPEED Changing Modes |
|
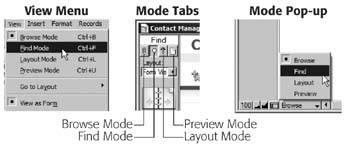
Switching between FileMaker's four modes is such a common task that the program actually gives you four ways to do it. The Mode pop-up menu (Section 1.1.1) is just one way. You can also use the Mode tabs in the status area (shown here at left), or pick a mode from FileMaker's View menu (right). The keyboard shortcuts are speediest of all:
If you ever forget these shortcuts, check the View menu to refresh your memory. FileMaker also gives you several ways to find out which mode you're in. The Mode pop-up always displays the current mode, and since it's always visible, it's the easiest place to check your mode. But the Mode tabs also reveal the current mode, and the View menu indicates the current mode with a checkmark. So when you return to FileMaker after checking email, you've got plenty of ways to reorient yourself.  |
Part I: Introduction to FileMaker Pro
Your First Database
- Your First Database
- An Very Quick Database Tour
- Creating a New Database
- Opening and Closing Database Files
- Saving Your Databases
- Adding Records to Your Database
- Navigating Your Database
- Same Database, Multiple Windows
Organizing and Editing Records
- Organizing and Editing Records
- Views
- Advanced Find Mode
- Changing Multiple Records
- Sorting Records
- Editing Whats in Your Fields
- Paragraph Formatting
- Beyond Text: Container Fields
- Checking Spelling
- Printing and Preview Mode
Building a New Database
- Building a New Database
- Tables and Fields
- Defining Fields
- Advanced Field Options
- Bringing It All Together
Part II: Layout Basics
Layout Basics
Creating Layouts
Advanced Layouts and Reports
- Advanced Layouts and Reports
- Setting up Field Controls
- Adding Field Controls to Layouts
- Field Behavior
- Tab Order
- Print-Related Layout Options
- Format the Number/Date/Time/Graphic
- Adding Buttons
- Tab Panels
- Reports and Summary Fields
Part III: Multiple Tables and Relationships
Multiple Tables and Relationships
- Multiple Tables and Relationships
- Relational Databases Explained
- Modeling Your Database
- Creating a Relational Database
- Relational Databases
Advanced Relationship Techniques
- Advanced Relationship Techniques
- Creating Related Records
- Table Occurrences
- Managing Data with Data Tunneling
- Building a Data Tunneling Interface
- Connecting Databases
- Lookups
- Advanced Relationships
Part IV: Calculations
Introduction to Calculations
- Introduction to Calculations
- Understanding Calculations
- The Structure of a Calculation
- Creating a Calculation Field
- Auto-Enter Calculations
- Validate Data Entry with a Calculation
- Replacing Data Using a Calculation
- Comments
Calculations and Data Types
- Calculations and Data Types
- Number Crunching Calculations
- Going Beyond Basic Calculations
- Text Parsing Calculations
- Date and Time Calculations
- Containers in Calculations
Advanced Calculations
- Advanced Calculations
- Stored, Unstored, and Global Fields
- Logical Functions
- The Let Function and Variables
Extending Calculations
Part V: Scripting
Scripting Basics
- Scripting Basics
- Your First Script
- The Importance of the Layout
- Running Scripts
- Branching and Looping in Scripts
Script Steps
- Script Steps
- Go to Layout
- Scripting for Fields
- Working with Records
- Finding Records
- Sorting Records
- Working with Windows
- Working with Files
- Printing
- Other Script Steps
Advanced Scripting
- Advanced Scripting
- Commenting Scripts
- Asking and Telling the User
- Organizing Complex Scripts
- Handling Errors
- Putting a Complex Script Together
Part VI: Security and Integration
Security
Exporting and Importing
- Exporting and Importing
- Exporting a File
- Export Formats
- Importing Data
- Import Data Sources
- Importing and Exporting in a Script
Sharing Your Database
- Sharing Your Database
- FileMaker Network Sharing
- Sharing Over the Internet
- FileMaker Server
- Server Hardware
Developer Utilities
- Developer Utilities
- Script Debugger
- Disable Script Steps
- The Database Design Report
- Tooltips
- Copying Database Structure
- Custom Menus
- Developer Utilities
- File Maintenance
Part VII: Appendixes
Appendix A. Getting Help
EAN: 2147483647
Pages: 176


 -B) to switch to Browse mode.