Encoding
| As I briefly mentioned earlier, when you burn to disc or an ISO image Premiere Pro converts your audio and video into formats suitable for DVD players. This process is called encoding.The primary DVD encoding format is MPEG2. Like Windows Media, QuickTime, and Flash, MPEG2 is a form of compression that allows for high quality video to playback at low data rates. What makes MPEG2 different from other compression types is that instead of compressing each individual frame, it in essence takes "snapshots" of groups of frames, encoding the differences between the frames as opposed to the frames in their entirety. The number of frames used in a snapshot is commonly referred to as the GOP (Groups of Pictures) size. With various flavors of MPEG encoding you can have small GOP or large GOP sizes. Although MPEG compression makes a great playback format, because every frame is not individually and uniquely accounted for it can be a painful format in which to edit. Regardless of whether you are burning to disc, folder, or ISO image, in every case you must determine the encoding settings and the amount of compression for your files. You modify your encoding settings using the Adobe Media Encoder (Figure 11.6). To access the Adobe Media Encoder, click the Settings button in the Encoding section of the Export to DVD (Burn DVD) dialog box. Figure 11.6. The Adobe Media Encoder has been overhauled for Premiere Pro 2.0. Take note of the Output area on the left side; this shows you a preview of the sequence being encoded from the settings you define on the right side. Using the time ruler at the bottom of the Output area; you can scrub to any frame in the sequence to see what it looks like. Under Export Settings on the right, notice that Format is locked as MPEG2-DVD. This setting is locked because you accessed the encoder from the Burn DVD dialog and Premiere Pro's DVD Authoring functions author in MPEG2-DVD only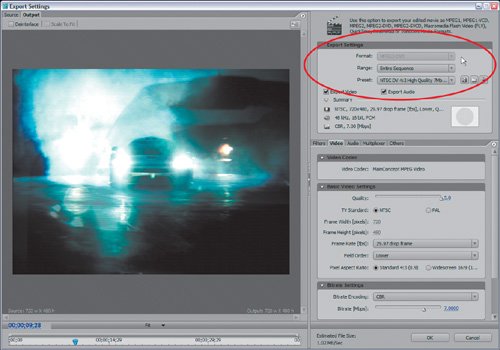 Instead of taking you on a complete tour of the Adobe Media Encoder, I will focus on the settings and functions commonly used to encode for DVD authoring. The Encoder can be broken into two areas: Source/Output (left side) and Export Settings (right side). Depending on the Export Settings to the right, the output or source content will update and preview on the left. Let's take a look at the Export Settings on the right. Notes If you are interested in going beyond the basics and exploring the Encoder in its entirely, check out Chapter 29, "Professional Workflows: Using the Adobe Media Encoder," which takes you on a tour of the encoder suggesting the best settings and formats for a number of different tasks. Export Settings Area: Format and PresetsWhen you access the encoder to assign your DVD encoding settings from the Burn DVD dialog, the Adobe Media Encoder is locked into MPEG2-DVD as the export format. When accessing the Encoder from the Burn DVD dialog,the only settings that the dialog needs are the parameters listed in the tabs below the Export Settings (Figure 11.7). These parameters can be customized or preloaded from a multitude of presets (Figure 11.8). In this case the Range setting does not apply to the encoding of the files for your DVD. Figure 11.7. Below the Export Settings box are five tabsFilters, Video, Audio, Multiplexer, and Othersfeaturing customizable settings that define exactly how the audio and video encodes in the selected MPEG2-DVD format. You can quickly load a preset from the Export Settings > Preset drop-down menu and then adjust any of the settings to your liking Choosing the right preset is as easy as understanding the video format of your source sequence. If you are editing with widescreen PAL MiniDV footage, you simply select one of the PAL DV 16x9 presets. If you are shooting widescreen NTSC DV 24p footage you can select from either of the NTSC Progressive 16x9 presets. If you aren't encoding widescreen footage, select from the 4x3 presets. Once a preset is loaded, the Summary section (Figure 11.9) lists the settings for video (TV standard, frame size, frame rate, field dominance, and quality), audio (Hertz, bit depth, and format), and bitrate (encoding type, bitrate). Figure 11.8. Premiere Pro offers many preset choices for the MPEG2-DVD format. If you are burning from an interlaced NTSC sequence, you can pick from any of the NTSC presets. If you are burning from a progressive NTSC sequence, select from the Progressive NTSC presets.In either case, once a preset is loaded you can modify the preset to change the settings further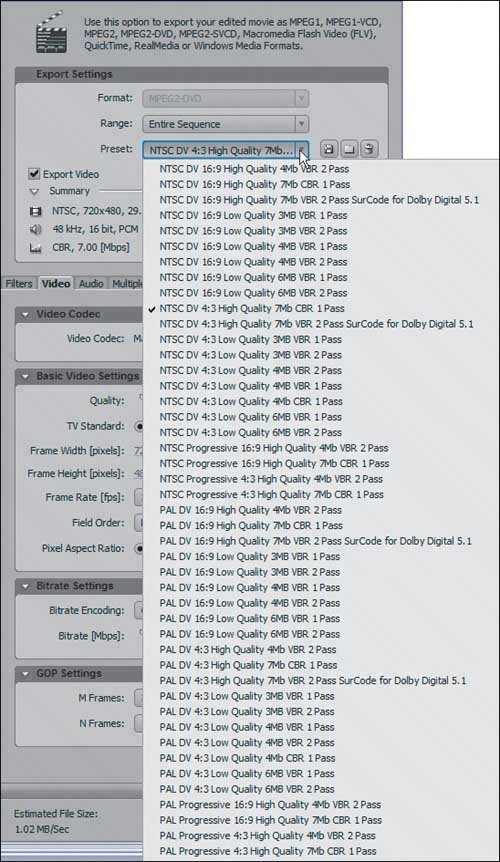 Figure 11.9. Below the check boxes for Exporting Audio and Video is a summary of the loaded preset that reflects the encoder settings. The top line is Video, the second is Audio and the third is the Bitrate Settings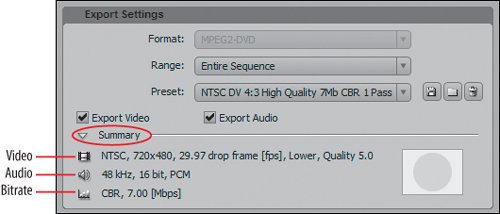 CBR vs. VBRWhen choosing a preset, note that all the listings are classified as either CBR or VBR. CBR (constant bit rate) applies the same amount of data to all of the source material when encoding, whereas VBR (variable bit rate) analyzes the source material and applies less data where it isn't needed and more data where it is needed. VBR functions best using two passes through the source material, the first pass to analyze and calculate the best bitrates and the second pass to write them out into the file. The quickest way to burn your DVD at the highest quality is to use the High Quality CBR presets, which write out the file in a single pass at a constant bit rate. The only drawback of high bitrate CBR encoding is that the file sizes tend to be larger and therefore less data can fit on a disc. Table 11.1 details the results of various bitrates. When deciding which is right for your project, don't forget to add 1080 MB for PCM stereo audio as well.
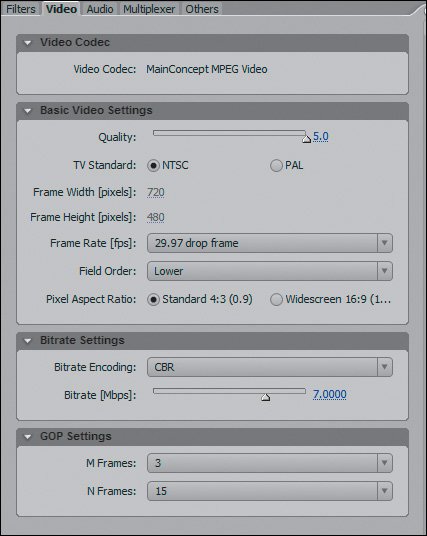
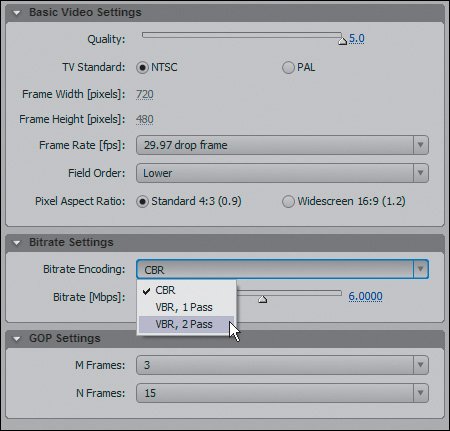
Based on these results, a 5 Mbps Constant encode plus stereo audio will barely fit onto a standard DVD-5 disc. If you have a longer timeline and want to be more economical with file sizes, High Quality VBR 2 pass is the right choice. By doing two passes on your video you truly maximize the encoding process and allow the encoder to intelligently write more data where more data is needed and less data when it is not needed. If you have the time, two pass is always the best choice. Notes For most of the work I do, I tend to use a 4.5 Mbps constant bitrate when I have to burn a DVD for viewing purposes. Any source material with stereo audio and a duration of under two hours fits fine on a DVD, and the bitrate is large enough to ensure good quality. Presets vs. CustomizationFor most DVD burning, loading a preset is all you need to do, especially if you're encoding NTSC DV video. Standard NTSC DV is 29.97 fps, lower-field dominant, 720x480 with a 4x3 aspect ratio, and has stereo audio embedded in it. Although the majority of the encoder settings will match that of your source footage, you can customize some settings to give you better control and a higher quality encode. As you encode more and more video content you will pick up on which data rates offer the best results and which rates work better with which formats. If you are encoding standard definition video you might find that you need less data using two passes; by creating your own preset for each encode that you do, you ease the process of narrowing down and allowing quick access to the best settings for a specific encode. If you decide to customize a preset, the next sections provide a tab-by-tab overview of what you can adjust and how it affects the encode. If you're encoding NTSC DV video for DVD authoring you can skip the Filters tab and head to the Video tab. Video TabThe Video tab houses two important group boxes: Basic Video Settings and Bitrate Settings (Figure 11.10). To help you keep track of their contents, as you hold your mouse over each drop-down menu or radio button Premiere Pro displays feedback on that setting at the bottom of the Video tab (just above OK and Cancel). Figure 11.10. For all my MPEG encodes I leave Quality at 5.0; this adds some time to the encode, but it ensures greater accuracy to the compression of the source material The only setting that I recommend customizing in Basic Video Settings is the Quality slider. I always leave Quality at its top value of 5.0. Decreasing Quality speeds up encoding but at a detriment to accuracy because, in essence, the encoder uses less time to analyze the source material. The remaining options should always match the source footage you are encoding. For the 4x3 NTSC DV footage of our example, the settings in Figure 11.10 match perfectly. The Bitrate Settings group box is where you can further customize your encode and decide whether or not you want a constant (CBR) or variable (VBR) encode.For CBR encodes, simply set the slider at your desired bitrate (Figure 11.11a) and you're ready to encode. VBR encodes require a little more thought (figure 11.11b). For both encodes you need to look at the duration and format of what you are encoding in order to determine whether to use CBR or VBR. For DV footage under an hour you can use a high CBR value (refer to Table 11.1). For longer material from higher resolution sources (uncompressed HD or SD) you can use a VBR preset. Figures 11.11a and b. With CBR encoding, the Bitrate setting is straightforward; 6 Mbps is usually a good choice (a). A VBR, 2 Pass encode is a more complex setup with the Minimum, Target, and Maximum Bitrate each customized to a specific value (b). Typically, for a 90- to 120-minute video, the VBR settings in the figure are solid and will give you good results Because a VBR encode uses more data when more is needed and less when less is needed, you need to specify the Minimum Bitrate for the low areas, the Target Bitrate at which the encode should try to average out, and the Maximum Bitrate for the high areas that require more data. If you think about it, footage of a solid, single-color wall requires minimal data to encode; conversely, a shot from a hill overlooking colorful houses in San Francisco requires a great deal more data to represent the colors and details of the image. The wall would be a minimum bitrate section of your source, while the San Francisco shot might be a maximum. The only way to find out if your VBR values are set up right is to encode your video and pay attention to the compression throughout the video. If you find that in general the quality is lacking, bump up your minimum and target. If a couple of sections that have a lot of motion and lots of detail also have compression artifacts, then bump up your maximum. Although the GOP Settings might look alternately enticing or intimidating, they do not make too much of a difference with basic DVD encoding. Tip For VBR encodes I tend to use a Minimum Bitrate ranging from 1.5 to 3.0, my Target is typically 4 to 5, and my Maximum Bitrate is 6.5 to 8.Keep in mind that as you increase the Minimum and Target you dramatically increase the file size of the encode. Typically the Maximum Bitrate is used less than the Minimum when encoding. Audio TabThe Audio tab has only one drop-down menu that yields valuable options for encoding the audio portion of your sequence. The Audio Format Settings drop-down gives you the choice of encoding your audio in PCM, MPEG, or Dolby Digital format (Figure11.12a, b, and c ). Figures 11.12a, b, and c. The default audio format is PCM (a, top left). If you choose MPEG (layer 3,a.k.a. mp3), you have a choice of bitrates for encoding (b, top right). Select Dolby Digital (c, bottom left), and you will most likely use the SurCode for Dolby Digital codec (the Dolby Digital AC3 encoder comes at a fee of around $300)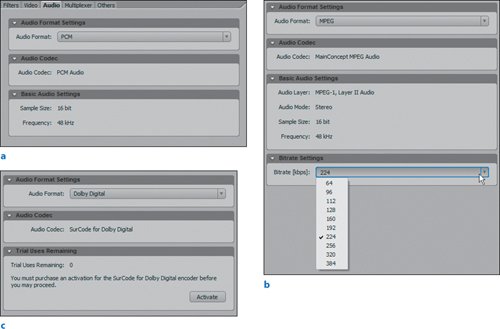 Because DVD audio is supposed to be 16 bits at 48 kHz, the Basic Audio Settings are locked and reflect that value. Of course, audio can also be stereo or 5.1 at 16 bits 48 kHz. If you wish to encode in 5.1, you have to use the SurCode for Dolby Digital encoder for Audio Codec. Out of the box you get three free encodes with the SurCode for Dolby Digital encoder and then you have to buy a license to use it indefinitely. If you are burning to files that will be authored later, you could choose MPEG for Audio Format, which makes the audio portion of your encode significantly smaller. Later, however, you would have to convert it to Dolby or PCM when authoring to DVD. For most projects, you simply can leave your Audio tab with Audio Format set for PCM. Multiplexer TabThe last tab worth looking at is the Multiplexer tab. If you are authoring your DVD using Premiere Pro or Encore DVD, set the Multiplexer value to None. If you are authoring your DVD in another application that uses multiplexed files and you plan on using the files that you export from Premiere Pro as your source material, click the radio button for DVD. A multiplexed encode for DVD writes both the audio and video into a single file as opposed to an MPEG video file and PCM audio file for each encoded clip. For all Premiere Pro DVD authoring you can leave the Multiplexer button checked for None. Saving Your PresetWhen you finish customizing your Export Settings, you should save and name your custom preset for further use: Simply click the Save Preset button next to the Preset drop-down menu in the Adobe Media Encoder (Figures 11.13a and b). Figures 11.13a and b. After you modify a preset, the Preset drop-down lists it as Custom (a). To save a Custom preset, click the Save button and then rename it as descriptively as possible so that you can know at a glance what the settings are (b) Give the preset a descriptive name, then click OK, and Premiere saves it into the stack of presets that become available when you access the Encoder using MPEG2-DVD as your format. |
EAN: 2147483647
Pages: 200
- ERP Systems Impact on Organizations
- Intrinsic and Contextual Data Quality: The Effect of Media and Personal Involvement
- Healthcare Information: From Administrative to Practice Databases
- A Hybrid Clustering Technique to Improve Patient Data Quality
- Development of Interactive Web Sites to Enhance Police/Community Relations
- Assessing Business-IT Alignment Maturity
- Linking the IT Balanced Scorecard to the Business Objectives at a Major Canadian Financial Group
- Measuring and Managing E-Business Initiatives Through the Balanced Scorecard
- A View on Knowledge Management: Utilizing a Balanced Scorecard Methodology for Analyzing Knowledge Metrics
- Governance Structures for IT in the Health Care Industry
