| In version 6.x of WebLogic Server, the network configuration capabilities of a WebLogic domain and its associated WebLogic Server instances were very limited, which constrained the opportunities to improve networking performance and resolve networking problems. The following are some examples of these networking constraints: -
Each WebLogic Server instance could accept connections from only one IP address bound to a single network interface card (NIC), preventing the capability to improve network throughput from multiple NICs. -
Each WebLogic Server instance could segment incoming and outgoing network traffic only through the following distinct ports: -
A nonsecure port reserved for nonsecure HTTP, IIOP, and T3 traffic (port 7001 by default) -
A secure port reserved for HTTPS , IIOPS, and T3S traffic (port 7002 by default) -
An optional administration port used to isolate administration traffic -
The Network configurations that were port specific could be assigned only at the WebLogic instance level, which implied that all network ports shared the same settings. WebLogic Server 7 still uses the default network configuration found in the previous version of WebLogic Server. The attributes that constitute this default network configuration are specified when a WebLogic Server is createdfor example, the HTTP and HTTPS port numbers as well as the listen address of WebLogic Server. Also, as in previous WebLogic Server versions, WebLogic Server 7 stores this information as attributes in the ServerMBean and SSLMBean, respectively. The listen address and port attributes are defined in the ServerMBean, and the SSL attributes are defined in the SSLMBean. To extend the capabilities of the default network configuration, WebLogic Server 7 introduces two new configurable network resources: network channels and network access points (NAPs). They are stored in two new MBeans: NetworkChannelMBean and NetworkAccessPointMBean. The fact that these new network resources extend the default network configuration implies that you do not need to use them if you feel that you cannot leverage their new features. The default network configuration can still be used and is a requirement for all WebLogic Servers within a domain. The following sections discuss network channels and network access points (NAPs) in detail, after which you can decide whether leveraging these new network resources is applicable in your environment. An Introduction to Network Channels WebLogic Server uses network channels to define the basic attributes of a network connection to a WebLogic Server instance. Sample attributes of a network channel include -
The communication protocols (HTTP, HTTPS, T3, T3S, COM) -
The default listen ports to use for secure and nonsecure communication -
The default properties for the connection, such as the login timeout value and maximum message sizes The previous version of WebLogic Server used one default network channel for all its network communication. When you define multiple network channels, you can configure additional port numbers and protocol settings for use with one or more WebLogic Server instances. For example, you can do the following: -
You can simplify your domain's network configuration by defining a single network channel, which is assigned to every WebLogic Server instance in a domain, as shown in Figure 24.10. Figure 24.10. A simple example showing how you can use a domainwide network channel. 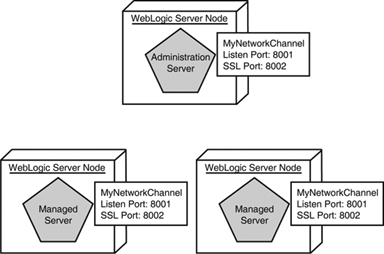 -
You can apply weighted values to network channels to prioritize server-to-server traffic such as internal connections made for remote references, such as a resource located via JNDI. Note Channel weights do not apply to connections initiated directly via a URL.
Taking this approach, you can ensure the same network connection properties for each WebLogic Server instance in a domain. Any changes to the network channel's connection attributes automatically propagate to the WebLogic Server instances that employ that network channel. Network channels, in a way, serve as templates for the network configuration of a WebLogic domain, and can be exploited further when they are used in conjunction with network access points (NAPs), which are discussed in the "Understanding Network Access Points" section later in this chapter. For each WebLogic Server instance, you can use three types of network channels, which are all bound to the same network IP address: -
The default network channel, which is automatically created by WebLogic Server based on the initial listen address and port settings defined in the ServerMBean. If no other network channel is available to service a network connection, the default network channel is used. -
An optional administration channel, which can be defined to separate the administration traffic from application traffic in your domain. -
A custom channel that you define and assign to a WebLogic Server instance within a domain using the Administration Console. The defined ports are in addition to the ports defined in the ServerMBean and SSLMBean. The following sections describe how to view your default network configuration information, enable the administration port, and configure a simple network channel using the Administration Console. Viewing Your Default Network Configuration To view the default network configuration of a WebLogic Server instance in your domain, follow these steps: -
Select the Servers node in the left pane to display the servers configured for your WebLogic domain. -
Select the name of the server in the left pane. -
Click the Connections, Summary tab in the right pane to display the server's current default network settings, as shown in Figure 24.11. Figure 24.11. Viewing the network configurations for WebLogic Server in a domain. 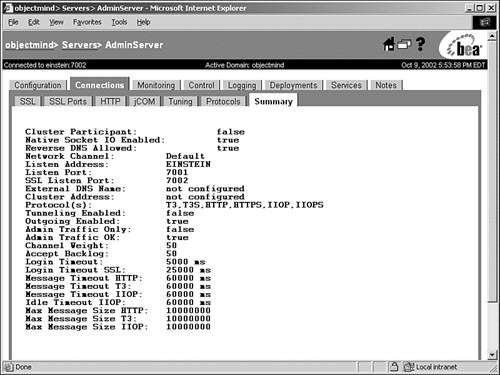 Enabling the Administration Port When the administration port is enabled for a WebLogic domain, an administration network channel is automatically created for each WebLogic Server instance in that domain upon startup. This administration network channel is then used for all administration-type traffic within the domain. Having a distinct and dedicated domainwide administration port provides the following advantages: -
The administration traffic is assured no contention with application traffic for critical administration operations. -
WebLogic Server can be started in a standby state, which is a new WebLogic Server Lifecycle feature. Even though these advantages are very appealing from an administration perspective, the administration port accepts only secure (SSL) connections, which implies that you will have to set up each WebLogic Server in your domain with support for SSL. All managed servers within a domain will need to establish an SSL connection to the administration server. Also, the administration port is a domainwide option, so you cannot configure an administration port for individual managed servers within a domain; it is an all-or-none option. Because SSL communication is a prerequisite for using the administration port, enabling this feature is a three-step process, which first involves setting up an SSL for each WebLogic Server in your domain, including the administration server. When this task is complete, you can enable the administration port feature. Finally, you must modify the startup scripts for each managed server in the domain so they use the SSL protocol and the administration port to connect to the administration server. Caution After you enable the Administration port, no communication between the administration and managed servers is possible over the plain-text HTTP protocol. Only communication using the secure HTTPS protocol is allowed.
The following steps will guide you through enabling the SSL protocol for each WebLogic Server in your domain, using the default certificate ( democert.pem ) and private keys ( demokey.pem ) provided with WebLogic Server: Caution The default WebLogic certificate and private keys are for demonstration purposes only. They should be used only to proof an SSL configuration.
-
From the Server node in the left pane of the Administration Console, select a WebLogic Server. -
In the Connections, SSL tab, enter the following information, as shown in Figure 24.12: Figure 24.12. Setting the demonstration SSL attributes for the SSL protocol using the Administration Console. 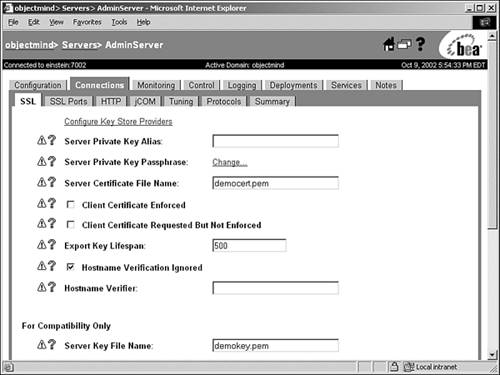 -
Server Certificate File Name Enter democert.pem . -
Hostname Verification Ignored Enable this option. Note The Hostname Verification Ignored attribute should be enabled only for demo or trial certificates. -
Server Key File Name Enter demokey.pem . -
Trusted CA File Name Enter ca.pem . Note Using ca.pem for Trusted CA File Name is required only for two-way SSL communication. Click Apply. -
In the Connections, SSL Ports screen, make sure you have enabled the SSL Listen Port, as shown in Figure 24.13, and click Apply. Figure 24.13. Enabling the SSL protocol for a WebLogic Server. 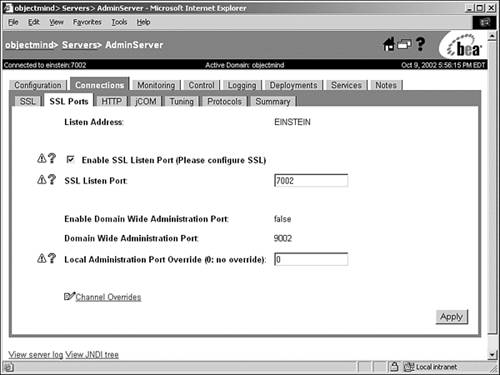 The following steps will guide you through enabling the administration port for your domain using the Administration Console: -
Click the name of your domain in the left pane. -
Click the Configuration, General tab in the right pane to display the domain's general configuration information. -
Select the Enable Domain Wide Administration Port checkbox in the right pane, as shown in Figure 24.14. Figure 24.14. Enabling the Domain Wide Administration Port.  -
Enter a value in the Domain Wide Administration Port field to specify the default administration port that all servers will use. By default, this value is set to 9002. Click Apply. -
Shut down all the WebLogic Server instances in your domain, including the administration server. Before starting the WebLogic Servers, make sure you have modified the startup scripts for your WebLogic Servers as follows : -
Ensure you have specified the following startup options for the JAVA_OPTION variable in both the startWebLogic.cmd and startManagedServer.cmd scripts: -Dweblogic.security.SSL.ignoreHostnameVerification=TRUE -Dweblogic.security.SSL.trustedCAKeyStore=d:\bea\weblogic700\server\lib\cacerts Caution Even though you have enabled this feature via the Administration Console, there is currently a problem with the managed servers acknowledging this feature has been enabled. It is only for this reason that you have to be explicit in the startup script of the managed servers.
-
For each managed server's startup script ( startManagedServer.cmd ), ensure the ADMIN_URL variable specifies the SSL protocol for connecting to the administration server port, as in this example: SET ADMIN_URL=https://host:admin_port To restart your domain's WebLogic Servers, start the administration server first. To use the Administration Console from this point onward, you will need to use the HTTPS protocol and the defined administration port, as shown in this example: https://host:admin_port/console You should validate the default administration channel using the Connections, Summary tab in the Administration Console, as shown in Figure 24.15. Figure 24.15. Validating the configuration of your administration port. 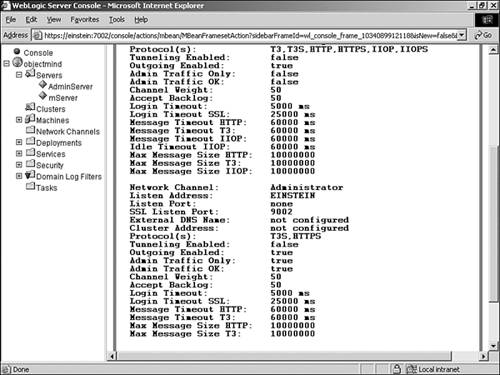 After you start your administration server and validate the default administration port settings, you can start your managed servers using their respective startup scripts. Note If you run into any SSL handshake problems, they imply that you have not correctly set the SSL attributes via the Administration Console, or the Hostname Verification Ignored startup option has not been specified in your startup scripts. In such a case, make sure you have declared the following options in your startup scripts: -Dweblogic.security.SSL.ignoreHostnameVerification=TRUE -Dweblogic.security.SSL.trustedCAKeyStore=d:\bea\weblogic700\server\lib\ cacerts
Configuring a Network Channel The following steps will guide you through configuring a network channel, which you can then assign to the WebLogic Servers in your domain: -
Select the Network Channels node in the left pane of the Administration Console. -
Click Configure a New Network Channel in the right pane. -
From the Configuration, General tab, enter the following attribute values for the new network channel, as shown in Figure 24.16: Figure 24.16. Configuring a network channel using the Administration Console. 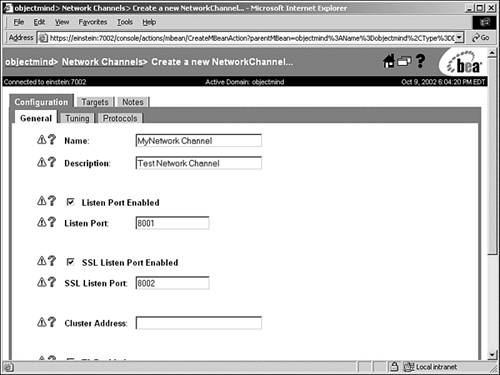 -
Name Enter a name to identify the network channelfor example, MyNetworkChannel . Caution Do not use a name that begins with .WL because the WebLogic Server reserves this prefix internally for the naming of channels. -
Description Even though this field is optional, it is good administration practice to describe what purpose the network channel will have in your WebLogic domain. -
Listen Port Enabled Enable the nonsecure listen port. -
Listen Port Leave the default listen port number as 8001. -
SSL Listen Port Enabled Enable the secure listen port. -
SSL Listen Port Leave the default SSL listen port number as 8002. -
ClusterAddress Leave the cluster address blank. -
T3 Enabled Enable the T3 protocol. -
T3S Enabled Enable the T3S protocol. -
HTTP Enabled Enable the HTTP protocol. -
HTTPS Enabled Enable the HTTPS protocol. -
Tunneling Enabled Disable HTTP Tunneling using the network channel. -
COM Enabled Disable COM-based network traffic. Click Apply to create a network channel. -
Select the Configuration, Tuning tab to change the backlog and timeout attributes for the new channel. Keep the default settings for the purposes of this example and click Apply. -
Select the Configuration, Protocols tab to configure protocol support for the new channel. Keep the default settings for the purposes of this example and click Apply. -
Select the Targets, Servers tab to select the WebLogic Servers in the domain that will use the new channel. Select one or more servers in the Available column and use the arrow button to place the server in the Chosen column. -
Click Apply to assign the network channel to the chosen servers or clusters. To use the new channel port designations, you must reboot any servers that you assigned as targets. You can view the new network configuration for the assigned server using their respective Connections, Summary tab in the Administration Console. Understanding Network Access Points A network access point (NAP) is an optional configurable resource that is used in the context of a network channel to override certain network channel attributes on a per-server basis. For example, because all network channels inherit their listen address from their target WebLogic Server's default network channel, you can use NAPs to override this value to take advantage of multiple NICs with different IP addresses or multiple IP addresses assigned to one NIC. However, only one NAP can be assigned to each defined network channel on a WebLogic Server instance. You can leverage together network channels and NAPs as follows: -
You can define separate network channels for nonsecure and secure connections and assign them to different IP addresses, as shown in Figure 24.17. Figure 24.17. Using network channels and NAPs to segment nonsecure and secure network traffic in a WebLogic domain. 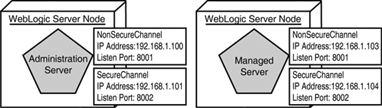 -
You can physically separate incoming client traffic from internal server-server traffic for a specific WebLogic Server domain through the definition and assignment of two network channels using unique IP addresses, where one channel has no support for outgoing connections. Such a configuration, known as an edge server configuration , is shown in Figure 24.18. Figure 24.18. Using network channels and NAPs in an edge server configuration. 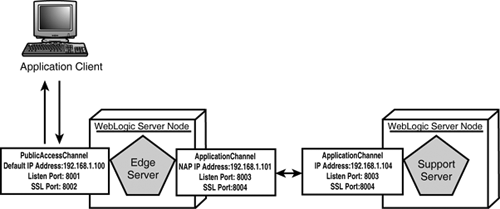 Note You can also use network channels with different port numbers to logically segment external client and internal server-server network traffic.
If you do not configure a NAP for a network channel, the WebLogic Server instance uses the configuration associated with the network channel to generate a new network connection. Leveraging Network Access Points in Your Network Channel As stated earlier, NAPs in conjunction with network channels allow you to leverage multiple NICs and IP addresses, enabling you to physically segment the network traffic within your WebLogic domain. To showcase how you can use NAPs, this section describes how to create an edge server configuration, similar to Figure 24.18. Tip If you do not have multiple IP addresses on your machine, you can use ports instead of IP addresses to logically segment your network traffic because the principle is still the same.
As shown in Figure 24.19, the network channel and NAP configuration required for this example are as follows: Figure 24.19. A simple edge server configuration example showcasing the use of network channels and NAPs. 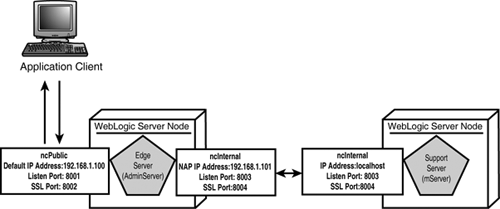 -
An ncPublic network channel will be created to allow public incoming and outgoing network traffic. However, it will not be configured to allow server-server connections between WebLogic Servers in a domain. For this reason, this channel will be assigned to the WebLogic Server that will accept network connections from clients (the edge server). In this example, the AdminServer will serve as the edge server. -
The ncPublic network channel will use the same IP address assigned to the default network channel. -
An ncInternal network channel will be created to service all server-server connections from the edge server (AdminServer) to the managed servers, which in this example will be mServer. -
The ncInternal network channel will use NAP to be assigned to a unique private IP address on the edge server. The following steps will guide you through creating your edge server configuration: -
To create the ncPublic and ncInternal network channels, use the steps described earlier in this chapter in the "Configuring a Network Channel" section. -
Using the Targets, Server tab for each channel, as shown in Figure 24.20, assign the newly created network channels to their WebLogic Servers as follows: Figure 24.20. Assigning the network channels to their WebLogic Servers. 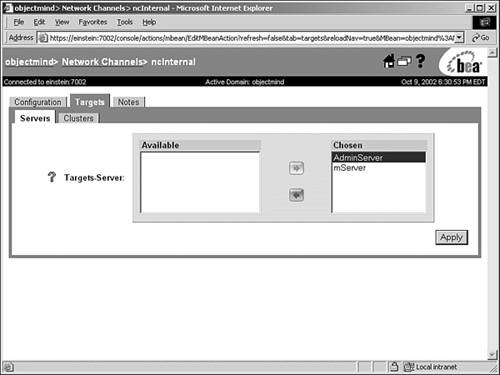 -
Assign the ncPublic channel to your edge server (AdminServer). -
Assign the ncInternal channel to your edge and support (mServer) servers, respectively. Click Apply. -
For the ncPublic network channel, disable the Outgoing Enabled option using the Configuration, Tuning tab, as shown in Figure 24.21. Figure 24.21. Disabling the Outgoing Enabled option for a network channel. 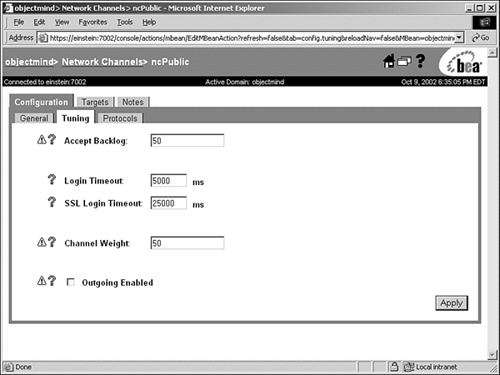 -
In the left pane, select the edge server (AdminServer) and display the Connections, Tuning tab. -
Click the Channel Overrides link. -
From the displayed assigned network channels, select the ncInternal channel because this is the channel where you will be applying the new NAP settings (overriding default network channel settings). -
From the Configuration, General tab, enter a new listen address for this channel, as shown in Figure 24.22. Figure 24.22. Creating a NAP for the listen address of a network channel. 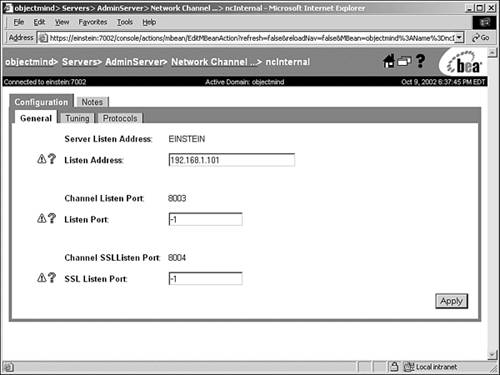 If you do not have multiple IP addresses, you can override the default ports for both the listen and SSL ports. This way, you can logically segment your network traffic from the ncPublic channel. -
Click Apply to save your NAP settings. Tip You should always use NAPs to explicitly specify the listen address of a network channel on a machine that has multiple NICs. If you leave the listen address blank or use Localhost, the network channel's listen port and SSL listen ports will be bound to all available IP addresses on the NICs.
 |