Hack 49. Add Bookmarks to Your Movie
| < Day Day Up > |
|
Both QuickTime and Windows Media have a feature to allow viewers to jump to specific points in a video. Using this feature, you can create a casting reel for your movie. When casting for a movie, you have to audition a lot of people. Even after narrowing down your list of candidates, you still want to view their auditions easily. You might even want to distribute video to your colleagues for their input. You can either pass along one videotape or DVD per candidate, or you can create a single digital video file and allow people to jump from one candidate to another easily. To enable people to move from one section of video to another, you need to create locators in the video. In QuickTime these locators are called chapters, and in Windows Media they are called markers. For the sake of consistency, I will refer to them as bookmarks when referring to their use in both systems. Although both QuickTime and Windows Media provide functionality for bookmarks, the way you create them is completely different in each platform. For QuickTime, you use QuickTime Pro (http://www.apple.com/quicktime/upgrade/; $29.99) and a text editor. For Windows Media, you use the Windows Media File Editor, which is a part of the Windows Media Encoder 9 Series of tools available from Microsoft (http://www.microsoft.com/windows/ windowsmedia/9series/encoder/default.aspx; free). If you plan on distributing both types of video, you can use Discreet's cleaner (http://www.discreet.com/products/cleaner; $549) to create bookmarks and have both types of video created from it.
4.12.1. Creating Chapters Using QuickTime ProIf you have QuickTime and a text editor installed on your computer, you have the tools to create a chapter track. However, you will need to upgrade QuickTime Pro to unlock the features necessary to create chapter tracks. Upgrading also unlocks the ability to perform minor editing, apply filters and effects [Hack #89], export movies for use on a cell phone , and a slew of other features. 4.12.1.1. Creating a chapter listTo create the chapter track, you need to create a list of chapters you would like people to be able to access. Using a text editor, such as Text Edit, simply create a list of chapters, each separated by a line break. For example, on a casting reel, you would create a chapter for each actor, most likely by name: Oxford Wells Tony Clark Rich Gable Joey Harper After creating your list, save it as a text file. After you have created your initial chapter list, launch QuickTime Player, choose File Figure 4-21. An imported text file for use as a chapter track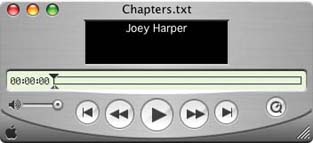 Oddly enough, immediately after importing the chapter list, you need to export it. Selecting File Select Export 4.12.1.2. Editing a text descriptor fileAfter exporting the QuickTime descriptors file, you need to open the file in a text editor. You also need to open the movie you want to add the chapter track to in QuickTime Player. Once the movie is opened in QuickTime Player, choose Movie Figure 4-22. Text Export Settings as configured for chapter track use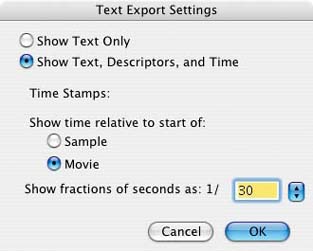
When you have found a position where you would like a viewer to jump to, such as the beginning of a person's audition, type the Current Time into the appropriate location in your text file. You should continue the process of locating the time and typing it, until you have entered information for all of the chapters in your movie. Figure 4-23 shows a movie, its Properties window, and a text file being edited for use as a chapter track. Figure 4-23. Creating a chapter track as a text file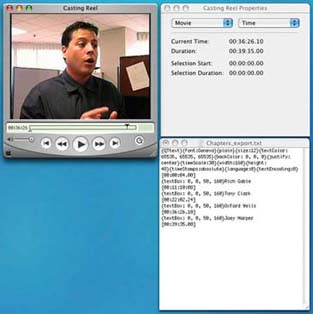
The last timecode in your text file should be the duration of the movie. So, if your movie's Duration is 00:39:35.00, enter your final timecode as [00:39:35. 00]. When you're finished, save your text file and then import it into QuickTime Player by choosing File 4.12.1.3. Creating a chapter track from a descriptors fileAfter importing your descriptor file into QuickTime Player, choose Edit Then, paste the copied movie into the movie you would like to add the chapter track. Selecting the movie and then choosing Edit In the Properties window of your movie, choose your newly added Text Track from the first pop-up menu and Make Chapter from the second pop-up menu. Then, click the Set Chapter Owner Track button and select either the audio or video track as the Owner. Figure 4-24 shows the Properties window with a newly created chapter track. Figure 4-24. A newly created chapter track with a Video Track owner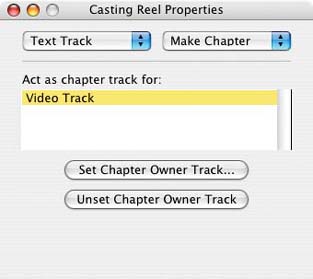 A feature called Preloading makes sure your chapter track loads before your movie does. Although QuickTime Player might automatically enable Preloading on your chapter track, you should make sure it is enabled. From the second pop-up menu in the Properties window, select Preload and make sure the Preload checkbox is checked. 4.12.1.4. Finalizing a movie with a chapter trackAfter creating the chapter track, you will notice a small pop-up menu inside your movie's window. As shown in Figure 4-25, this pop-up contains the chapter titles and will allow a viewer to easily jump from one section of your movie to another. You will also notice that there is a small black box in the corner of your movie with the title of each chapter. You most likely don't want the side effect of the black box, so you can turn it off by choosing Edit Figure 4-25. A chapter track with an annoying black box in the corner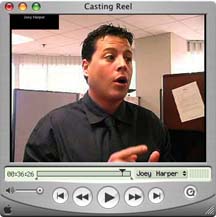 When you are satisfied with your movie, choose File 4.12.2. Creating Markers Using the Windows Media File EditorThe Windows Media File Editor is installed, along with a suite of other applications, when you download and install the Windows Media Encoder 9 Series of tools. Using the File Editor is straightforward, but it does require your video to be in the correct format, either WMV or ASF. Within the application, you can also add commands to display text, open applications, open URLs, or perform other scripting events. 4.12.2.1. Opening a videoAfter launching Windows Media File Editor, you need to open a video file to edit. To do so, choose File Figure 4-26. Opening a video using Windows Media File Editor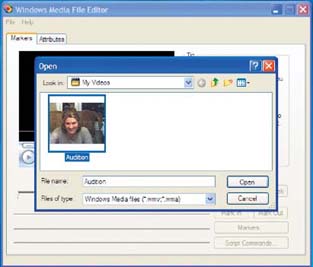 After opening your video, you can play it just as you would in a media player. However, this is more than a media player, so you will notice that you can add markers, add script commands, and enter information for various attributes like the Title, Author, and Copyright information. 4.12.2.2. Adding the markersTo add markers, scan the video and stop at a point where you would like to add a marker. Then, click the Markers… button to open the Markers window. If you know the times for each marker you would like to add, you will be able to add your markers a lot faster. The Markers window provides a list of all the markers associated with the video file. Clicking on the Add button brings up a dialog box to enter the Marker Properties for both the Name and Time. The current time (where you are in your movie) will be entered in the Time field, so the only thing you need to do is enter the Name for the specific marker, such as an actor's name. Figure 4-27 shows a marker with the Name of Joey Harper and the Time of 00:36:26.1 being entered. When you have entered the Name and Time, click the OK button to close the Marker Properties window. If you do not know the time for any additional markers, click the OK button to close the Markers window and locate the next point in your movie. You will need to repeat the process for each marker you would like to add. Figure 4-27. Editing the properties for a marker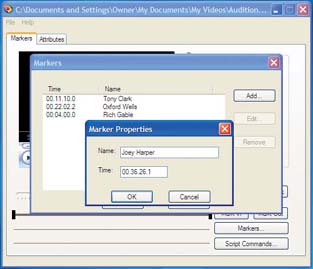 4.12.2.3. Saving a marked movieAfter entering all of your markers, you need to save your video file. To save the markers inside the current file, choose File After you've saved and indexed your movie, you will be able to jump from one marker to another by choosing View If you would like to save your movie in a different format, choose File 4.12.3. Using cleaner to Create BookmarksIf you own Discreet's cleaner, and you want an easier-to-understand solution, or you plan on distributing both QuickTime and Windows Media files, using cleaner to create bookmarks is the perfect solution. cleaner refers to the feature as a chapter event. Figure 4-28. File markers available through Windows Media Player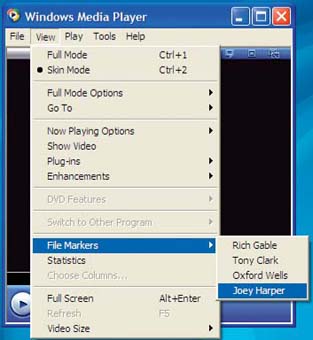 To begin, launch cleaner and simply drag the movie you would like to work with to the Batch window. Then, choose Windows From the Project window, click the EventStream tab and then click the Edit button, which brings up the EventStream window, allowing you to add the Chapter information. Figure 4-29 shows chapters being added to a movie using EventStream. To create a new chapter, locate the position on the movie's timeline (in the Project window) where you would like the Chapter to start. Then, in the EventStream window, click the Add button and select Chapter (QT, WM) from the pop-up menu. cleaner will automatically enter the Start time for you, so you just need to type the Text entry as you would like it to appear in your movie's chapter list. Merely continue the process of locating the start time, clicking the Add button, and adding Text until you have added all of the chapters you want. When you have finished, click the Save button and close the EventStream window. Figure 4-29. Adding a chapter using cleaner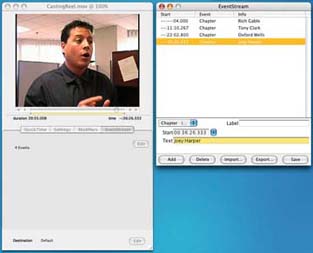 To create your final movie, choose Batch That's all you need to do with cleaner straightforward and easy. 4.12.4. Hacking the HackJust because I've presented this for use as a casting-reel solution doesn't mean it's limited to such use. You can create a video catalog, where people can jump to various products. Or, you can create a how-to video, where viewers can jump from one step to the next. If you want to get creative, you can combine the bookmark feature along with the ability to open a URL [Hack #84] and open a web page related to the scene in the movie. For example, if you have created a video catalog, when a user is presented with an item on screen, a web page could open with details about the item, such as the current price or ordering information. You can also take your approach one step further by creating an interactive video catalog [Hack #47]. |
| < Day Day Up > |
EAN: 2147483647
Pages: 158

 Markers
  Edit Sequence Marker… Then, you simply enter the chapters title in the Chapter text field.