Messaging and Synchronization
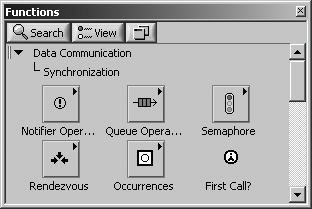
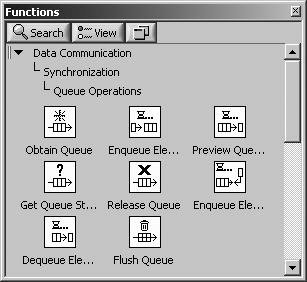
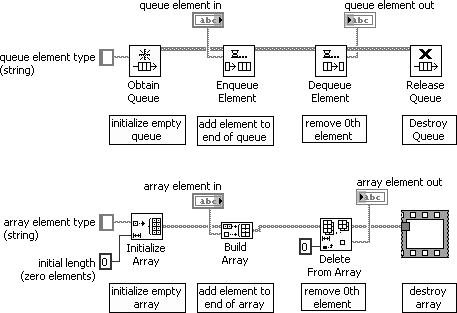
| In the last section, you learned about the queued message handler, which allows you to enqueue string message elements onto an array of string messages. This is a very powerful tool for application programming. But, LabVIEW also has some built-in tools for messaging and synchronization that allow you to implement some even more powerful applications. The Data Communication>>Synchronization palette (shown in Figure 13.80) contains the building blocks for complex, parallel, application logic, where dataflow becomes a little more fuzzy. These are the Queue, Notifier, Semaphore, Rendezvous, Occurrence, and First Call? VIs and functions. Figure 13.80. Synchronization palette QueuesQueues are one of the most commonly used messaging constructs. As we learned in the last section, where we discussed the queued message handler, a queue is an ordered set of elementsnamely, an array. To enqueue is to add an element to the queue, and to dequeue is to remove an element from the queue. The Queue Operations palette (shown in Figure 13.81) contains all the functions for operating on queues. Figure 13.81. Queue Operations palette The queue can be thought of as an array, which is operated on by referencemeaning, when you pass a queue around the block diagram of your VI using a wire, it is not the data of the queue that flows through the wire, but a reference to it. You cannot access the queue's array directly; you can only access the queue data through the various queue functions. To make the analogy easier to understand, see Figure 13.82 for a side-by-side comparison showing the analogous queue and array operations. You will learn more about the queue functions next. After learning about each of the queue functions, come back to this figure and study it to solidify this analogy. Figure 13.82. Queues are simply arrays operated on by reference.
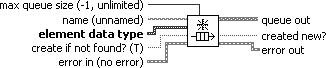
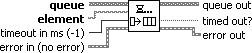
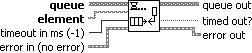
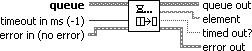
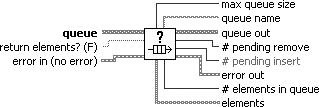
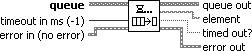
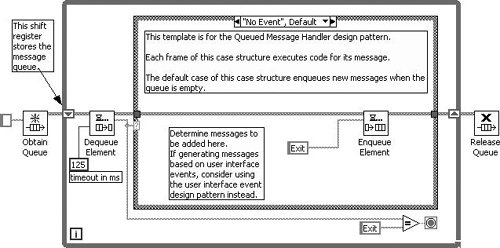
When you fork a queue reference wire, the queue is not copied. Rather, the reference is copied and both copies of the reference refer to the same queue. Many locations in your code can have a reference to the same queue; this is how they are able to share the queue and use it to communicate with each other. Creating and Destroying QueuesIn order to use queues, you will need to first create a queue. The Obtain Queue function (shown in Figure 13.83) creates a queue, or returns a reference to an existing (named) queue. Figure 13.83. Obtain Queue Obtain Queue (Data Communication>>Synchronization>>Queue Operations palette) returns a reference to a queue. You must specify the element data type, which is a polymorphic input that accepts any LabVIEW data type. This will define the data type used by the other queue functions when operating on the resulting queue. Use named queues to pass data between two sections of a block diagram or between two VIs. If you do not wire name, the function creates a new, unnamed queue reference. If you wire name, the function searches for an existing queue with the same name and returns a new reference to the existing queue. If a queue with the same name does not already exist and create if not found? is TRUE, the function creates a new, named queue reference. Release Queue (Data Communication>>Synchronization>>Queue Operations palette) releases a reference to a queue (see Figure 13.84). If you are releasing a reference to a named queue (one that was given a name when created using the Obtain Queue function), in order to destroy the named queue, call the Release Queue function a number of times equal to the number of times you obtained a reference to the queue or stop all VIs using the queue reference. Figure 13.84. Release Queue If force destroy? is TRUE, this function releases all references to the queue and destroys the queue. Enqueuing and Dequeuing ElementsEnqueue Element (Data Communication>> Synchronization>>Queue Operations palette) adds an element to the back of a queue (see Figure 13.85). If the queue is full, the function waits timeout in ms before timing out. If space becomes available in the queue during the wait, the function inserts the element and timed out? is FALSE. If queue becomes invalid (for example, the queue reference is released), the function stops waiting and returns error code 1122. Use the Obtain Queue function to set the maximum size of the queue. Figure 13.85. Enqueue Element Enqueue Element at Opposite End (Data Communication>>Synchronization>> Queue Operations palette) adds an element to the front of a queue (see Figure 13.86). This function is similar to the Enqueue Element function. If the queue is full, the function waits timeout in ms before continuing. If queue becomes invalid (for example, the queue reference is released), the function stops waiting and returns error code 1122. Figure 13.86. Enqueue Element at Opposite End Dequeue Element (Data Communication>> Synchronization>>Queue Operations palette) removes an element from the front of a queue and returns the element (see Figure 13.87). If the queue is empty, the function waits timeout in ms before timing out. If an element becomes available in the queue during the wait, the function removes and returns the element and timed out? is FALSE. If queue becomes invalid (for example, the queue reference is released), the function stops waiting and returns error code 1122. Figure 13.87. Dequeue Element Flush Queue (Data Communication>> Synchronization>>Queue Operations palette) removes all elements from a queue and returns the elements as an array (see Figure 13.88). This function does not release the queue reference. Use the Release Queue function to release the reference. Figure 13.88. Flush Queue Obtaining Queue Status InformationGet Queue Status (Data Communication>>Synchronization>>Queue Operations palette) returns information about the current state of a queue, such as the number of elements currently in the queue (see Figure 13.89). You also can use this function to verify that queue is a valid queue refnum. If queue is not a valid queue refnum, the function returns error code 1. Figure 13.89. Get Queue Status Preview Queue Element (Data Communication>>Synchronization>>Queue Operations palette) returns the element at the front of the queue without removing the element from the queue (see Figure 13.90). Use the Dequeue Element function to return the element at the front of the queue and remove it from the queue. If the queue is empty, the function waits timeout in ms before timing out. If an element becomes available in the queue during the wait, the function returns the element and timed out? is FALSE. If queue becomes invalid (for example, the queue reference is released), the function stops waiting and returns error code 1122. Figure 13.90. Preview Queue Element Activity 13-10: Building a Queued Message Handler Using QueuesIn this activity you modify the Queued Message Handler template to use queues instead of an array of strings.
Queue Examples, Templates, and HintsFor more examples showing how to use queues, look inside examples\general\queue.llb, found beneath your LabVIEW installation. There are also some very good templates that you can use to build your own VIs. Select the File>>New . . . from the menu to launch the New dialog. In the VI>>From Template>>Frameworks>> Design Patterns>> tree node, you will see the following options:
Each of these templates uses queues to implement a very power framework design pattern. And, here are some final hints for using queues:
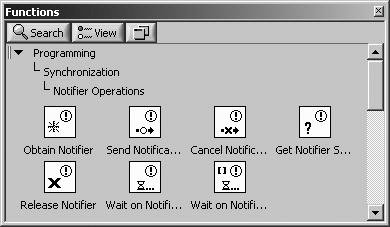
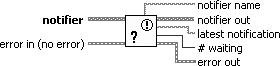
NotifiersNotifiers are probably the second most commonly used messaging construct (with queues being the most commonly used). The Notifier Operations palette (shown in Figure 13.92) contains all of the functions for operating on notifiers. Just like a queue, a notifier has an element data type that you can define, but it can have only one element (unlike a queue, which has an array of elements). Notifiers are very useful in situations where you only need to have the latest message, and not all the messages. The notifier is most useful for broadcasting information to multiple locations, or consumers. A notifier usually has a single source, or producer, but it can (in some instances) be useful to have multiple producers. Figure 13.92. Notifier Operations palette Creating and Destroying NotifiersObtain Notifier (Data Communication>>Synchronization>>Notifier Operations palette) returns a reference to a notifier (see Figure 13.93). You must specify the element data type, which is a polymorphic input that accepts any LabVIEW data type. This will define the data type used by the other notifier functions when operating on the resulting notifier. Figure 13.93. Obtain Notifier Use named notifiers to pass data between two sections of a block diagram or between two VIs. If you do not wire name, the function creates a new, unnamed notifier reference. If you wire name, the function first searches for an existing notifier with the same name and returns a new reference to the existing notifier. If a notifier with the same name does not already exist and create if not found? is TRUE, the function creates a new, named notifier reference. Release Notifier (Data Communication>>Synchronization>>Notifier Operations palette) releases a reference to a notifier (see Figure 13.94). You can use the Obtain Notifier function to obtain a reference to the same notifier with the same name multiple times. To destroy a notifier, call the Release Notifier function a number of times equal to the number of times you obtained a reference to the notifier or stop all VIs using the notifier reference. Figure 13.94. Release Notifier If force destroy? is TRUE, this function releases all references to the notifier and destroys the notifier. Sending and Waiting on NotificationSend Notification (Data Communication>> Synchronization>>Notifier Operations palette) sends a message to all functions waiting on a notifier (see Figure 13.95). All Wait on Notification and Wait on Notification from Multiple functions currently waiting on the notifier stop waiting and continue to execute. Figure 13.95. Send Notification Cancel Notification (Data Communication>>Synchronization>>Notifier Operations palette) erases any message currently in a notifier and returns the canceled message (see Figure 13.96). If any Wait on Notification or Wait on Notification from Multiple functions received the message before the call to this function, those functions continue to execute. Figure 13.96. Cancel Notification This function does not recall or reset any wait functions. After you cancel a notification, any subsequent wait functions wait until the notifier receives another message. Canceling a notification before the notifier has a message does not result in an error. Wait on Notification (Data Communication>>Synchronization>>Notifier Operations palette) waits until a notifier receives a message (see Figure 13.97). When the notifier receives a message, this function continues to execute. Use the Send Notification function to send the message. If a notifier reference becomes invalid (for example, when another function closes it), the function stops waiting and returns error code 1122. If the notifier does not contain a message, this function waits until the notifier receives a message. Figure 13.97. Wait on Notification Each unique instance of this function remembers the time stamp of the last message it read. If ignore previous is FALSE, each instance of the Wait on Notification function waits if the message in the notifier has a time stamp for the same time that the instance of the function last executed. If the message is new, then the function returns the message. When ignore previous is TRUE, the Wait on Notification function always waits for a new message, even if the message currently in the notifier is one it has never seen before. This function does not remove the message from the notifier. Although a specific instance of the function returns a message only once, other instances of the function or to the Wait on Notification from Multiple function repeat the message until you call the Send Notification function with a new message. Wait on Notification from Multiple (Data Communication>>Synchronization>> Notifier Operations palette) waits until at least one of the specified notifiers receives a message (see Figure 13.98). When one of the notifiers receives a message, this function continues to execute. Use the Send Notification function to send the message. If a notifier reference becomes invalid, such as when another function closes it, this function stops waiting and returns error code 1122. If the notifier does not contain a message, this function waits until the notifier receives a message. Figure 13.98. Wait on Notification from Multiple This function is similar to the Wait on Notification function. Each unique instance of this function remembers the time stamp of the last message it read. If this function receives only one message, the function stops remembering which message the time stamp refers to, and the only item filled in the notifiers array is the first element. If ignore previous is FALSE, each instance of the Wait on Notification from Multiple function determines if one or more notifier has a message newer than the time stamp most recently received by this function. If one or more of the notifiers has new messages, all messages are returned. When ignore previous is TRUE, this function always waits for a new message, even if the message currently in the notifier is one it has never seen before. This function does not remove the message from the notifier. Although a specific instance of the function returns a message only once, other instances of the function or to the Wait on Notification function repeat the message until you call the Send Notification function with a new message. Obtaining Notifier Status InformationGet Notifier Status (Data Communication>>Synchronization>>Notifier Operations palette) returns information about the current state of a notifier, such as the last uncancelled notification sent to the notifier (see Figure 13.99). Figure 13.99. Get Notifier Status Notifier Examples and HintsFor more examples showing how to use notifiers, look inside examples\general\notifier.llb, found beneath your LabVIEW installation. And, here are some final hints for using notifiers:
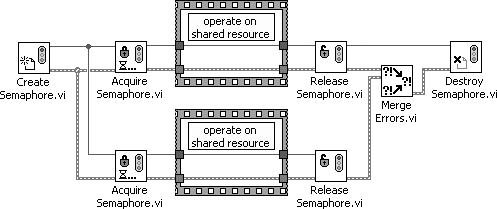
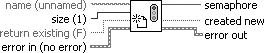
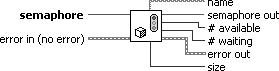
Semaphores: Locking and Unlocking Shared ResourcesThe VIs found on the Semaphore palette (shown in Figure 13.100) allow you to lock and unlock a shared resource. A shared resource might be a communication pipeline (such as a TCP connection), an external instrument (such as bench-top GPIB instrument), data (such as a global variables), or anything that can only be operated on by one (or a fixed number of) process(es) at a time. Figure 13.100. Semaphore palette Unlike a queue or a notifier, a semaphore has no data. Rather, it is used purely for synchronizationto provide exclusive sequential access (via a lock/unlock mechanism) to some shared resource. (A semaphore is sometimes referred to as mutex, or mutual exclusion.) Figure 13.101 shows a typical use case where a semaphore is used to enforce sequential (one at a time) access to a shared resource. The secret to how this works is that once Acquire Semaphore (the lock function) has been called in one location, if it is called again in any other locations, the subsequent calls will wait until Release Semaphore (the unlock function) is called and it is "their turn" to execute. (They will execute in the order that they started waiting.) Figure 13.101. Semaphore Example.vi showing how to lock a shared resource You will learn more about the semaphore functions next. Creating and Destroying SemaphoresCreate Semaphore (Data Communication>>Synchronization>>Semaphore palette) looks up an existing semaphore or creates a new semaphore and returns a refnum (see Figure 13.102). You can use this refnum when calling other Semaphore VIs. Figure 13.102. Create Semaphore Destroy Semaphore (Data Communication>>Synchronization>>Semaphore palette) destroys the specified semaphore (see Figure 13.103). All Acquire Semaphore VIs that are currently waiting on this semaphore time out immediately and return an error. Figure 13.103. Destroy Semaphore Acquiring (Locking) and Releasing (Unlocking) SemaphoresAcquire Semaphore (Data Communication>>Synchronization>>Semaphore palette) acquires (locks) access to a semaphore (see Figure 13.104). Figure 13.104. Acquire Semaphore If the semaphore is already acquired by the maximum number of tasks, the VI waits ms timeout milliseconds before timing out. If the semaphore becomes available during the wait, timed out is FALSE. If the semaphore does not become available or semaphore is not valid, timed out is TRUE. The count on a semaphore is incremented each time Acquire Semaphore executes, even if the task acquiring the semaphore has already acquired it once. Acquiring the same semaphore twice without an intervening call to Release Semaphore generally results in incorrect behavior, such as corrupted data values. This VI attempts to execute even if the error in parameter contains an error. Release Semaphore (Data Communication>>Synchronization>>Semaphore palette) releases access to a semaphore (see Figure 13.105). If Acquire Semaphore is waiting for the semaphore this VI releases, it stops waiting and continues execution. Figure 13.105. Release Semaphore To ensure correct functionality, call Release Semaphore later in the dataflow from Acquire Semaphore. LabVIEW protects the code between Acquire Semaphore and the Release Semaphore, so only as many parallel tasks can run simultaneously with the protected code as the size of the semaphore. If a semaphore is already acquired and you call Release Semaphore without an Acquire Semaphore preceding it somewhere earlier in the dataflow, LabVIEW makes the semaphore available for another Acquire Semaphore to proceed, which violates the idea of semaphores protecting shared resources. For most use cases, this results in incorrect behavior, but LabVIEW cannot detect the situation for you. This VI attempts to execute even if the error in parameter contains an error. If a semaphore is currently unacquired, Release Semaphore returns error code 1111. Obtaining Semaphore Status InformationGet Semaphore Status (Data Communication>>Synchronization>>Semaphore palette) returns current status information of a semaphore (see Figure 13.106). Figure 13.106. Get Semaphore Status Not A Semaphore (Data Communication>> Synchronization>>Semaphore palette) returns TRUE if semaphore is not a valid semaphore refnum. Note that (unlike with queue and notifier references) you cannot use the Not A Number/Path/Refnum function with a semaphore refnum. You must use the Not a Semaphore function for this purpose (see Figure 13.107). Figure 13.107. Not A Semaphore Semaphore Examples and HintsFor more examples showing how to use semaphores, look inside examples\general\semaphore.llb, found beneath your LabVIEW installation. And, here are some final hints for using semaphores:
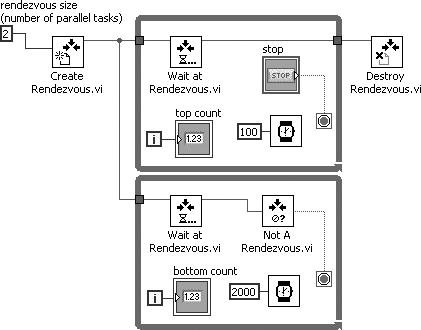
What would happen if semaphores did have data? What if the Acquire Semaphore function read the data and the Release Semaphore function wrote the data? This is exactly what the traditional Graphical Object-Oriented Programming (GOOP) framework does. You can learn more about GOOP and Object-Oriented Programming in Appendix D, "LabVIEW Object-Oriented Programming." RendezvousThe VIs found on the Rendezvous palette (shown in Figure 13.108) allow you to synchronize two or more separate, parallel tasks at specific points of execution. Each task that reaches the rendezvous waits until the specified number of tasks are waiting, at which point all tasks proceed with execution. Figure 13.108. Rendezvous palette Unlike a queue or a notifier, a rendezvous has no data. Rather, it is used purely for synchronizationto cause parallel tasks to all wait at a specific point before proceeding. Figure 13.109 shows a typical use case where a rendezvous is used to synchronize parallel tasks in separate loops. When this code executes, the loops will run at the rate of the slowest loop, due to the presence of the Wait at Rendezvous function. Figure 13.109. Rendezvous Example.vi showing how to synchronize parallel tasks You will learn more about the rendezvous functions next. Creating and Destroying RendezvousCreate Rendezvous (Data Communication>>Synchronization>>Rendezvous palette) looks up an existing rendezvous or creates a new rendezvous and returns a refnum (see Figure 13.110). You can use this refnum when calling other Rendezvous VIs. Figure 13.110. Create Rendezvous Destroy Rendezvous (Data Communication>>Synchronization>>Rendezvous palette) destroys the specified rendezvous (see Figure 13.111). All Wait at Rendezvous VIs that are currently waiting on this rendezvous time out immediately and return an error. Figure 13.111. Destroy Rendezvous Waiting on a RendezvousWait at Rendezvous (Data Communication>> Synchronization>>Rendezvous palette) waits until a sufficient number of tasks have arrived at the rendezvous (see Figure 13.112). Figure 13.112. Wait at Rendezvous Resizing a RendezvousResize Rendezvous (Data Communication >>Synchronization>>Rendezvous palette) changes the size of rendezvous by size change and returns new size (see Figure 13.113). Remember, the size of a rendezvous is the number of instances of Wait at Rendezvous that must be waiting before all instances can proceed. Figure 13.113. Resize Rendezvous Obtaining Rendezvous Status InformationGet Rendezvous Status (Data Communication>>Synchronization>>Rendezvous palette) returns current status information of a rendezvous (see Figure 13.114). Figure 13.114. Get Rendezvous Status Not A Rendezvous (Data Communication>>Synchronization>>Rendezvous palette) returns TRUE if rendezvous is not a valid rendezvous refnum. Note that (unlike with queue and notifier references) you cannot use the Not a Number/Path/Refnum function with a rendezvous refnum. You must use the Not a Rendezvous function for this purpose (see Figure 13.115). Figure 13.115. Not A Rendezvous Rendezvous Examples and HintsFor more examples showing how to use rendezvous, look inside examples\general\rendezvous.llb, found beneath your LabVIEW installation. And, here are some final hints for using rendezvous:
OccurrencesThe VIs found on the Occurrences palette (shown in Figure 13.116) allow you to control separate, synchronous activities, in particular, when you want one VI or part of a block diagram to wait until another VI or part of a block diagram finishes a task without forcing LabVIEW to poll. Figure 13.116. Occurrences palette You can perform the same task using global variables (or local variables within the same VI), with one loop polling the global variable until its value changes. However, global variables use more overhead because the loop that waits uses execution time. With occurrences, the second loop becomes idle and does not use processor time. When the first loop sets the occurrence, LabVIEW activates the second loop and any other block diagrams that wait for the specified occurrence.
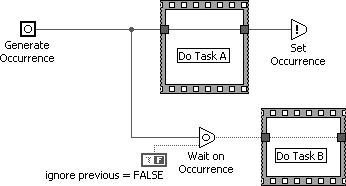
You are encouraged to use notifiers instead of occurrences for most operations. However, for some memory- and processor-intensive event-driven programs, occurrence might be the best choice. Unlike the other synchronization VIs, there is no destroy function for occurrenceseach instance of the Generate Occurrence function acts similarly to a constant, outputting the same value each time it is called. Additionally, occurrences have no datathey are used purely for synchronization where you want to wait until an event occurs in some other location (or the wait function times out). Figure 13.117 shows Occurrence Example.vi (located in the EVERYONE\CH13 folder on the CD-ROM), an example where an occurrence is used synchronize two parallel tasks. In this example, Task B cannot execute until Task A completes, causing Set Occurrence to execute and therefore cause Wait on Occurrence (which was waiting for the occurrence to be set) to stop waiting. Figure 13.117. Occurrence Example.vi showing how to synchronize parallel tasks You will learn more about the occurrence functions next. Creating OccurrencesGenerate Occurrence (Data Communication>>Synchronization>>Occurrences palette) creates an occurrence that you can pass to the Wait on Occurrence and Set Occurrence functions (see Figure 13.118). Figure 13.118. Generate Occurrence Ordinarily, only one Generate Occurrence function is wired to any set of Wait on Occurrence and Set Occurrence functions. You can wire a Generate Occurrence function to any number of Wait on Occurrence and Set Occurrence functions. You do not have to have the same number of Wait on Occurrence and Set Occurrence functions. Unlike other synchronization VIs (such as queues, notifiers, etc.), each Generate Occurrence function on a block diagram represents a single, unique occurrence. In this way, the Generate Occurrence function is similar to a constant. When a VI is running, every time a Generate Occurrence function executes, the function produces the same value. For example, if you place a Generate Occurrence function inside of a loop, the value produced by the Generate Occurrence function is the same for every iteration of the loop. If you place a Generate Occurrence function on the block diagram of a reentrant VI, the Generate Occurrence function produces a different value for each caller. Waiting on and Setting OccurrencesWait on Occurrence (Data Communication>>Synchronization>>Occurrences palette) waits for the Set Occurrence function to set or trigger the given occurrence (see Figure 13.119). Figure 13.119. Wait on Occurrence Set Occurrence (Data Communication>>Synchronization>>Occurrences palette) triggers the specified occurrence. All nodes that are waiting for this occurrence stop waiting (see Figure 13.120). Figure 13.120. Set Occurrence Occurrence Examples and HintsFor more examples showing how to use occurrences, look inside examples\general\occurrence.llb, found beneath your LabVIEW installation. And, here are some final hints for using occurrences:
First Call?The First Call? function (see Figure 13.121) is found on the Data Communication>>Synchronization palette. The Boolean output of this function indicates that a subVI or section of a block diagram is running for the first time. Figure 13.121. First Call? The First Call? function (Data Communication>>Synchronization palette) returns TRUE only the first time you call it after you click the Run button. You can place the First Call? function in multiple locations within a VI. The function returns TRUE the first time the section of the block diagram in which it is placed runs. This function is useful if you want to run a subVI or a section of a block diagram within a loop or Case Structure only once when the VI runs. First Call? returns TRUE the first time the VI runs after the first top-level caller starts running, such as when the Run button is clicked or the Run VI method executes. If a second top-level caller calls the VI while the first top-level caller is still running, First Call? does not return TRUE a second time. After all the top-level callers become idle and a top-level caller starts again, First Call? returns TRUE the first time the VI runs after the idle state. Reentrant VIs (discussed in Chapter 15) have an instance per data space. Therefore, a shared reentrant VI returns TRUE for each data space instance the first time its top-level caller calls it. |


EAN: 2147483647
Pages: 294