18.2 Groups with Backbone - The Block Commands
|
| < Day Day Up > |
|
18.2 Groups with Backbone – The Block Commands
No single aspect of CAD has served as a stronger selling point than blocks. In fact, all quality CAD systems have blocks (or cells, or something that behaves like blocks). No other single command or routine can speed the drawing process as well, and none has a greater potential for cost cutting or streamlining design management.
What is a block? A block is a single object made up of several other objects. You can manipulate blocks, like groups, as a single unit. But you can share blocks between drawings. More importantly, blocks can contain user-defined data. We'll discuss creation and manipulation of blocks here. In Lesson 19, we'll discuss attaching data to blocks and exporting that data to other computer applications (such as spreadsheets or databases).
There are three block commands. Block and BMake create blocks within a drawing. (There really is no difference between the two – BMake is just a later version of the Block command.) WBlock creates a block as a separate drawing file.
| Note | Although all of these commands call a dialog box, AutoCAD has an older command line interface for Block and WBlock. Look on these as something like your appendix – important at one time but no longer necessary. Still, if you're determined to know how they work (you probably have a future in programming), enter a dash prior to the command. AutoCAD will lead you through the options on the command line. |
Groups of blocks are often assembled in useful packages called libraries (Figure 18.2a). A library is a group of blocks, or predefined drawings, used as inserts in a drawing. Use of blocked objects saves the time you might otherwise need to create the objects.

Figure 18.2a
There are two types of libraries: Template files – associated with the Block and BMake commands, and Folders – associated with the WBlock command. Both libraries are useful (each has its pluses and minuses), but each project should use only one type.
| Note | Most libraries consist of drawings associated with a single design discipline. For example, an architectural library may contain drawings of doors, windows, toilets, tubs, and so forth, whereas a piping library will contain drawings of valves, elbows, tees, etc. Library creation has become quite a business alongside CAD industries. Autodesk has created symbol libraries for several disciplines. A number of these accompanied your software, and we'll see how you can use them in Section 18.2.3. For other Autodesk libraries, visit their web site. |
-
The project guru (CAD coordinator) should create (or oversee) the Folder Library – a collection of standardized drawings to be used on the contract – and store it on a network. The path to the folder should be defined in the Support File Search Path section of the Files tab of the Options dialog box. This will make insertion much easier. [Note: The Options dialog box isn't a place for AutoCAD novices to experiment!]
The Folder Library is easy for a single person (the guru) to maintain. Adding, deleting, or changing a project standard involves modifying only one file for each change.
-
Blocks can be included as part of the templates used on a project (creating Template Libraries). Accessing blocks that are part of the original template is a bit faster than the Folder method, but the size of the template can become quite large (heavy with block definitions) before any actual drafting begins. Additionally, any changes in project standards require that all the templates be updated. Even if the templates are centrally stored on a network, this may involve several files.
The decision as to which type of library to use should be universal for the project and is best made by the guru and the design supervisor. This doesn't mean that the operator can't create and use blocks on the fly. But the operator should take care not to duplicate (or overwrite) project standards.
Another thing that must concern the CAD operator, both in the creation and insertion of blocks, is how blocks relate to layers. This can sound complicated, so let's use a chart (after all, a chart is worth a thousand words – give or take).
| IF THE OBJECTS USED TO MAKE THE BLOCK ARE ON: | WHEN INSERTED, THE BLOCK HAS THE CHARACTERISTICS OF: | WHEN INSERTED, THE BLOCK EXISTS ON: |
|---|---|---|
| Layer 0 | The current layer | The current layer |
| Any other layer | The layer on which it was created | The current layer |
Let me try to explain this by using some examples (and fewer than a thousand words).
Generally speaking, you should always create objects for blocks on layer 0. Then when inserting the block on another layer (let's say, layer obj), all the objects that went in to creating the block will appear on – and share the characteristics of – the current layer (layer obj). When this layer (obj) is frozen, turned off, or locked, the block will be affected accordingly.
Text might be an exception to this general rule. When part or all of the objects used to create a block exists on a layer other than 0 (say, text), those objects in the inserted block will appear with the characteristics of the layer on which they were created. (If that layer doesn't exist in the drawing, AutoCAD will create it.) This will be true regardless of the layer that is current (say, obj) when the block is inserted. Now, when the obj layer is frozen, turned off, or locked, the block will be affected accordingly because the block exists on (was inserted on) layer obj. Additionally, when the text layer is frozen, turned off, or locked, the block will also be affected because that is the layer on which it was created.
Sound complicate? Use the chart!
18.2.1 Template Library Creation
Let's begin our study with the Block (or BMake) command. (To keep it simple, although I'll refer to the Block command, remember that Block and BMake are completely interchangeable). We use the Block command to create Template Libraries or to create blocks on the fly.
When completed, the newly defined block has become part of the current drawing's database and can be inserted into this drawing at any time. Save this drawing as a template, and the block will be available to any drawing using this template.
Block presents the Block Definition dialog box (Figure 18.2.1a – next page) where you can enter the information you'll need to create a block.
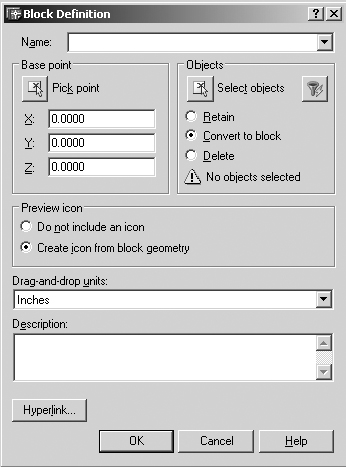
Figure 18.2.1a
-
Place the name of the block in the Name control box.
-
Although you can enter an insertion point's X, Y, and Z coordinates in the Base Point frame, it's easier to use the Pick point button. AutoCAD hides the dialog box and prompts:
Specify insertion base point:
You can then pick a base point on the screen.
-
Use the Select Objects button (in the Objects frame) to return to the graphics screen and select objects to include in the block. Alternately, you can use Quick Select filters by picking the "funnel" button to the right of Select objects.
Once you've selected the objects, you must tell AutoCAD what to do with them after it makes the block. Simply place a bullet next to the appropriate option:
-
A bullet next to Retain tells AutoCAD to keep the selected objects in their current state. That is, AutoCAD won't automatically delete the objects after creating the block. (Retain isn't available at the command line.)
-
Convert to block tells AutoCAD to convert the objects from individual objects to the first insertion of the newly defined block.
-
Delete will delete the objects used to create the block.
-
-
In the Preview icon frame, you can opt to have AutoCAD create a preview image of the block (usually a good idea). The icon will appear to the right of the frame.
-
In the Drag-and-drop units control box at the bottom of the dialog box, you should define what units to use when inserting the block (preferably the units used by the drawing in which the block will be inserted). AutoCAD will use these units when it inserts a block via the ADC or tool palettes (more on this later in this lesson).
-
At the bottom of the dialog box, you can enter a description of the block in the Description text box.
-
The Hyperlink… button allows you to associate a hyperlink with the block using an Insert Hyperlink dialog box.
Let's create some blocks.
Do This: 18.2.1.1 Creating Blocks in a Template
-
Open the blocks.dwg file the C:\Steps\Lesson18 folder. The drawing looks like Figure 18.2.1.1a.
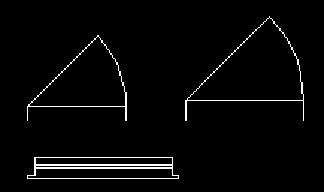
Figure 18.2.1.1a -
Follow these steps.
TOOLS
COMMAND SEQUENCE
STEPS

Make Block Button
Command: b
1. (Refer to the larger door seen in the upper right area of the drawing.)
Enter the Block command by typing block or b at the command prompt. Alternately, you can pick the Make Block button on the Draw toolbar. AutoCAD presents the Block Definition dialog box (Figure 18.2.1a).

2. Enter the name (door36) in the Block name text box.

3. Pick the Pick point button. AutoCAD returns to the graphics screen.
Specify insertion base point: _mid of
4. Pick the insertion point indicated in Figure18.2.1.1.4a. AutoCAD returns to the dialog box.
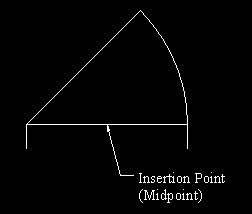
Figure 18.2.1.1.4a
Select objects:
Select objects: [enter]
5. Pick the Select objects button. AutoCAD returns to the graphics screen.
6. Select the arc, the vertical lines, and the angled line. Do not select the horizontal line. Confirm your selections. AutoCAD returns to the dialog box.

7. Place a bullet next to the Delete option in the Objects frame.

8. Tell AutoCAD to create a preview icon. (Notice the icon to the right of the Preview icon frame.)
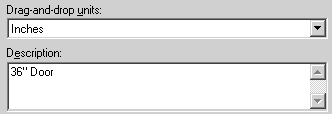
9. Complete the block definition by identifying the Drag-and-drop units and providing a Description.

10. Pick the OK button to complete the command.

Command: e
11. Erase the horizontal line. (You didn't select it as part of the block, so it remains on the screen.)

Command: qsave
12. Save the drawing but don't exit.
In this exercise, we've begun a Template Library. We could continue to add dozens of drawings as needed. Then, when we've finished, we would save this drawing with the .dwt extension and use it as a template for any number of future drawings. But let's look at the other approach to block libraries.
18.2.2 Folder Library Creation
You'll use the WBlock (for WriteBlock) command to create Folder Libraries. The procedure is very similar to creating blocks, but it also allows you to convert Template Library files to Folder library files.
As with the Block command, AutoCAD also provides a dialog box interface to ease creation of WBlocks. Access it by entering the WBlock command (or the W hotkey). The Write Block dialog box appears (Figure 18.2.2a). Does it look familiar? It should. Two of the frames are identical to the Block Definition dialog box. Let's examine the other frames.
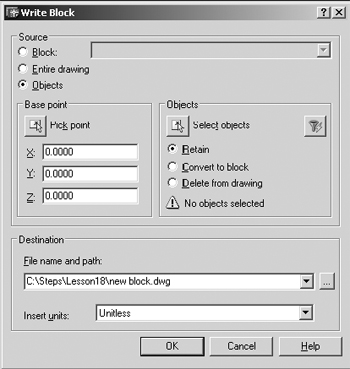
Figure 18.2.2a
-
In the Source frame, AutoCAD gives you three options:
-
The Block option opens the control box next to it. Here you can select from a list of blocks existing in the drawing to be saved as separate drawing files (WBlocks).
-
Of course, the Entire drawing option allows you to create a separate drawing file using all of the objects in the drawing.
-
The Objects option (the default) behaves like the Block command and allows you to select objects just as you did using the Block Definition dialog box.
-
-
The Base point and Objects frames are identical to their namesakes found on the Block Definition dialog box.
-
In the Destination frame, you'll:
-
name and locate the new block (File name and path text box).
-
identify the Insert units of the new block (this is the same thing as the Drag-and- Drop units found on the Block Definition dialog box).
-
In our next exercise, we'll create some WBlocks to begin a Folder Library. Then we'll convert the block created in our Template Library to a file we can use in our Folder Library.
Do This: 18.2.1.1 Creating Blocks for a Folder Library
-
Be sure you're still in the blocks.dwg file the C:\Steps\Lesson18 folder. If not, please open it now.
-
Follow these steps.
TOOLS
COMMAND SEQUENCE
STEPS
1. We'll create a block using the window drawing shown in Figure 18.2.2.1.1a.

Figure 18.2.2.1.1aNo Button Available
Command: w
2. We'll use the dialog box to wblock the window. Enter the WBlock command by typing wblock or w at the command line.
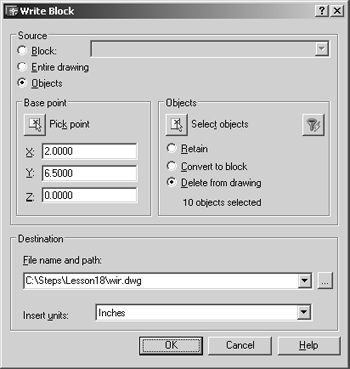
3. AutoCAD presents the Write Block dialog box. Fill it in as indicated (your base point may differ). Select the entire window drawing (shown in Figure 18.2.2.1.1a).

4. Pick the OK button to complete the command (nothing to it – right?).
Command: [enter]
5. Repeat Steps 1 through 4 for the remaining small door. Call the block door30 and use the midpoint of the horizontal line as your insertion point (as you did with the other door). Don't include the horizontal line as part of the block.
Command: [enter]
6. Now we'll use the WBlock command to export our earlier block to our Folder Library. Repeat the WBlock command.
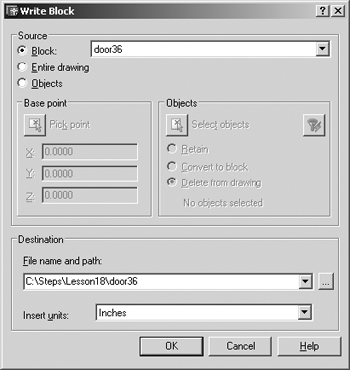
7. Do this:
-
Place the Source bullet in the Block option and then select door 36 from the control box. Notice that the Base point and Objects frames are no longer available (this information was provided when you defined the original block).
-
Be sure the Destination information in your dialog box agrees with that shown.
-
Pick the OK button to complete the command.
How simple!

Command: qsave
8. Save and close the drawing.
-
The wblocks you just created will appear in the C:\Steps\Lesson18 folder as new drawings that you can insert into other drawings as blocks!
18.2.3 Using Blocks in a Drawing – The -Insert and Insert Commands
Before we continue, we must know how to insert a block into a drawing once it has been created. There are two ways to do this – the -Insert command (for a command line interface) and the Insert command (for a dialog box interface). This time, we must look at the command line approach for a command because we'll need it later when we use AutoCAD's iDrop insertion tool. The command sequence for the -Insert command is:
Command: -insert (or –i)
Enter block name or [?]: [tell AutoCAD which block to insert – include a path if you wish to insert a file from a Folder Library]
Specify insertion point or [Scale/X/Y/Z/ Rotate/PScale/PX/PY/PZ/PRotate]: [using coordinates or picking a point with the mouse, tell AutoCAD where to put the block (you're precisely locating the blocks insertion point)]
Enter X scale factor, specify opposite corner, or [Corner/XYZ] <1>: [tell AutoCAD how to scale the block along the X-plane]
Enter Y scale factor <use X scale factor>: [tell AutoCAD how to scale the block along the Y-plane]
Specify rotation angle <0>: [tell AutoCAD how to orient the block]
We're presented with a few options when using the -Insert command.
-
Entering the question mark (?) at the first prompt will present this prompt:
Enter block(s) to list <*>:
Hit enter to display a list of all the blocks currently associated with the drawing.
-
AutoCAD next asks for an insertion point. This sounds simple enough but the list of options that follows the prompt can be quite confusing. Let's take a look at these:
-
The first series of options (those without the "P" prefix) allows you to scale the block as it's inserted. Scale and Rotate do just they say. X/Y/Z options allow you to scale along the selected axis.
-
The second series of option (those with the "P" prefix) does just what its counterparts without the P did, except that the scale or rotation is only for preview purposes. In other words, what you see isn't what you get.
-
-
The next prompt asks for an X scale factor, specify opposite corner, or [Corner/XYZ].
-
By default, AutoCAD will insert the block the same size it was when it was created. That is, the X scale factor and the Y scale factor will be 1 unless you set a scale at the last prompt. You can resize the block after picking an insertion point by typing a value at the X scale factor prompt.
-
By using the Corner (C) option, you can size the block manually by locating opposite corners of it.
-
The XYZ option enables you to resize the block in three dimensions.
-
-
At the Y scale factor prompt, you can resize the block along the Y-plane independently of the X scale. Alternately, you can accept AutoCAD's default, which is the scale indicated for the X scale factor.
-
The Rotation option, of course, allows you to change the rotation angle of the insertion.
Let's insert some blocks from our new Folder Library into a drawing.
| Note | Some third-party libraries provide blocks using a single unit dimension (like creating a door that is one unit wide by one unit high). When inserting the block, you'll indicate the size using the X and Y scale factors. This way, fewer blocks must be created but more work is involved in inserting them. This isn't always a good approach to blocks – especially if text is used in the block. Experience will show that time spent creating accurately sized blocks will almost always return "sevenfold" in time saved inserting them. |
Do This: 18.2.3.1 Inserting Blocks at the Command Line
-
Open the cab-pln.dwg file the C:\Steps\Lesson18 folder. The drawing looks like Figure 18.2.3.1a.
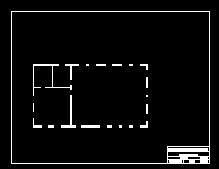
Figure 18.2.3.1a -
Follow these steps.
TOOLS
COMMAND SEQUENCE
STEPS

Command: z
Specify corner of window, enter a scale factor (nX or nXP), or
[All/Center/Dynamic/Extents/ Previous/Scale/Window] <real time>: 22',24'
Specify opposite corner: 36',13'
1. Zoom in around the front door opening as indicated. Your drawing looks like Figure 18.2.3.1.1a.

Figure 18.2.3.1.1a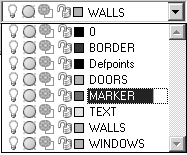
2. Thaw the Marker layer. Notice that a node appears in the door opening (Figure 18.2.3.1.2a).

Figure 18.2.3.1.2a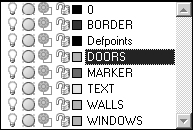
3. Set the Doors layer current.
No Button Available
Command: -i
4. Enter the -Insert command by typing -insert or -i at the command prompt.
Enter block name or [?]: c:\steps\lesson18\door36
5. Tell AutoCAD to insert the door36 file you created in the last exercise. Be sure to include the path.

Specify insertion point or [Scale/X/Y/Z/ Rotate/PScale/PX/PY/PZ/PRotate]: _nod of
6. Use the node as your insertion point.
Enter X scale factor, specify opposite corner, or [Corner/XYZ] <1>: [enter]
Enter Y scale factor <use X scale factor>: [enter]
Specify rotation angle <0>: [enter]
7. Accept the default X and Y scale factors, and the default Rotation angle. Your drawing looks like Figure 18.2.3.1.7a.
Notice that, although we created the block on layer 0, it exhibits the properties of the layer on which we inserted it (the Doors layer).
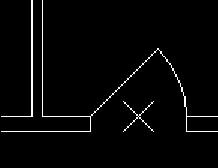
Figure 18.2.3.1.7a
Command: qsave
8. Save the drawing but don't exit.
The dialog box method of inserting blocks makes it a bit easier to identify the block to insert and to specify the insertion parameters. The Insert command calls the dialog box shown in Figure 18.2.3a.
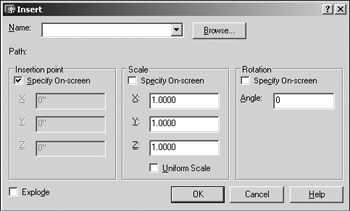
Figure 18.2.3a
-
The Name control box will list all of the blocks currently associated with the drawing (by definition, previous insertion, or template). To insert a wblock not currently associated with the drawing, use the Browse… button to locate the file. AutoCAD will show the path next to the Path statement.
-
In the Insertion point frame, you can identify the X/Y/Z coordinates for the insertion or (preferably) leave the check in the Specify On-screen box. Then you can identify the insertion point on the screen with a mouse pick and OSNAP.
-
The Scale frame also has a Specify On- screen box. But it may be preferable (unless you must see the scaled block to be sure of its size) to enter the X/Y/Z scale in the text boxes provided. A check in the Uniform Scale box will ensure the X/Y/Z scales remain proportional to the original block definition.
-
The Rotation frame also has a Specify On-screen box. Like the Scale data, it's up to you to decide what is easiest to use.
-
The last item in the Insert dialog box – the Explode check box in the lower left corner – enables you to place all the objects of a block without the definition of the block. In other words, you can insert the block pre-exploded.
Let's use the dialog box to insert some blocks into our drawing.
| Note | You can also access the Insert command from the Insert pull-down menu. |
Do This: 18.2.3.2 Using a Dialog Box to Insert Blocks
-
Be sure you're still in the cab-pln.dwg file the C:\Steps\Lesson18 folder. If now, please open it now.
-
Follow these steps.
TOOLS
COMMAND SEQUENCE
STEPS

Command: z
1. Adjust the display on your screen to see the back door opening. It's the only opening on the back wall with a node in it.

Insert Block Button
Command: i
2. Enter the Insert command by typing insert or i. Alternately, you can pick the Insert button on the Draw toolbar. AutoCAD presents the Insert dialog box (Figure 18.2.3a).

3. Since we last used the door36 block in this drawing, it's now part of the database and will be listed in the Name control box. If it'sn't, select it now.
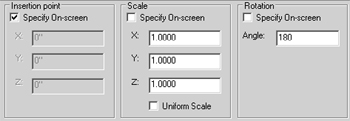
4. Be sure the Insertion point, Scale, and Rotation are set as indicated.

5. Pick the OK button. AutoCAD will continue the prompts on the command line.
Specify insertion point or [Scale/X/Y/Z/Rotate/PScale/PX/PY/PZ/ PRotate]: _nod of
6. Use the node as your Insertion point. AutoCAD won't prompt for Scale or Rotation because you entered that data in the dialog box. The door looks like Figure 18.2.3.2.6a.
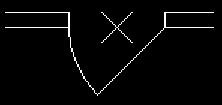
Figure 18.2.3.2.6a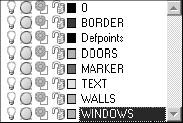
7. Now let's insert a block from our Folder Library. Set Windows as the current layer.

Command: i
8. Repeat the Insert command.

9. Pick the Browse… button.
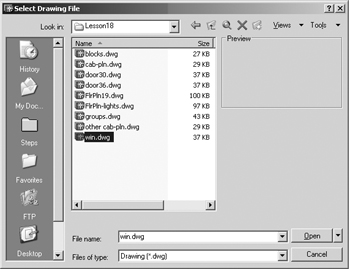
10. Go to the C:\Steps\Lesson18 folder and select the win.dwg file. Pick the Open button.
11.The win file now appears in the Name control box. Accept the insertion defaults and pick the OK button.
Specify insertion point or [Scale/X/Y/Z/ Rotate/PScale/PX/PY/PZ/PRotate]: _endp of
12. Place the window in the opening to the left of the back door (Figure 18.2.3.2.12a). (Use the endpoint OSNAP when selecting the insertion point indicated.)
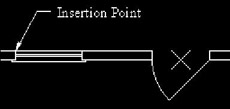
Figure 18.2.3.2.12a
Command: qsave
13. Save the drawing but don't exit.
14. Place the rest of the windows and the interior doors, and then freeze the Markers layer. When completed, your drawing will look like Figure 18.2.3.2.14a.
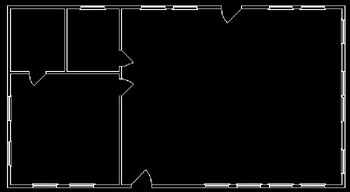
Figure 18.2.3.2.14a
Command: qsave
15. Save and close the drawing.
18.2.4 Getting Blocks from a Folder Library on a Web Site via AutoCAD's iDrop
Wow! Look what I made it do!
Novice CAD Operator
It was a long time in coming – but it's here at last! You can finally insert a drawing from a web site. What's more, you can do it using tools you already know – drag-and-drop, the -Insert command, and your web browser. The name of the marvelous new toy is iDrop, and it bears closer examination before we proceed.
What is iDrop?
iDrop is the name given to a simple procedure for grabbing drawings (Write Blocks) from and iDrop enabled web site (folder) library and then dragging and dropping them into your drawing.
Why bother when I can create my own blocks?
Taking iDrop drawings from a manufacturer's site means that you've the exact item you want. It greatly reduces any possibility of error during the exchange of information between manufacturer and designer, including dimensional errors and engineering data provided through attributes. (We'll look more at attributes in Lesson 19.) It also saves the designer/draftsperson drawing time as well as research time.
Before you get too excited, however, let me give the downside. iDrop is fairly new. To date, not all manufacturers have iDrop-enabled blocks for you to use (although the list is growing). Additionally, the programmers at Autodesk designed the plug-in for Internet Explorer 5 or better. So you may need to change or upgrade your web browser.
Once you're ready, proceed with the next exercise. (This exercise requires Internet access and Internet Explorer.)
Do This: 18.2.4.1 iDrop and Block Insertions
-
Open the cab-pln.dwg file the C:\Steps\Lesson18 folder. We'll iDrop our bathroom fixtures from our uneedcad site.
-
Open Internet Explorer and go to this site: http://www.uneedcad.com/2004.
-
Follow these steps.
TOOLS
COMMAND SEQUENCE
STEPS

1. If your browser is maximized, pick the Restore button in the upper right corner of the window to float it over the AutoCAD window.
2. Scroll down until you see the tub, sink, and WC (Figure 18.2.4.1.2a).

Figure 18.2.4.1.2a3. Notice the cursor when you pass over one of these items. It takes the shape of a tiny eyedropper (Figure 18.2.4.1.3a.

Figure 18.2.4.1.3a4. Pick anywhere in the AutoCAD window to make it active.
5. Zoom in around the bathroom. Your screen should look something like Figure 18.2.4.1.5a (without the Bathroom callout).
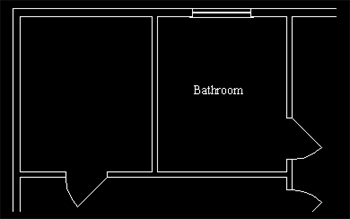
Figure 18.2.4.1.5a
6. Hold down the Alt key on your keyboard and press the Tab key until your browser highlights on the menu. Release the Alt key. Windows floats the Internet Explorer window over AutoCAD again. (Use this procedure for toggling between AutoCAD and Internet Explorer.)
7. Place the iDropper over the tub. Pick with the left mouse button and, holding the mouse button down, drag the object into the bathroom.
Release the button.
Specify insertion point or [Scale/X/Y/Z/Rotate/PScale/PX/PY/PZ/ PRotate]: r
Specify rotation angle: 90
Specify insertion point: _endp of
8. Follow the -Insert command's procedure to place the tub as shown in Figure 18.2.4.1.8a.
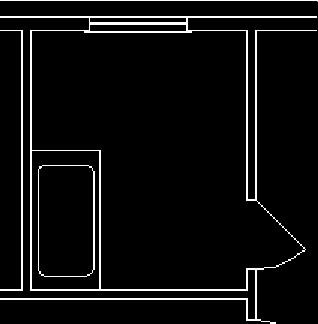
Figure 18.2.4.1.8a9. Repeat Steps 6, 7, and 8 to insert the sink and WC. Your drawing looks like Figure 18.2.4.1.9a.
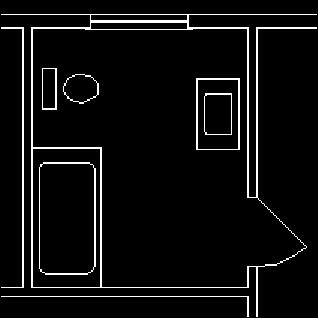
Figure 18.2.4.1.9a
Command: qsave
10. Save your work. Close Internet Explorer.
18.2.5 Getting Blocks from Another Drawing with the ADC or Tool Palettes
We first met the ADC (AutoCAD Design Center) back in Lesson 6 when we saw that we could share layer definitions between drawings. Well, sharing blocks between drawings is just as easy! In fact, with AutoCAD, you can view objects in a Template Library (or another drawing) as easily as you could view the different types of hatch patterns using the BHatch command.
In our next exercise, we'll take advantage of several things – first, we'll use the ADC to access a block on the web. We'll use the ADC to insert a block directly into our drawing (we'll use iDrop to do this); then we'll create a new tool palette in which to put our block so that we can access it more quickly and easily in the future (and to give us some experience creating tool palettes). Last, we'll use the tool palettes to insert another block into our drawing. (This exercise also requires Internet access.)
Let's give it a try.
Do This: 18.2.5.1 Sharing Blocks
-
Be sure you're still in the cab-pln.dwg file the C:\Steps\Lesson18 folder. If not, please open it now.
-
Zoom to display the bedroom (the large room to the left of the drawing).
-
Create a Furniture layer and make it current.
-
Follow these steps.
TOOLS
COMMAND SEQUENCE
STEPS

Tool Palettes Button

Design Center Button
Command: toolpalettes
Command: adc
1. Open both the Tool Palettes and the ADC.

2. Pick the DC Online tab on the ADC. AutoCAD accesses the Design Center web site.
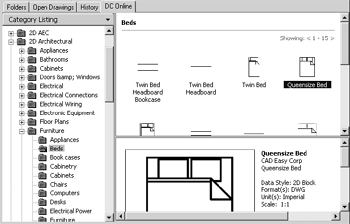
3. Scroll until you've located the \2d
Architecture\Furniture\Beds folder. Select Queensize Bed as indicated.
Specify insertion point or [Scale/X/Y/Z/ Rotate/PScale/PX/PY/PZ/ PRotate]: r
Specify rotation angle: 270
Specify insertion point:
4. Using the iDrop technique you learned in our last exercise, drag the bed and place it into the bedroom (Figure 18.2.5.1.4a).
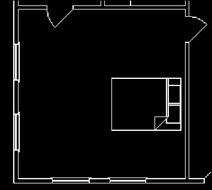
Figure 18.2.5.1.4a
5. Now let's create a tool palette and put the bed on it so that we can access it later without Internet access. Pick the Properties button at the base of the Tool Palettes title bar.
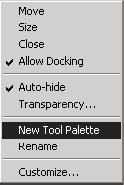
6. Select New Tool Palette from the menu. AutoCAD creates a new tool palette and asks you to name it.

7. Call it MyPalette.
8. Now drag-and-drop the Queensize Bed from the ADC into the new tool palette. The palette shows the bed as seen in Figure 18.2.5.1.8a.
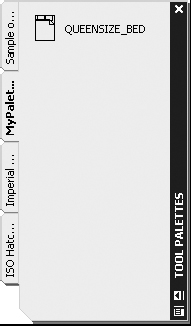
Figure 18.2.5.1.8a
9. Now we'll insert a block from the tool palettes into the drawing. Pick the Sample Office tab on the tool palettes. Select the table lamp.
10. Drag-and-drop the table lamp into your drawing beside the bed. Add another one for symmetry. Your drawing looks like Figure 18.2.5.1.10a.
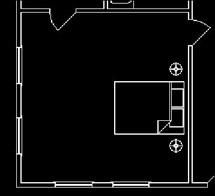
Figure 18.2.5.1.10a
Command: qsave
11. Add some more furnishings if you wish, then save the drawing but don't exit yet.
These procedures save quite a bit of time by showing the CAD operator exactly what's available for insertion from any library!
18.2.6 Editing Blocks
One of the delights that has accompanied the 200x releases has been the addition of a tool that greatly simplifies an operator's ability to edit a block. Prior to the Reference Editor, this chore was clumsy and difficult, and it often led to some surprising results. Today, using Refedit, we can enter the block's works, make our changes, and exit without a great deal of confusion.
| Note | Why such an odd name for a block editor? AutoCAD intended Refedit primarily as a tool to edit Xrefs (more on Xrefs later). But using it on blocks as well seemed like such a good idea that they added a bit of programming code and voila! We've a block editor as well! |
The procedure involves quite literally entering the block's "world." Think of this as something like entering a dream world where you can do dreamy things. These things only affect objects in the dream world (in our case, only the objects that make up the block). To return to the "real" world, you must leave the dream. But the changes you made while you were there will linger - if you like the dream. When you leave the block's world, the changes you made there will also remain – if you like your changes.
To make matters easier, AutoCAD provides a dialog box (Figure 18.2.6a). Here you see a couple tabs. (The tabs probably weren't necessary, there aren't that many options with which you'll have to cope.)
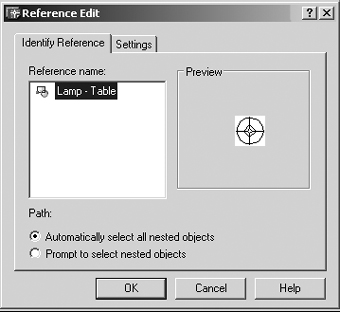
Figure 18.2.6a
-
In the first tab – Identity Reference –AutoCAD lists the selected references under Reference name and provides a preview of the selected name in a preview frame. Toward the bottom of this tab, you'll find a Path statement and a couple radio buttons.
-
The Path statement shows the path of any selected Xrefs. It'll remain blank if a block has been selected.
-
A bullet next to Automatically select all nested objects simply means that you'll be able to edit the primary selected block and any blocks that may be nested within it.
-
If the bullet rests next to Prompt to select nested objects, AutoCAD will allow you to select nested objects to include in the editing session.
-
-
The Settings tab (Figure 18.2.6b) has only three options.
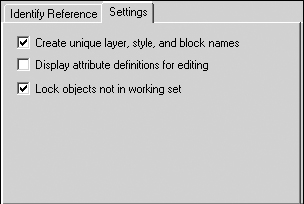
Figure 18.2.6b-
Create unique layer, style, and block names deals with how AutoCAD handles Xref properties. You'll see more of this when we talk about Xrefs.
-
A bullet next to Display attribute definitions for editing means that attribute definitions (more on these in Lesson 19) will be displayed during block editing. Editing attributes will effect only subsequent insertions of the blocks (not existing blocks).
-
Lock objects not in working set is a good place to leave a check. This prevents you from accidentally editing something that isn't part of the selected block or Xref.
-
By default, when using Refedit, only the selected block will be available for editing until you leave the command. Use Refclose to leave the block's world.
Let's edit a block to better understand this procedure.
Do This: 18.2.6.1 Editing Blocks
-
Be sure you're still in the cab-pln.dwg file the C:\Steps\Lesson18 folder. If not, please open it now. We'll change the lamp table next to the bed.
-
Follow these steps.
TOOLS
COMMAND SEQUENCE
STEPS

Command: z
1. Zoom in around the bedroom. Close the ADC and tool palettes if they're still open.
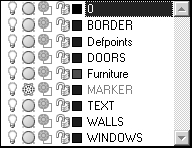
2. Set the 0 layer current.

Edit Block or Xref Button
Command: refedit
3. Enter the Refedit command by typing refebdit at the command prompt. Alternately, you can pick the Edit block or Xref button on the Refedit toolbar.
Select reference:
4. Select one of the lamps. AutoCAD presents the Reference Edit dialog box (Figure 18.2.6a).

Use REFCLOSE or the Refedit toolbar to end reference editing session.
5. Pick the OK button to continue. AutoCAD makes the block available for editing and lets you know how to finish your editing session.

Command: z
6. Zoom in around the lamp.

Command: e
7. Erase the inner square.
8. Now place an eight-sided polygon where the square was. (Inscribe the polygon in a circle with a radius of 3".) The lamp looks like Figure 18.2.6.1.8a.
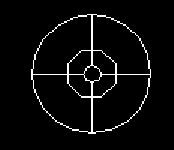
Figure 18.2.6.1.8a
Save back changes to reference Button
Command: refclose
9. Enter the Refclose command or pick the Save back changes to reference button on the Refedit toolbar. (If you pick the button, go to Step 11.)
Enter option [Save/Discard reference changes] <Save>: [enter]
10. If you entered Refclose at the command prompt, AutoCAD asks if you'd like to save your changes. Hit enter.
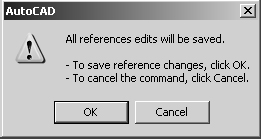
11. AutoCAD warns that it'll save the changes. This is an important warning, as you'll see. For now, pick the OK button.

Command: z
12. Zoom previous.
13. AutoCAD made the changes and returned to the graphics screen. But look closely at both of the lamps (Figure 18.2.6.1.13a). Notice that they were both changed!
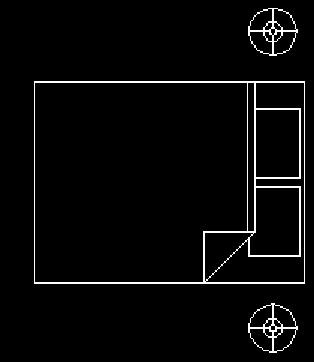
Figure 18.2.6.1.13a
Command: qsave
14. Save your drawing and exit.
In Step 13, did you notice that both lamps reflected the changes you made? I can't overemphasize the importance of this quirk – when one block changes, all blocks bearing the same name also change. Remembering this can work to your advantage when you need to update a group of blocks; forgetting it'll work against you if you try to change just one block out of a group.
|
| < Day Day Up > |
|
EAN: 2147483647
Pages: 96